
Palliative Care at Home: IAPC Launches New Infographic to Enhance National Awareness
The Indian Association of Palliative Care (IAPC) has unveiled its latest infographic, "Palliative Care at Home," marking the third installment in its ongoing "Care Continuum" series. This initiative underscores the IAPC’s unwavering commitment to expanding palliative care education and increasing its accessibility across India. The infographic, released in September 2025, aims to demystify and promote the crucial role of home-based palliative care services, building upon the foundational principles outlined in earlier publications.
Expanding the Reach of Palliative Care
The "Care Continuum" series, which commenced in June 2025, seeks to provide a comprehensive understanding of the various stages and settings in which palliative care can be integrated. The initial infographics laid the groundwork by discussing the broader concept of palliative care and its integration into the healthcare system. This latest release specifically targets the critical aspect of delivering compassionate and effective palliative care within the familiar and comfortable environment of a patient’s home.
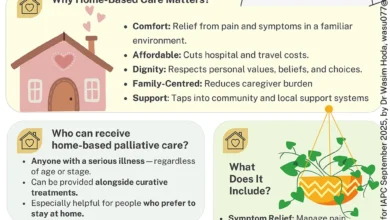
The IAPC’s strategic decision to focus on "Palliative Care at Home" is a response to the growing need for decentralized healthcare models that can reach a wider population. As India’s demographic landscape shifts, with an increasing elderly population and a rise in non-communicable diseases, the demand for supportive and end-of-life care services is escalating. Home-based palliative care offers a solution that can alleviate the burden on institutional healthcare facilities while ensuring patients receive personalized care aligned with their wishes and preferences.
Addressing a Growing Need: The Data Landscape
The importance of palliative care, particularly at home, is underscored by global and national health statistics. According to the World Health Organization (WHO), palliative care is an essential health service that should be accessible to all. Globally, it is estimated that over 40 million people require palliative care annually, with a significant portion of this need unmet. In India, the situation is particularly acute. The country faces a substantial burden of chronic diseases, including cancer, cardiovascular diseases, respiratory illnesses, and neurological disorders, all of which often necessitate palliative care.
Data from various studies highlight the challenges in accessing comprehensive palliative care. A significant percentage of patients with life-limiting illnesses in India do not receive adequate pain management or psychosocial support. This gap in care can lead to immense suffering for patients and their families. Home-based palliative care models have demonstrated their efficacy in addressing these challenges. Studies have shown that home care can lead to improved quality of life for patients, reduced hospital admissions, and enhanced patient and caregiver satisfaction. For instance, research published in journals like the Indian Journal of Palliative Care has consistently pointed to the positive impact of home hospice services on symptom control, emotional well-being, and the overall experience of patients nearing the end of life.
The IAPC’s Commitment to Education and Awareness
The IAPC, as a leading organization in advocating for and advancing palliative care in India, recognizes that a lack of awareness and understanding remains a significant barrier to its widespread adoption. Their infographic series is a testament to their proactive approach in bridging this knowledge gap. By creating visually engaging and easily digestible content, the IAPC aims to:
- Educate Healthcare Professionals: Providing physicians, nurses, social workers, and allied health professionals with clear information on the principles and practices of home-based palliative care. This includes guidance on symptom management, communication skills, and ethical considerations.
- Inform the Public: Empowering patients, families, and caregivers with the knowledge that palliative care is available and beneficial, even at home. This can help reduce stigma associated with end-of-life discussions and encourage proactive planning.
- Advocate for Policy Changes: Using data and awareness campaigns to influence policymakers and healthcare administrators to prioritize and invest in home-based palliative care services.
The September 2025 infographic, "Palliative Care at Home," is designed to be a readily shareable resource. The IAPC encourages its dissemination across professional networks, social media platforms, and institutional websites. This collaborative effort in spreading awareness is crucial for fostering a supportive ecosystem for home-based palliative care.

Background: The Evolution of Palliative Care in India
Palliative care in India has a relatively recent history, gaining momentum in the late 20th and early 21st centuries. While traditional Indian culture has always emphasized care for the elderly and the sick, the formalization of palliative care as a distinct medical specialty has been a gradual process. Early efforts were largely driven by non-governmental organizations and a few pioneering medical professionals.
The establishment of the IAPC in 1994 marked a significant turning point, providing a national platform for advocacy, education, and the development of standards of care. Over the years, the IAPC has been instrumental in:
- Developing Training Programs: Establishing fellowships and certificate courses in palliative medicine, creating a cadre of trained professionals.
- Establishing Palliative Care Units: Encouraging the integration of palliative care services within hospitals and healthcare institutions.
- Promoting Research: Supporting and disseminating research findings related to palliative care in the Indian context.
- Advocating for National Policies: Engaging with the government to include palliative care in national health strategies and guidelines.
The "Care Continuum" series represents a logical progression in this journey, moving from the general principles to specific service delivery models like home-based care. The series aims to build upon the foundation laid by earlier initiatives, providing practical insights for various stakeholders.
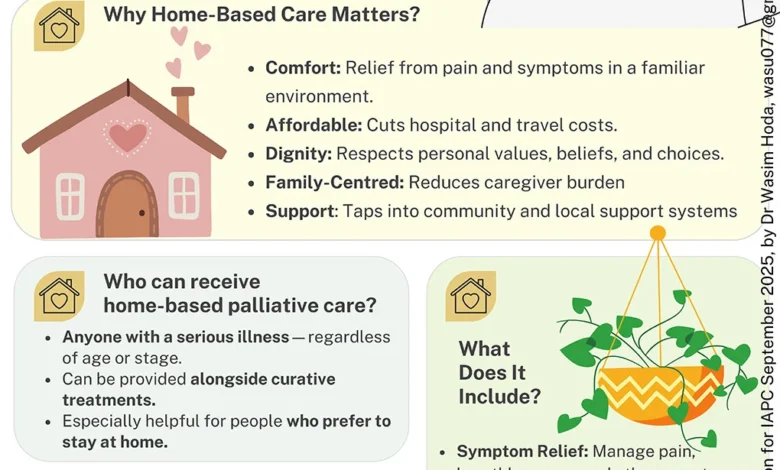
Key Components of Palliative Care at Home
The infographic likely elaborates on several critical aspects of home-based palliative care, including:
- Symptom Management: Addressing physical symptoms such as pain, nausea, breathlessness, and fatigue, which are common in life-limiting illnesses. This often involves medication management, non-pharmacological interventions, and close monitoring.
- Psychosocial and Emotional Support: Providing emotional comfort, counseling, and support to patients and their families to cope with the challenges of illness, loss, and grief. This can involve addressing anxiety, depression, and existential distress.
- Spiritual Care: Respecting and supporting the spiritual beliefs and practices of patients and their families, which can be a source of strength and comfort.
- Communication and Advance Care Planning: Facilitating open and honest communication about the patient’s wishes, values, and preferences regarding their care. This includes discussions about advance directives and end-of-life decisions.
- Caregiver Support: Recognizing the immense role of family caregivers and providing them with the necessary training, emotional support, and respite care to prevent burnout.
- Coordination of Care: Ensuring seamless communication and collaboration between the home care team, the patient’s primary physician, and other healthcare providers involved in their care.
- Ethical Considerations: Navigating complex ethical dilemmas that may arise in home-based palliative care settings, such as issues of autonomy, dignity, and the patient’s best interests.
Expert Contributions and Future Directions
The IAPC explicitly acknowledges the valuable support of Dr. Wasimul Hoda, a Fellow in Pain Medicine at the Department of Anaesthesia, Critical Care and Pain Medicine, AIIMS New Delhi, for this initiative. Such collaborations between leading institutions and individual experts are vital for the advancement of palliative care. Dr. Hoda’s expertise in pain management, a cornerstone of palliative care, highlights the interdisciplinary nature of this field.
The availability of these infographics on the IAPC’s website and social media platforms ensures a wide reach and accessibility. The link provided to access previously published infographics ("https://www.palliativecare.in/iapcs-infographics/") serves as a valuable repository for anyone seeking comprehensive information on the palliative care continuum.
The launch of "Palliative Care at Home" is not merely an informational dissemination; it is a strategic step towards normalizing and strengthening home-based palliative care services across India. The IAPC’s continued efforts in creating such educational resources are instrumental in fostering a more compassionate and supportive healthcare landscape, where individuals facing life-limiting illnesses can receive dignified and comprehensive care, wherever they choose to receive it. The success of such initiatives will ultimately be measured by their impact on improving the quality of life for countless patients and their families throughout the country. The ongoing series promises further insights into different facets of palliative care, reinforcing the IAPC’s commitment to its mission.


