


Size insulation for 2×4 and 2×6 walls is crucial for energy efficiency and comfort in any home. Understanding the differences between 2×4 and 2×6 wall construction is key to choosing the right insulation type and amount. Different insulation materials have varying R-values, impacting their effectiveness in different climates. This guide will walk you through selecting, installing, and maintaining insulation for both wall types, ensuring your home is well-insulated and energy-efficient.
From fiberglass and cellulose to spray foam, various insulation options cater to different needs and budgets. We’ll explore the pros and cons of each material, comparing their cost-effectiveness, installation complexity, and overall energy efficiency. This detailed breakdown will empower you to make informed decisions about insulation for your 2×4 or 2×6 walls.
Introduction to Insulation for 2×4 and 2×6 Walls
Insulation is a critical component of residential construction, playing a vital role in energy efficiency and occupant comfort. Properly insulated walls minimize heat transfer, reducing energy consumption for heating and cooling. This translates to lower utility bills and a smaller environmental footprint. The type and amount of insulation used are significantly affected by the wall construction itself. Understanding the differences between 2×4 and 2×6 framing is crucial for choosing the right insulation solution.x4 and 2×6 walls, while both serving the same purpose, differ fundamentally in their structural design.
2×4 walls are more common in older homes or smaller-scale projects. They have a narrower stud cavity, which directly impacts the amount and type of insulation that can be effectively installed. 2×6 walls, conversely, offer a larger cavity, allowing for more insulation, often leading to better energy performance. This difference in cavity size and insulation capacity is a primary driver in the choice of insulation materials and installation techniques.
Insulation Types Commonly Used
A variety of insulation materials are used in residential walls, each with its own set of advantages and disadvantages. Common types include fiberglass, cellulose, spray foam, and rigid foam board. The choice depends on factors like cost, performance, ease of installation, and environmental impact. The key performance metric is the R-value, which measures a material’s resistance to heat flow.
A higher R-value indicates better insulation.
R-Value Comparison for 2×4 and 2×6 Walls
The table below provides a comparative overview of typical R-values for various insulation types in 2×4 and 2×6 wall construction. Note that these are average values and actual R-values can vary based on specific insulation products and installation techniques.
| Insulation Type | R-Value (2×4) | R-Value (2×6) | Description |
|---|---|---|---|
| Fiberglass | 3.8 | 5.0 | A common, cost-effective insulation material. Often comes in batts or rolls. |
| Cellulose | 3.5 | 4.7 | Made from recycled paper products, known for its environmental friendliness and excellent fire resistance. |
| Spray Foam | 4.5 | 6.0 | A closed-cell foam applied directly to the wall cavity, offering superior air sealing and high R-values. |
| Rigid Foam Board | 4.0 | 5.5 | Pre-formed rigid panels that are installed between studs, offering a high R-value and excellent resistance to moisture. |
Significance of Proper Insulation
Proper insulation significantly impacts both energy efficiency and indoor comfort. By reducing heat transfer, insulation lowers heating and cooling costs. This translates to substantial savings over the lifetime of a home. Furthermore, consistent indoor temperatures contribute to occupant comfort and well-being. Reduced drafts and temperature fluctuations contribute to a more comfortable living environment.
Choosing the Right Insulation for 2×4 Walls

Selecting the appropriate insulation for your 2×4 walls is crucial for maximizing energy efficiency and comfort in your home. The right choice depends on factors like budget, desired performance, and the specific climate conditions of your area. Understanding the various types and their trade-offs will empower you to make an informed decision.Choosing the right insulation material for 2×4 walls requires careful consideration of several key factors.
These factors include the insulation’s R-value, its resistance to moisture and pests, its installation ease, and its overall cost-effectiveness. Each insulation type offers a unique balance of these characteristics.
Factors to Consider When Choosing Insulation
Several crucial factors influence the selection of insulation for 2×4 walls. Understanding these factors is essential for making an informed decision that aligns with your specific needs and priorities. Budget constraints, desired energy efficiency, and the installation complexity all play a role in the selection process.
Advantages and Disadvantages of Different Insulation Types, Size insulation for 2×4 and 2×6 walls
Different insulation types offer varying advantages and disadvantages. Understanding these nuances is key to selecting the best material for your specific situation. Fiberglass, cellulose, and spray foam insulation are popular choices, each with its own set of strengths and weaknesses.
- Fiberglass Insulation: Fiberglass is a common choice due to its affordability and relatively straightforward installation. It effectively resists moisture and pests, contributing to long-term performance. However, it can be somewhat bulky, which might affect the usable space in the cavity. Its resistance to fire is generally good.
- Cellulose Insulation: Cellulose insulation is made from recycled paper products. This makes it an environmentally friendly option. It’s known for its excellent thermal performance and its ability to absorb sound, creating a quieter living environment. However, it can be more challenging to install and requires special attention to moisture control during the installation process.
- Spray Foam Insulation: Spray foam insulation offers exceptional energy efficiency due to its airtight properties. It significantly reduces air infiltration, leading to better insulation performance. Its installation can be more involved, requiring specialized equipment and expertise. The high cost of spray foam is a significant factor to consider.
Cost-Effectiveness Comparison of Insulation Types
A crucial aspect of choosing insulation is its cost-effectiveness. The following table provides a comparative analysis of different insulation types, considering their cost, installation complexity, and energy efficiency.
| Insulation Type | Cost | Installation Complexity | Energy Efficiency |
|---|---|---|---|
| Fiberglass | Moderate | Low | Good |
| Cellulose | Moderate | Moderate | Very Good |
| Spray Foam | High | High | Excellent |
Step-by-Step Guide for Installing Insulation in 2×4 Walls
A proper installation method is critical for maximizing the insulation’s effectiveness. This detailed guide Artikels the steps involved in installing insulation in 2×4 walls.
- Preparation: Ensure the wall cavity is clean and free of debris. Inspect the framing for any damage or gaps that need attention.
- Measuring and Cutting: Precisely measure the cavity dimensions to determine the required insulation length and width. Cut the insulation to fit the cavity, ensuring proper sizing.
- Installation: Carefully place the insulation within the wall cavity, ensuring it fills the space completely and tightly. Avoid creating gaps or air pockets.
- Finishing Touches: Once the insulation is in place, seal any remaining gaps with appropriate caulk or sealant to minimize air leakage.
Proper Placement of Insulation in a 2×4 Wall Cavity
A well-placed insulation ensures optimal energy efficiency and comfort. The diagram below illustrates the proper placement of insulation within a 2×4 wall cavity.
[Imagine a simple diagram here illustrating a 2×4 wall cavity with insulation properly filling the space between the studs. Label the studs, the insulation, and the vapor barrier (if applicable). Clearly indicate the proper orientation of the insulation.]
Choosing the Right Insulation for 2×6 Walls
Insulating 2×6 walls presents unique considerations compared to 2×4 walls. The increased stud spacing and cavity size in 2×6 construction demand careful selection of insulation to maximize thermal efficiency and minimize potential issues like air leakage. Understanding the nuances of insulation types and their performance is key to achieving optimal results in a 2×6 wall assembly.
Considerations for 2×6 Wall Insulation
x6 walls, with their larger cavities, offer more space for insulation. This increased space allows for greater insulation volume, leading to improved R-values. However, this also necessitates a more strategic approach to insulation selection and installation. Factors to consider include the desired level of energy efficiency, the local climate, and the specific insulation characteristics. Choosing the right insulation material for 2×6 walls is crucial for maximizing energy savings and minimizing potential issues like moisture buildup.
Advantages and Disadvantages of Different Insulation Types, Size insulation for 2×4 and 2×6 walls
Various insulation types are available for 2×6 walls, each with its own set of advantages and disadvantages. The ideal choice depends on factors like cost, installation complexity, and the specific needs of the building project.
- Fiberglass Batt Insulation: Fiberglass batt insulation is a cost-effective option, readily available, and relatively easy to install. Its primary advantage lies in its affordability. However, it may not provide the highest R-value per inch of thickness compared to other options, and it can be susceptible to air leakage if not properly installed.
- Cellulose Insulation: Cellulose insulation, made from recycled paper products, is a good choice for eco-conscious homeowners. It offers good insulation properties, and it’s often touted for its fire resistance. However, the installation process can be more labor-intensive than fiberglass, and proper moisture control is essential during installation to avoid mold or mildew growth.
- Spray Foam Insulation: Spray foam insulation offers exceptional air sealing and high R-values, leading to significant energy savings. Its ability to fill in gaps and create a tight seal minimizes air infiltration. However, spray foam insulation can be more expensive than other options and requires specialized application. The potential for moisture issues, particularly in poorly ventilated areas, should also be considered.
Additionally, proper ventilation during installation is essential to avoid potential health hazards.
- Rigid Foam Insulation: Rigid foam insulation (like XPS or EPS) is often used as a sheathing material on exterior walls, but it can also be used as a layer within the cavity. Its high R-value and ability to resist moisture make it a good option in high-humidity areas. However, its installation can be more complex than other options, and it may not provide the same level of air sealing as spray foam.
Comparison of R-Values for 2×6 and 2×4 Walls
The R-value of insulation is a crucial measure of its thermal resistance. For a given insulation thickness, 2×6 walls generally allow for higher R-values due to the increased cavity space. A 2×6 wall insulated with 4 inches of fiberglass batt insulation might achieve a comparable R-value to a 2×4 wall insulated with 6 inches of the same material.
This difference in insulation thickness reflects the larger cavity in 2×6 walls.
Figuring out the right size insulation for 2×4 and 2×6 walls can be tricky, but it’s crucial for energy efficiency. Knowing how to properly insulate your walls can really save you money on your energy bills. To keep your home cozy and comfortable, consider also how to clean your screen door regularly, a simple task that makes a big difference.
Following a quick cleaning routine, like the one on how to clean screen door , can keep your home looking its best. Ultimately, good insulation is key to maintaining a comfortable temperature year-round, and that’s something you can easily achieve when you understand the correct sizing for your walls.
Insulation Options for 2×6 Walls: Pros, Cons, and Cost-Effectiveness
The following table summarizes the pros, cons, and cost-effectiveness of various insulation types for 2×6 walls:
| Insulation Type | Pros | Cons | Cost-Effectiveness |
|---|---|---|---|
| Spray Foam | Excellent air sealing, high R-value, long-term durability, good moisture resistance | Higher upfront cost, specialized installation required, potential for off-gassing in some cases | Generally cost-effective in the long run due to energy savings, but high initial investment. |
| Fiberglass Batt | Relatively affordable, readily available, easy to install, good R-value | Can be susceptible to air leakage if not properly installed, lower R-value per inch compared to other options | Highly cost-effective, especially for DIY installations. |
| Cellulose | Eco-friendly, good R-value, fire-resistant | More labor-intensive installation, moisture control crucial, may not be as easy to work with as batt insulation. | Moderately cost-effective, competitive with fiberglass. |
| Rigid Foam | High R-value, good moisture resistance, excellent for exterior applications | More complex installation, may not provide same level of air sealing as spray foam, can be heavy | Cost varies depending on the type and thickness, often comparable to other options. |
Installation Methods for 2×6 Walls
Proper installation is crucial for maximizing the performance of insulation in 2×6 walls. The specific installation methods vary slightly depending on the type of insulation used. Ensure proper sealing of seams and gaps to minimize air leakage. Consider using vapor barriers where appropriate to prevent moisture buildup.
Insulation Installation Methods and Techniques
Proper insulation installation is crucial for maximizing energy efficiency and comfort in a building. Choosing the right insulation and correctly installing it are equally important factors in achieving optimal performance. Incorrect installation can lead to air leaks, thermal bridging, and reduced insulation effectiveness. This section delves into the various methods and techniques for installing insulation in 2×4 and 2×6 walls, highlighting the importance of proper sealing.Effective insulation installation involves more than just placing the material; it requires precision and attention to detail.
This meticulous approach ensures the insulation performs its intended function, creating a comfortable and energy-efficient living space. The steps Artikeld below detail the key considerations for both wall types, emphasizing the importance of sealing and the differences between insulation types.
Installation Methods for 2×4 Walls
The installation method for 2×4 walls often depends on the type of insulation used. Batt insulation, for instance, is typically installed in the wall cavity after the framing is complete. This involves carefully placing the insulation batts between the studs, ensuring they are compressed to eliminate air gaps. A crucial aspect is ensuring the insulation is snug against the studs and the exterior and interior wall sheathing.
Fiberglass batt insulation is popular due to its relatively low cost and good insulating properties. Spray foam insulation, on the other hand, requires specialized equipment and application techniques.
Installation Methods for 2×6 Walls
x6 walls, with their larger cavity, often accommodate a wider range of insulation options. The larger cavity allows for more insulation, potentially increasing the R-value. Similar to 2×4 walls, batt insulation is commonly installed in the cavity. However, due to the increased space, thicker insulation batts can be used, potentially increasing the R-value of the wall. This larger cavity also allows for the use of other insulation types such as cellulose or loose-fill insulation, which are often blown into the cavity using specialized equipment.
It’s important to consider the specific insulation type when choosing the installation method.
Comparing Installation Procedures for Various Insulation Types
Different insulation types require unique installation approaches. Batt insulation is relatively straightforward to install, requiring careful placement between studs. Spray foam insulation demands specialized equipment and application techniques, often requiring a professional installer. Loose-fill insulation, such as cellulose, needs specialized equipment to be blown into the wall cavity. The choice of installation method should align with the chosen insulation type and the experience level of the installer.
Tools Needed for Different Insulation Types
The tools required for insulation installation vary based on the chosen insulation type.
| Insulation Type | Tools Needed | Safety Precautions | Installation Steps |
|---|---|---|---|
| Batt Insulation | Utility knife, measuring tape, pencil, gloves, and a helper for larger areas. | Wear safety glasses to protect eyes from debris. Use gloves to protect hands from sharp edges. Ensure proper ventilation. | Measure and cut insulation to fit the wall cavity. Place insulation between studs, ensuring it is snug against the studs and sheathing. |
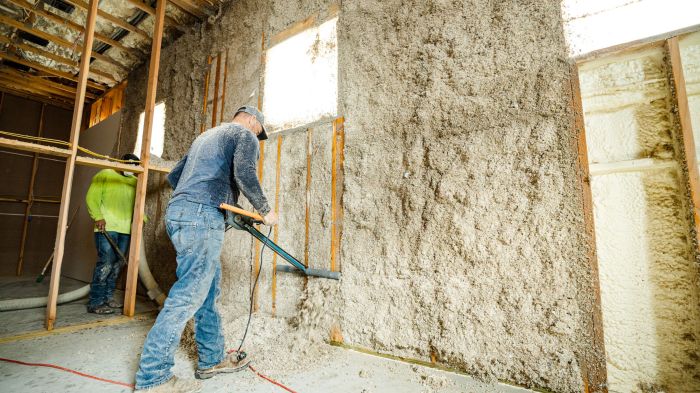
| Spray Foam Insulation | Spray equipment, safety glasses, respirator, gloves, measuring tape, and pencil. | Wear a respirator to avoid inhaling spray foam fumes. Use appropriate safety gear to prevent skin contact with the spray foam. | Apply spray foam according to manufacturer instructions. Ensure proper ventilation during and after application. |
| Loose-fill Insulation (e.g., Cellulose) | Insulation blower, safety glasses, respirator, gloves, and measuring tape. | Wear a respirator to avoid inhaling insulation fibers. Use safety glasses to protect eyes from debris. Follow manufacturer’s instructions for proper ventilation. | Use an insulation blower to fill the wall cavity with loose-fill insulation. Ensure the cavity is completely filled. |
Importance of Proper Sealing
Proper sealing is essential to prevent air leakage. Air leaks can significantly reduce the effectiveness of insulation and increase energy bills. Using sealant to fill gaps and cracks around windows, doors, and the edges of insulation can greatly reduce these leaks. Furthermore, ensuring the insulation is tightly compressed and properly installed is crucial in minimizing air infiltration.
Improper sealing can negate the benefits of high-quality insulation, resulting in significant energy waste. Professional installation can often ensure a tighter seal.
Insulation and Air Sealing Considerations: Size Insulation For 2×4 And 2×6 Walls
Proper insulation is crucial for a well-built home, but it’s only part of the equation. Air sealing is equally vital for maximizing energy efficiency. Air leaks, often invisible to the naked eye, can drastically reduce the effectiveness of your insulation, leading to wasted energy and higher utility bills. This section will delve into the importance of air sealing, methods for identifying and sealing leaks, and the overall impact on energy efficiency.Air sealing works in conjunction with insulation to create a highly efficient building envelope.
Choosing the right size insulation for 2×4 and 2×6 walls is crucial for energy efficiency. When it comes to cutting the insulation to fit, understanding the nuances of different power tools like the miter saw vs table saw can really impact your project. Ultimately, the correct size insulation for your 2×4 or 2×6 walls will depend on factors like the R-value needed and the specific type of insulation you’re using.
Insulation prevents heat transfer, while air sealing prevents air infiltration and exfiltration, essentially creating a tight barrier against the outside elements. This combination significantly reduces heat loss in winter and heat gain in summer, resulting in substantial energy savings.
Identifying Air Leaks in 2×4 and 2×6 Walls
Air leaks can manifest in various ways, from drafts around windows and doors to subtle leaks around electrical outlets and plumbing penetrations. A thorough inspection is key to identifying these vulnerabilities. Visual inspection can help locate obvious leaks, while using a smoke pen or a candle can reveal hidden gaps. A smoke pen, when introduced into a suspected leak, will trace the path of the air leak with a visible smoke trail.
Sealing Air Leaks in 2×4 and 2×6 Walls
Several methods are available for sealing air leaks. Caulking is a common and effective method for sealing gaps around windows, doors, and other penetrations. Specialized expanding foam can fill larger gaps and cracks. Using weatherstripping around doors and windows is another effective measure. Insulating and sealing around electrical outlets, plumbing penetrations, and recessed lighting fixtures can further reduce air leaks.
Impact of Air Sealing on Energy Efficiency
Air sealing significantly impacts a building’s energy efficiency. A properly sealed home retains heat in winter and stays cooler in summer, directly reducing the energy required for heating and cooling. This translates into lower energy bills and a smaller carbon footprint. For example, a home with properly sealed walls and penetrations can experience a 10-20% reduction in heating and cooling costs compared to a poorly sealed home.
Common Air Leaks and Solutions
- Window and Door Frames: Caulking gaps around window and door frames is essential. Apply a high-quality, weather-resistant sealant to create a tight seal. Replacing older, drafty windows with energy-efficient models is another option.
- Electrical Outlets and Switches: Gaps around electrical outlets and switches are common culprits. Use expanding foam or specialized sealant to fill these openings.
- Plumbing Penetrations: Pipes passing through walls can create significant air leaks. Use a combination of caulk and expanding foam to seal these openings effectively.
- HVAC Ducts: Inspect and seal any gaps or cracks in the HVAC ductwork to prevent significant energy loss. Insulate the ducts as well to further reduce heat transfer.
Comparison of Air Sealing Techniques
Different techniques offer varying levels of effectiveness. Caulking is cost-effective for smaller gaps, while expanding foam is more suitable for larger openings. Weatherstripping is particularly useful for doors and windows. A combination of techniques is often necessary for a complete and effective seal.
Insulation for Specific Climate Zones
Choosing the right insulation isn’t a one-size-fits-all solution. Climate significantly impacts insulation performance. Extreme temperatures, high humidity, and consistent precipitation all affect how well insulation works and its lifespan. Understanding your region’s climate is crucial for selecting the most effective and durable insulation options. This section will delve into how climate influences insulation choices and how to select the best option for your specific area.Proper insulation selection considers the average temperature range, humidity levels, and precipitation patterns in a given climate zone.
The effectiveness of insulation materials is heavily influenced by these factors. Understanding these impacts ensures that the insulation system not only meets current needs but also provides long-term protection and comfort.
Factors Influencing Insulation Selection by Climate
Climate dictates the insulation’s required R-value. Higher R-values are necessary in colder climates to effectively resist heat loss, while moderate climates may require lower R-values. Insulation types, installation methods, and potential air sealing requirements all depend on climate-specific needs. The goal is to minimize energy loss and maximize comfort.
Insulation Types for Different Climates
The ideal insulation type varies greatly depending on the climate. Factors such as moisture resistance, vapor permeability, and thermal performance must be considered.
Cold Climates (e.g., Northern US, Canada)
In cold climates, high R-value insulation is crucial to minimize heat loss. Fiberglass batt insulation, cellulose, and rigid foam insulation are common choices. Fiberglass is a cost-effective option, while cellulose provides excellent thermal performance and fire resistance. Rigid foam insulation, like XPS or polyurethane, offers exceptional thermal resistance but may be more expensive. Proper air sealing is essential to prevent air infiltration, which significantly impacts the effectiveness of the insulation.
For example, in extremely cold climates, a house in Minnesota with insufficient insulation may experience significant energy costs, while the same house with adequate insulation may use 30-50% less energy.
Moderate Climates (e.g., Midwest, parts of the South)
Moderate climates generally require insulation that balances thermal performance and cost. Fiberglass batt insulation, cellulose, and spray foam insulation can all be effective choices. The selection will depend on factors such as moisture levels and the need for vapor control. For example, in a moderate climate like parts of the Midwest, using appropriate insulation can result in significant energy savings and improved indoor comfort.
Hot and Humid Climates (e.g., Southeastern US, Southern states)
In hot and humid climates, moisture resistance is paramount. Spray foam insulation, rigid foam, and certain types of cellulose insulation are often preferred due to their ability to resist moisture absorption. Proper vapor barriers are crucial to prevent moisture from accumulating behind the insulation. In regions like the southeastern United States, improper insulation can lead to mold growth and moisture damage, negatively impacting the home’s longevity and occupant comfort.
Examples show that properly insulated homes in humid climates maintain more stable indoor temperatures, preventing the buildup of moisture that can lead to mold and mildew.
Choosing the right size insulation for 2×4 and 2×6 walls is crucial for energy efficiency. Thinking about how to effectively insulate your home can be tricky, but it’s important to consider the different types of insulation materials available, and how to get the best results. Learning how to grow strawberry plants in pots, for example, requires a different approach to insulation than what’s needed for a house.
So, if you’re looking to improve your home’s insulation, understanding the proper thickness for 2×4 and 2×6 walls is essential to keeping your home warm in the winter and cool in the summer. how to grow strawberry plants in pots might seem unrelated, but knowing how to manage your home’s temperature can be a helpful skill.
Ultimately, proper insulation is key for both cozy homes and successful gardening efforts.
High-Wind Climates
High-wind climates demand insulation that effectively seals gaps and minimizes air infiltration. This often involves a combination of insulation and meticulous air sealing techniques. Air sealing is just as important as choosing the correct insulation material in high-wind areas. For instance, in mountainous regions or coastal areas with high winds, properly insulated and air-sealed homes can reduce energy costs significantly.
Cost Analysis of Different Insulation Options

Insulation is a crucial element in energy-efficient homes, but the initial cost can be a significant factor in the decision-making process. Understanding the costs of various insulation types and the potential long-term savings is essential for homeowners and builders. This section delves into the financial aspects of insulation, providing a comprehensive overview of material and labor costs, as well as long-term savings projections.The cost of insulation is influenced by numerous factors, ranging from the type of insulation chosen to the complexity of installation.
Comparing different insulation options requires a thorough understanding of both upfront costs and the potential for reduced energy bills over time. This analysis will help you navigate the financial considerations involved in selecting the right insulation for your home.
Material Costs for 2×4 and 2×6 Walls
The cost of insulation materials varies significantly depending on the type chosen. Common insulation types, their typical price ranges, and considerations for 2×4 and 2×6 wall structures are presented below.
- Fiberglass Batt Insulation: This is a popular, relatively inexpensive option. Prices typically range from $0.50 to $1.50 per square foot, depending on the thickness and brand. 2×4 walls might use 3.5 inches of fiberglass, while 2×6 walls could benefit from 4.5 inches. These thicknesses will affect the cost per square foot. The price difference between 2×4 and 2×6 walls is largely dependent on the square footage of the wall space and the required thickness of insulation.
- Spray Foam Insulation: This type of insulation is known for its high R-value and airtight properties, leading to superior energy efficiency. However, it is generally more expensive than fiberglass, with prices typically ranging from $2 to $5 per square foot, depending on the type of spray foam (open-cell or closed-cell) and labor costs. The cost difference between 2×4 and 2×6 walls for spray foam installation often hinges on the amount of foam required to achieve the desired R-value for each wall structure.
- Cellulose Insulation: This is a recycled insulation material made from paper products. It is often a mid-range option in terms of cost, typically ranging from $1.00 to $2.50 per square foot. The price varies with the density and the application method, and cost comparison for 2×4 and 2×6 walls would depend on the thickness of the insulation needed.
Labor Costs and Installation Factors
The labor involved in insulation installation significantly impacts the overall cost.
- Installation Complexity: Installing insulation in complex areas like attics or around plumbing can increase labor costs. The complexity of installation for 2×4 and 2×6 walls varies based on the access to the wall cavity and the specific insulation type used.
- Skill Level of Installers: Experienced installers can often complete the job more quickly and efficiently, which can influence the final labor costs. The price difference between a skilled and unskilled installer can vary greatly. A qualified installer with experience in working with both 2×4 and 2×6 walls will likely have a clearer understanding of the necessary procedures and materials.
- Material Handling and Disposal: Proper handling and disposal of insulation materials are crucial, and this can affect the overall labor cost. The cost of material disposal will depend on the local regulations and the volume of insulation material used.
Long-Term Cost Savings
Insulation significantly reduces energy consumption, leading to long-term savings on utility bills.
- Energy Efficiency: Higher R-values lead to better insulation and greater energy savings, potentially resulting in significant cost savings over the life of the building. This is a key factor when comparing the long-term costs of different insulation types for 2×4 and 2×6 walls. The specific savings will depend on the climate, energy prices, and the specific insulation chosen.
- Reduced Heating and Cooling Costs: Lower energy consumption translates to lower utility bills. For instance, a well-insulated home could save hundreds of dollars annually on heating and cooling costs, leading to a quicker return on investment.
Breakdown of Material and Labor Costs
While precise figures are difficult to provide without specific project details, a general cost breakdown is shown below:
| Insulation Type | Material Cost (approx.) | Labor Cost (approx.) | Total Cost (approx.) |
|---|---|---|---|
| Fiberglass Batt | $1-$2/sq ft | $1-$3/sq ft | $2-$5/sq ft |
| Spray Foam | $2-$5/sq ft | $2-$4/sq ft | $4-$9/sq ft |
| Cellulose | $1-$2.50/sq ft | $1-$3/sq ft | $2-$5.50/sq ft |
Note: These are estimates and actual costs may vary based on specific factors like location, material availability, and labor rates.
Epilogue
In conclusion, choosing the right size insulation for your 2×4 or 2×6 walls is a significant investment in your home’s energy efficiency and comfort. By considering factors like R-value, climate, and cost-effectiveness, you can select the perfect insulation solution. Remember, proper installation and air sealing are equally important for maximizing the benefits of your insulation investment. With the right knowledge and careful planning, you can ensure your home is well-insulated for years to come.