


How to repair gaps between floorboards? This comprehensive guide walks you through every step, from identifying the cause to achieving a flawless finish. We’ll explore common reasons for gaps, evaluate the damage, prepare the area, perform the repair, and finally, prevent future issues. Get ready to tackle those unsightly gaps and restore your floor’s beauty and stability.
Understanding the various causes of gaps, such as moisture, settling, or subfloor issues, is crucial. This article will detail the different types of wood floor construction and how they affect gap formation. We’ll also discuss the necessary tools and materials, along with safety precautions to ensure a smooth and successful repair.
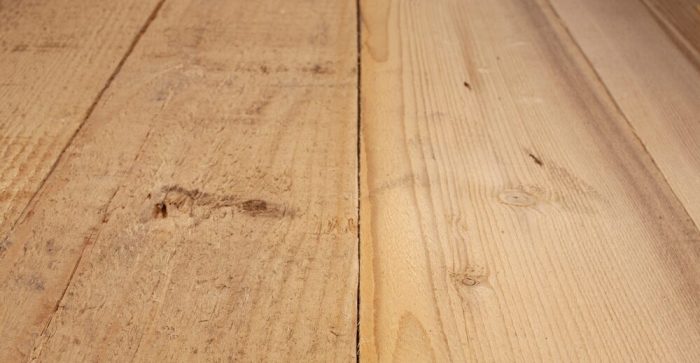
Identifying the Cause of Gaps: How To Repair Gaps Between Floorboards
Fixing gaps in floorboards requires a diagnosis of the underlying cause. Simply filling the gaps without addressing the root problem will likely lead to their reappearance. Understanding the reasons behind the gaps is crucial for effective and lasting repairs. This section will explore the common causes of gap formation, from wood floor construction to environmental factors.Identifying the source of the gap is paramount to successful repair.
This often involves careful observation and analysis of the floor’s structure and the surrounding environment.
Common Reasons for Gaps
Gaps between floorboards are often caused by a combination of factors, including improper installation, environmental influences, and the floor’s own structural changes over time. A thorough inspection helps pinpoint the precise cause, allowing for targeted and effective repair strategies.
- Improper Installation: Incorrect subfloor preparation, inadequate fastening of floorboards, or using unsuitable materials during installation can all lead to gaps. Misaligned or improperly fitted boards, for example, will inevitably create gaps over time.
- Environmental Factors: Fluctuations in temperature and humidity levels can cause wood to expand and contract, leading to gaps. Sudden temperature changes, especially in climates with significant seasonal variations, can be a contributing factor.
- Subfloor Conditions: A weak or uneven subfloor is a frequent culprit. Uneven subfloors will not provide a consistent support system for the floorboards, potentially leading to gaps. Problems with the subfloor, such as inadequate moisture control, can exacerbate these issues.
- Settlement: Over time, the structure of a building can settle, causing the floor to shift and create gaps. This is especially true in older homes or those with unstable foundations. Settlement is a common cause of floor problems.
- Moisture: Excess moisture in the subfloor can cause the wood to swell, leading to gaps and potentially structural damage. This can result from leaks, high humidity, or inadequate moisture barriers.
Types of Wood Floor Construction
Different types of wood flooring constructions have varying susceptibility to gap formation. Understanding the construction of your floor can provide insight into the potential causes.
- Solid Wood Flooring: Solid wood flooring is made of a single piece of wood and is often more prone to gaps due to movement from temperature and moisture fluctuations.
- Engineered Wood Flooring: Engineered wood flooring consists of multiple layers of wood, which can be less susceptible to gaps, but can still be affected if the underlying layers are not adequately supported or the moisture control is inadequate.
Comparison of Gap Causes
The table below provides a quick reference for identifying gaps based on their visual characteristics.
| Cause | Visual Characteristics |
|---|---|
| Settlement | Gaps tend to be irregular and scattered, potentially accompanied by other structural issues like squeaking or creaking. The gaps might not be consistent in size or location. |
| Moisture | Gaps may be more pronounced in areas with visible signs of water damage, like discoloration or warping. Moisture-related gaps often appear consistently in specific zones. |
| Improper Installation | Gaps may appear consistently along seams or around specific areas, showing a pattern of misalignment or poor fastening. Gaps might be of uniform size and location if there were mistakes in the installation process. |
| Temperature Fluctuations | Gaps may be more noticeable during specific times of the year, such as when there are significant changes in temperature. This could manifest as wider gaps in warmer months or narrower gaps in cooler months. |
Assessing the Extent of the Damage

Knowing the extent of the damage is crucial before undertaking any repair. A thorough assessment helps determine the appropriate repair method and prevents further damage. Ignoring minor gaps can lead to larger problems, while overestimating the damage can result in unnecessary expense. This section will detail various methods to evaluate the severity of gaps, allowing you to tackle the issue effectively and efficiently.
Methods for Evaluating Gap Severity
Several methods can help determine the severity of gaps between floorboards. Visual inspection, combined with measurements, provides a comprehensive understanding of the problem. Carefully examining the gaps and measuring their dimensions is essential to identify potential issues.
Measuring Gap Size and Location
Accurate measurements are vital for assessing the extent of damage. Use a ruler or measuring tape to precisely record the width and length of each gap. Note the exact location of each gap using a system like coordinates (e.g., “2 feet from the wall, 3 feet from the doorway”). A detailed record of the gap’s location and size helps in planning the repair process and ensures no critical areas are missed.
Take multiple measurements for gaps that vary in width along their length. For example, if a gap widens towards the center, document the minimum and maximum widths.
Impact of Gap Size on Floor Stability
Different gap sizes have varying impacts on floor stability. A table below illustrates the potential implications:
| Gap Size (mm) | Potential Impact |
|---|---|
| Less than 5 mm | Minor gap, unlikely to significantly affect stability. |
| 5-10 mm | Moderate gap, potential for creaking or squeaking. Regular inspection recommended. |
| 10-15 mm | Significant gap, potential for uneven settling. Professional assessment may be necessary. |
| 15 mm+ | Severe gap, high risk of structural damage and instability. Immediate attention is required. |
Visual Inspection of the Subfloor
Inspecting the subfloor is crucial to identify the root cause of the gaps. Inspect the subfloor for any signs of damage such as rot, warping, or loose or missing components. This step ensures that the repair addresses the underlying issue, preventing the gap from recurring.
Identifying Areas with Damage
Different methods can be employed to identify areas with significant or minor damage. A flashlight or a borescope can be used to inspect areas that are difficult to see directly. Listen carefully for any creaking or squeaking sounds, which can indicate loose or damaged areas. Carefully feel the subfloor for any unevenness or depressions. These indicators can help locate areas requiring additional attention.
For example, a visible bulge in the subfloor might suggest a problem needing repair. Similarly, an audible squeaking sound emanating from a specific area may point towards a loose joist or support beam. Document each area with damage to aid in planning and execution of repairs.
Preparing the Area for Repair

Getting your floorboards ready for repair is crucial for a successful and lasting fix. A well-prepared area ensures the repair is properly implemented, minimizing the risk of future issues and maximizing the longevity of the fix. This involves meticulous preparation, from gathering the right tools and materials to ensuring a clean and safe workspace. A systematic approach will save time and effort, ultimately leading to a more satisfying result.Careful preparation is the cornerstone of successful floorboard gap repair.
It involves a combination of meticulous cleaning, careful assessment, and proper tool selection. By meticulously preparing the area, you lay the foundation for a precise and durable repair, preventing further damage and ensuring the longevity of the repair.
Essential Tools and Materials
Proper tools and materials are essential for a successful floorboard gap repair. A comprehensive toolkit allows for a precise and effective repair, reducing the risk of errors and ensuring a durable fix. Selecting the right tools and materials is a key step in achieving a high-quality repair.
- Measuring tools (measuring tape, level): Accurate measurements are paramount for precise repair work, ensuring the replacement pieces fit perfectly and avoid gaps or inconsistencies. Inaccurate measurements can lead to a less aesthetically pleasing repair and potentially result in further damage to the floor.
- Wood filler/putty/repair compound: Choosing the appropriate filler is critical for a seamless repair. Different fillers cater to varying needs, from simple gaps to more complex repairs.
- Sandpaper (various grits): Sandpaper is essential for smoothing the filled gap and achieving a consistent surface with the surrounding floorboards. Different grits are used for different stages of the sanding process, allowing for a gradual refinement of the repair area.
- Caulk (optional): Caulk is beneficial for filling larger gaps or creating a watertight seal, especially in areas prone to moisture.
- Safety glasses, gloves, and dust mask: These are crucial for protecting yourself from wood dust and debris, preventing respiratory issues and skin irritation during the repair process.
Preparing the Affected Area
Thorough preparation of the affected area is a crucial step for a lasting and successful repair. This involves removing loose debris, ensuring a clean working surface, and making accurate measurements. By taking this step seriously, you lay the groundwork for a long-lasting repair.
- Remove loose debris: Before starting the repair, carefully remove any loose debris, dirt, or dust from the affected area. This ensures a clean working surface and allows for a precise application of the repair material. Failing to remove debris could lead to inconsistencies and affect the longevity of the repair.
- Clean the area: Thoroughly clean the area around the gap using a brush, vacuum, or damp cloth. This removes any dirt or dust that could interfere with the adhesion of the repair material. A clean surface ensures the repair material adheres properly, leading to a stronger and more durable fix.
- Assess the gap: Examine the gap carefully to determine the exact dimensions and shape. This will help you select the appropriate repair material and ensure a precise fit. Proper assessment is vital to the success of the repair.
- Mark the area (optional): For larger or more complex repairs, marking the area with a pencil or marker can help guide the repair process. Marking the area allows for a more precise application of the filler or repair material.
Safety Precautions
Safety is paramount during any home repair project. Proper safety precautions protect you from potential hazards and ensure a safe working environment. Adhering to safety precautions is crucial for both your well-being and the successful completion of the repair.
- Wear safety glasses to protect your eyes from flying debris.
- Use a dust mask to prevent inhalation of wood dust.
- Use gloves to protect your hands from the repair materials.
- Ensure adequate ventilation to prevent the buildup of wood dust.
- If working near electrical outlets, turn off the power to avoid electrical hazards.
Tools and Materials Needed
This table Artikels the tools and materials required for various types of floorboard gap repairs. The specific requirements vary depending on the severity and extent of the damage. Selecting the correct tools and materials is key to a successful repair.
| Type of Repair | Tools | Materials |
|---|---|---|
| Small gaps (under 1/2 inch) | Measuring tape, wood filler, sandpaper, safety glasses, gloves | Wood filler, wood putty, appropriate wood stain or paint (if necessary) |
| Moderate gaps (1/2 inch to 1 inch) | Measuring tape, wood filler, putty knife, sandpaper, safety glasses, gloves, caulk (optional) | Wood filler, wood putty, caulk, appropriate wood stain or paint (if necessary) |
| Large gaps (over 1 inch) | Measuring tape, wood filler, putty knife, chisel, hammer, sandpaper, safety glasses, gloves, caulk (optional) | Wood filler, wood putty, caulk, appropriate wood stain or paint (if necessary), wood shims or blocks (if needed) |
Repairing the Gaps
Fixing gaps between floorboards is a common DIY project, but success depends on careful preparation and appropriate techniques. A well-executed repair not only enhances the aesthetic appeal of the floor but also improves its structural integrity, preventing further damage. Addressing these gaps promptly prevents drafts, squeaking sounds, and potential tripping hazards.Understanding the root cause of the gaps, along with their extent, is crucial before embarking on any repair.
This involves careful inspection, consideration of the floor’s material, and potential underlying issues. Different methods of repair suit various circumstances and skill levels.
Methods for Repairing Gaps
Different methods offer varying degrees of complexity, cost, and effectiveness. Choosing the right approach depends on the size and nature of the gap, as well as your comfort level with DIY projects.
- Shimming: This method involves inserting small, wedge-shaped pieces of wood or specialized shims into the gaps to raise the lower board. Shims are typically made of wood, plastic, or metal, with varying thicknesses. This method is effective for smaller gaps, and is often used as a temporary solution.
- Patching: A patching method entails filling the gaps with a suitable wood filler, allowing it to dry and harden. This method is ideal for small to medium-sized gaps where a complete replacement isn’t necessary. Careful selection of filler matching the existing floorboards’ color and texture is essential for seamless results.
- Replacing: Replacing damaged floorboards is the most involved method, but is often necessary for larger or more significant gaps. This requires removing the damaged boards and installing new ones. This method guarantees a strong and long-lasting repair but takes more time and skill.
Step-by-Step Procedures for Each Method
- Shimming: First, identify the gap and measure its width and depth. Select shims of appropriate thickness to fill the gap. Gently tap the shim into place, ensuring it is securely fitted. Apply wood glue to the shim for additional stability, if needed. If the gap is significant, consider using multiple shims.
- Patching: Clean the gap thoroughly, removing any debris. Apply wood filler to the gap, ensuring a smooth and even surface. Let the filler dry completely, according to the manufacturer’s instructions. Once dry, carefully sand the filler to match the surrounding floorboards. A wood-stain or paint might be necessary to match the existing floor color.
- Replacing: Carefully remove the damaged boards, paying attention to the subfloor. Assess the subfloor for any damage. Install new boards, ensuring they are properly aligned and fastened. Use appropriate fasteners and wood glue for a strong and secure installation. After the installation, inspect the newly fitted boards for proper alignment and stability.
Advantages and Disadvantages of Different Repair Techniques
The choice of method depends on the specific circumstances and desired outcomes.
Fixing those pesky gaps between floorboards can be a real pain, but a well-maintained floor is a happy floor! Knowing how to store everything efficiently in your home, like decluttering and organizing closets and cupboards, is actually a great way to prevent future floor damage. For example, if you can optimize how you store your heavier items, you can reduce the stress on the floor and minimize the appearance of gaps.
Once you’ve mastered those storage techniques, you’ll be ready to tackle those floorboard gaps with confidence, how to store everything in your home , and get a beautiful, solid-looking floor.
- Shimming: Advantages include its relatively low cost and speed. Disadvantages include its suitability only for small gaps, and potential instability if not done properly. It might also not be a long-term solution.
- Patching: Advantages include its moderate cost and relative ease of execution. Disadvantages include the potential for the filler to shrink or crack if not properly applied or matched to the wood. This is less permanent than replacing.
- Replacing: Advantages include a permanent and sturdy repair, capable of handling larger gaps. Disadvantages include higher costs, greater time investment, and potentially higher skill requirements. It is a more extensive and involved procedure.
Repair Method Comparison Table
| Method | Cost | Time | Skill Level |
|---|---|---|---|
| Shimming | Low | Low | Low |
| Patching | Medium | Medium | Medium |
| Replacing | High | High | High |
Installing Wood Filler and Shims
Proper installation of wood filler and shims ensures a lasting repair. Carefully following manufacturer instructions is essential for optimal results.
- Wood Filler: Choose a filler that matches the existing floorboards’ color and texture. Apply a thin, even layer to the gap. Let the filler dry completely, then sand to a smooth finish.
- Shims: Select shims that precisely fit the gap. Carefully tap the shim into place, ensuring it is securely fitted. If the gap is wide, use multiple shims, applying wood glue for added stability. Inspect the shim placement for proper alignment.
Finishing the Repair
Bringing your floorboards back to their former glory requires a meticulous finishing touch. This final stage ensures a seamless transition between the repaired area and the existing floor, restoring its aesthetic appeal and structural integrity. A proper finish not only improves the look but also protects the repaired section from future damage.
Sanding the Repaired Area
Thorough sanding is crucial to achieving a smooth, even surface. Sanding levels the filler and prepares the area for the final finish. Begin with a coarse-grit sandpaper (e.g., 80-grit) to remove any high spots or unevenness created by the filler. Gradually progress to finer grits (e.g., 120-grit, 180-grit, and 220-grit) to achieve a smooth surface. Ensure the sanding direction is consistent with the wood grain to avoid creating streaks.
Regularly wipe away sanding dust to maintain a clear view of the surface.
Finishing Techniques
Achieving a seamless finish requires careful application of a suitable wood finish. A good approach is to use a technique called ‘feathering’. This involves blending the edges of the repaired section with the surrounding area. Work in small sections, applying the finish in the direction of the wood grain. Allow each coat to dry completely before applying the next.
A professional finish often involves multiple thin coats rather than a single thick one.
Matching Color and Finish
Selecting a finish that matches the existing floor is essential for a cohesive look. Observe the existing finish and consider the type of wood stain, if applicable. If you are unsure, consult a professional or a reputable woodworking store for advice. Carefully match the color and sheen of the new finish to the original floor.
Wood Filler Types
Various wood fillers cater to different repair scenarios. For minor gaps, a wood putty or a similar product is often sufficient. For larger or deeper gaps, a wood filler specifically designed for gaps and cracks might be a better choice. Consider the type of wood and the desired appearance when selecting a filler. Avoid fillers that are too soft or too hard for the specific job.
Finishing Options
Different wood finishes offer various characteristics and levels of protection. A detailed overview of popular choices is presented in the table below.
| Finishing Option | Characteristics | Suitability |
|---|---|---|
| Oil-based Polyurethane | Durable, hard finish with a smooth, even sheen. | Excellent for high-traffic areas and exterior applications. |
| Water-based Polyurethane | Easy to apply, less odor, and environmentally friendly. | Suitable for interior applications, including floors and furniture. |
| Varnish | Provides a glossy, protective finish. | Suitable for areas that need high gloss and shine. |
| Danish Oil | Offers a natural, wood-toned finish that emphasizes the wood’s grain. | Ideal for enhancing the natural beauty of the wood. |
| Shellac | Quick-drying, offers a good level of protection. | Versatile, but might require multiple coats for full protection. |
Preventing Future Gaps
Repairing gaps in your floorboards is a significant step, but it’s even more valuable to prevent them from happening in the first place. Understanding the underlying causes and implementing proactive measures will save you time, money, and frustration in the long run. This involves a deep dive into the structural integrity of your subfloor and the environmental factors affecting your flooring.Proper subfloor installation and ongoing maintenance are crucial in preventing future gaps.
The quality of the initial installation sets the stage for the longevity of your flooring, and consistent upkeep can prevent problems from escalating. Addressing issues early, rather than reacting to them after they’ve developed, is key to a stable and beautiful home.
Subfloor Installation and Maintenance
A sturdy and properly installed subfloor is the foundation for a gap-free floor. This involves ensuring the subfloor is level, adequately supported, and properly sealed against moisture. Uneven or improperly installed subfloors create stress points that lead to warping and gaps. Ensuring the subfloor is correctly attached to the joists is vital. Use appropriate fasteners, and check for any loose or damaged areas.
Regular inspections can prevent major issues from developing.
Moisture Control
Moisture is a significant enemy of wood floors. Excessive moisture can cause wood to expand and contract, leading to gaps and damage. Controlling moisture levels in your home is crucial. Regularly check for signs of leaks or water damage. Ensure proper ventilation in your home, particularly in areas where water is used, like bathrooms and kitchens.
Consider using moisture barriers to prevent moisture from reaching the subfloor. Implementing these measures can protect your floor from moisture-related problems.
Temperature Fluctuations
Significant temperature changes can also cause wood to expand and contract. Consistent fluctuations lead to stress on the floorboards, potentially resulting in gaps. Maintaining a stable indoor temperature is crucial. Insulation can help regulate temperature and prevent drastic changes. Using proper insulation materials is essential in reducing the effects of temperature variations.
Consider using a thermostat to maintain a stable temperature throughout the year.
Floor Joist Support and Leveling
Adequate support for your floor joists is paramount. Weak or sagging joists cause the floorboards to shift and warp, resulting in gaps. Inspect your floor joists regularly for signs of damage or rot. If you notice any issues, consult a professional to assess the extent of the damage and implement the necessary repairs. Ensure that the joists are correctly spaced and adequately supported to prevent sagging or shifting.
The levelness of the subfloor plays a vital role in the stability of the floorboards. Use a level to ensure that the subfloor is even and that any irregularities are addressed.
Maintaining Floor Stability
Regular maintenance is key to maintaining the stability of your floor over time. Periodic checks for any signs of movement or damage in the floorboards are important. Regular inspections can help prevent small problems from escalating into larger issues. Avoid placing heavy objects directly on the floorboards without proper support. Consider using furniture pads or specialized underlayments to distribute weight and prevent concentrated pressure points.
Fixing those pesky gaps between floorboards is crucial for a cozy home, but did you know that these same gaps can also invite spring pests? Properly sealing them up is a great first step. Think about it – less entry points means less chance for unwelcome critters. For detailed tips on preventing those pesky spring invaders, check out our comprehensive guide on ways to prepare your home for spring pests.
Once you’ve tackled the pest issue, you can focus on the perfect wood filler and expertly filling those gaps to ensure a beautiful, pest-free floor.
This helps maintain the stability of the flooring and minimizes stress on the boards.
Fixing those pesky gaps between floorboards can be a real pain, but thankfully it’s a fixable problem. While you’re tackling that DIY project, you might be inspired by the current trend of 90s bathrooms back in style. 90s bathrooms back in style bring a unique charm to any space. Just remember to choose the right wood filler and caulk for a seamless, long-lasting result, and you’ll have a beautiful, solid floor in no time.
Troubleshooting Common Issues
Fixing floorboard gaps can sometimes lead to unexpected problems. Knowing how to anticipate and address potential issues is crucial for a successful repair. This section will detail common problems and their solutions, helping you navigate any roadblocks during the process.Uneven subfloors, improper fitting of the filler, or unsuitable materials can all contribute to a less-than-perfect repair. Careful planning and troubleshooting can prevent these issues and ensure a long-lasting, aesthetically pleasing result.
Identifying Subfloor Irregularities
Before starting any repair, thoroughly examine the subfloor. Uneven surfaces can cause the floorboards to shift or buckle, leading to gaps that reappear after initial repairs. Visual inspection, combined with a feel for the surface, will help you identify these irregularities. Using a straightedge or a level will help you determine the extent of the unevenness. A significant dip or rise in the subfloor requires more than just filling the gap.
Addressing Issues with Filler Material
Choosing the right filler is vital for a successful repair. Using inappropriate materials can lead to cracking, shrinking, or discoloration over time. If the filler material is too soft, it may compress easily, creating new gaps. Hard, brittle fillers may crack or crumble, requiring replacement. The filler should match the color and texture of the wood.
Diagnosing and Fixing Filler Issues, How to repair gaps between floorboards
Improper application of the filler can also cause problems. If the filler is applied unevenly, it can create a noticeable bulge or dip, making the repair visually unappealing. Overfilling the gap can also cause the filler to protrude, requiring additional sanding or trimming. Carefully following the application instructions for the chosen filler material is crucial.
Dealing with Uneven Subfloors
Uneven subfloors are a common culprit behind recurring gaps. For minor dips, consider using shims to level the subfloor before installing the filler. If the unevenness is substantial, a more extensive repair, like using leveling compound, might be necessary. This often involves preparing the subfloor with appropriate materials and tools, ensuring the leveling compound is properly mixed and applied according to manufacturer instructions.
Table of Common Repair Problems and Solutions
| Problem | Solution |
|---|---|
| Gap reappears after repair | Check for uneven subfloor; use shims or leveling compound if necessary. |
| Filler material cracks or shrinks | Use appropriate filler for the wood type and application. |
| Filler is unevenly applied | Apply filler smoothly and evenly, allowing sufficient drying time. |
| Filler protrudes after drying | Sand or trim the protruding filler to match the surrounding area. |
| Subfloor is significantly uneven | Level the subfloor with shims, leveling compound, or professional help if necessary. |
Epilogue
Repairing gaps in your floorboards can seem daunting, but this guide breaks down the process into manageable steps. From diagnosing the root cause to finishing the repair, we’ve covered every aspect to ensure a professional-looking result. By following our tips on prevention, you can maintain the integrity of your floors for years to come. So, roll up your sleeves and tackle those gaps with confidence!