


How to overwinter begonias like a pro? This guide will walk you through everything you need to know to keep your begonias thriving through the winter months. We’ll cover everything from ideal growing conditions to the best potting mix and watering strategies. From understanding the different types of begonias to troubleshooting common problems, you’ll learn how to ensure your begonias survive the winter and flourish come spring.
A healthy overwintering process leads to a beautiful display next season.
Begonias are beautiful, but they’re also delicate. Overwintering them properly is crucial for their health and longevity. This detailed guide provides a comprehensive overview of the essential steps involved in successfully overwintering your begonias. From the right light and temperature to soil composition and watering techniques, we’ll cover it all. With a bit of care and attention, you can enjoy your begonias for years to come!
Introduction to Overwintering Begonias
Begonias, with their vibrant blooms and lush foliage, are beloved garden plants. However, their delicate nature often necessitates overwintering to ensure continued health and beauty. Overwintering is the process of preparing begonias for the colder months, allowing them to survive the harsh winter conditions and emerge strong for the following spring. This crucial step is essential for their longevity, as begonias typically have a shorter lifespan compared to other perennial plants.Overwintering not only extends the life of your begonias but also helps them maintain their vibrant colors and lush foliage.
Without proper care during the colder months, your begonias may struggle to survive the winter and their growth will be significantly impacted. The typical lifespan of a begonia can vary greatly depending on the variety, growing conditions, and the level of care provided. However, many begonia varieties are not perennial in colder climates. Overwintering, therefore, becomes a crucial part of maintaining your begonia collection.
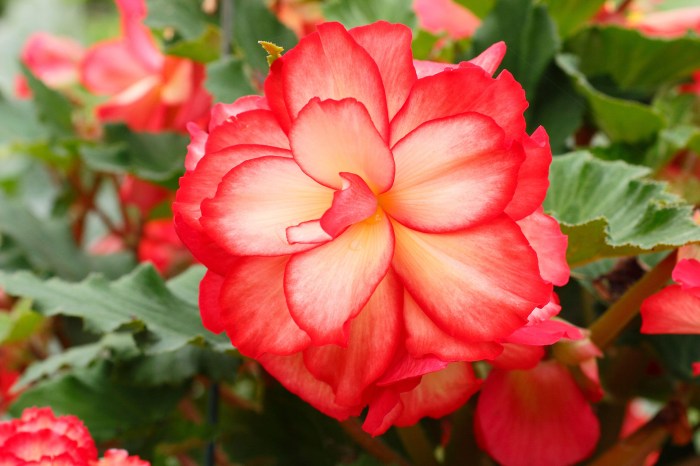
Different begonia types have varying requirements for overwintering.
Different Begonia Types and Their Overwintering Needs
Various types of begonias exist, each with unique characteristics. Some, like the rhizomatous begonias, are more resilient than others, and their needs differ significantly. Understanding these differences is crucial for successful overwintering. A comparison of different begonia types and their overwintering requirements helps tailor the approach for each variety.
| Type | Light | Temperature | Soil |
|---|---|---|---|
| Rhizomatous Begonias | Bright, indirect light; some direct sun in spring and summer | 50-70°F (10-21°C) during the winter; 70-80°F (21-27°C) in the summer. | Well-drained soil; avoid waterlogging. |
| Tuberous Begonias | Bright, indirect light; avoid direct sunlight in the winter. | 50-60°F (10-16°C) during the winter; 60-70°F (16-21°C) in the summer. | Well-drained soil; Allow soil to dry out slightly between waterings. |
| Rex Begonias | Bright, indirect light; avoid direct sunlight | 60-70°F (16-21°C) year-round; avoid sudden temperature changes. | Well-drained soil; maintain consistent moisture. |
| Cane Begonias | Bright, indirect light | 60-75°F (16-24°C) year-round; avoid cold drafts. | Well-drained soil; water regularly. |
Ideal Growing Conditions for Begonias

Keeping your begonias happy during the overwintering period hinges on replicating their preferred growing conditions as closely as possible. This ensures they remain healthy and vibrant, ready to flourish when spring arrives. Providing the right light, temperature, humidity, and other environmental factors is crucial for successful overwintering.
Light Requirements
Begonias thrive in bright, indirect light. Direct sunlight can scorch their leaves, leading to unsightly damage. During the overwintering period, a location near an east-facing window or a spot with filtered light from a south-facing window is ideal. If using grow lights, adjust the intensity to prevent burning the foliage. Too little light can lead to leggy growth and reduced flowering.
Temperature Requirements
Maintaining a consistent temperature range is vital for begonias during overwintering. The ideal temperature range is between 15°C and 21°C (59°F and 70°F). Avoid temperatures below 10°C (50°F), as this can cause significant stress and potential damage to the plants. Temperatures exceeding 24°C (75°F) can also lead to issues. For example, a sudden drop in temperature can cause shock and leaf loss.
Humidity Requirements
Begonias appreciate higher humidity levels. Maintaining a humidity level of 50-60% is ideal for their well-being. You can achieve this by grouping plants together, placing them on trays filled with pebbles and water (ensure the pots don’t sit directly in the water), or using a humidifier. Low humidity can lead to leaf tips browning and wilting.
Keeping your begonias happy through winter can be tricky, but with a few simple steps, you’ll be a pro in no time! First, move them to a cool, bright spot, and reduce watering significantly. Rising home items tariffs are making more expensive supplies like potting mixes and fertilizer harder to come by, which is important to consider for your begonias’ health.
Luckily, you can often get creative and use what you have on hand, and that will save you some money in the long run. So, take a look at how you can use these clever tips to overwinter your begonias.
Environmental Factors for Overwintering
Maintaining the optimal environment for your begonias requires careful consideration of various factors. The following table Artikels key environmental factors, their ideal values, potential issues if not met, and solutions to address them.
| Factor | Ideal Value | Potential Issue | Solution |
|---|---|---|---|
| Light | Bright, indirect | Scorching leaves from direct sun, leggy growth from insufficient light | Place near east-facing window or filtered south-facing light; adjust grow light intensity |
| Temperature | 15°C – 21°C (59°F – 70°F) | Significant stress, potential damage from temperatures below 10°C (50°F); issues with temperatures above 24°C (75°F) | Maintain consistent temperature; move to a warmer location if necessary |
| Humidity | 50-60% | Leaf tips browning, wilting | Group plants together, use pebble trays, or a humidifier |
| Watering | Allow the top inch of soil to dry between waterings | Root rot from overwatering, or wilting from underwatering | Adjust watering schedule based on soil dryness; use appropriate pot size for watering needs. |
Choosing the Right Potting Mix: How To Overwinter Begonias Like A Pro
A crucial aspect of successful begonia overwintering is selecting the appropriate potting mix. The right blend ensures proper drainage, aeration, and nutrient availability, all vital for the plant’s health and vigor during dormancy. A well-chosen potting mix can significantly impact the plant’s ability to recover and flourish when spring arrives.Proper drainage is paramount during overwintering. Begonias are susceptible to root rot if the soil retains excessive moisture.
A well-draining mix allows for optimal oxygen circulation around the roots, which is critical for their health and prevents the buildup of harmful pathogens. This, in turn, contributes to a healthier, more robust plant that can withstand the challenges of dormancy and thrive in the coming spring.
Composition of a Suitable Potting Mix
A suitable potting mix for begonias during overwintering should strike a balance between drainage and water retention. A mix that drains too quickly can lead to nutrient leaching and dehydration, while one that retains too much water can lead to root rot. The ideal mix typically contains a combination of organic and inorganic materials to provide both aeration and moisture retention.
Examples of Effective Ingredients, How to overwinter begonias like a pro
Several ingredients contribute to an excellent potting mix for begonias. A good starting point is a quality peat-based potting mix, which offers a good balance of water retention and drainage. Adding perlite or vermiculite improves drainage significantly, preventing waterlogging. Adding a small amount of coarse sand or bark chips provides additional aeration and drainage capacity. These materials, in combination, help to create a porous and well-draining environment for the begonia’s roots.
Composted bark or pine bark is another excellent option, providing organic matter and essential nutrients while promoting good drainage.
Importance of Well-Draining Soil
Well-draining soil is critical for begonias to prevent root rot, a common cause of decline during overwintering. When the soil retains excessive moisture, roots are deprived of oxygen, leading to fungal diseases and ultimately, root death. Proper drainage allows for optimal oxygen circulation around the roots, which is crucial for their health and overall plant vigor.
Comparison of Potting Mixes
Different potting mixes can have varying effects on begonia health. Understanding the pros and cons of different mixes is essential for selecting the best option for your begonias.
| Mix Type | Drainage | Water Retention | Nutrients |
|---|---|---|---|
| Standard Peat-Based Mix | Good | Moderate | Low |
| Peat-Based Mix with Perlite | Excellent | Moderate | Low |
| Composted Bark Mix | Excellent | Moderate | Moderate |
| Mix with Vermiculite and Sand | Very Good | Low | Low |
Choosing the right potting mix is an important step in ensuring successful overwintering for your begonias. The table above provides a comparative overview of different mixes, highlighting their drainage, water retention, and nutrient characteristics. By carefully considering these factors, you can select a mix that best supports your begonias’ needs during this crucial period.
Potting and Repotting Begonias
Overwintering begonias successfully often hinges on the right potting and repotting practices. A well-maintained pot, proper soil, and timely repotting can ensure your begonias thrive during the cooler months and bloom beautifully when spring arrives. Proper potting and repotting techniques ensure the roots have the necessary space and nutrients to flourish, preventing rootbound issues that can hinder growth and flowering.Repotting begonias isn’t just about changing containers; it’s about providing the right environment for their root system to continue growing and supporting healthy, vibrant blooms.
Knowing when and how to repot is crucial for successful overwintering.
Potting Begonias for Overwintering
The initial potting process for begonias destined for overwintering sets the stage for their success. Using the right potting mix and container size is key. Ensure the chosen pot provides adequate drainage and allows for proper air circulation. The pot should be neither too large nor too small; a size that comfortably accommodates the root ball without being excessively roomy is ideal.
The right potting mix is essential. It should facilitate good drainage while retaining enough moisture to keep the roots hydrated.
Repotting Begonias During Overwintering
Determining the need for repotting during the overwintering period is essential. Rootbound begonias, those with roots filling the entire pot, require repotting. Signs of rootbound conditions include roots emerging from the drainage holes or the plant appearing stunted despite adequate care. Repotting addresses this issue, allowing the roots to grow further and the plant to continue its cycle.
When and Why Repot
Repotting during overwintering is crucial for maintaining the health and vigor of your begonias. Regular checks for root growth are important. If the roots are circling the root ball or are emerging from the drainage holes, it’s a clear indication that the plant needs a larger pot. A cramped root system limits nutrient absorption, hindering growth and flowering.
Step-by-Step Repotting Guide
- Assessment: Carefully examine the begonia’s root system. Look for signs of rootbound conditions. Gently remove the begonia from its current pot. If the roots are tightly packed and emerge from the drainage holes, repotting is necessary. If roots are healthy and not overly crowded, repotting may not be immediately required.
- Preparation: Gather your supplies: a slightly larger pot (about 2 inches wider in diameter), fresh potting mix specifically designed for begonias, a sharp knife or pruning shears, and a watering can.
- Potting Mix: Fill the new pot about one-third full of fresh potting mix. This layer provides stability and a base for the plant.
- Placement: Carefully place the begonia in the center of the new pot. Fill in around the roots with fresh potting mix, ensuring the top of the root ball is level with the rim of the pot.
- Watering: Gently water the begonia thoroughly to settle the potting mix and eliminate any air pockets. Avoid overwatering. Allow excess water to drain completely.
- Location: Return the begonia to its usual overwintering location, maintaining the appropriate light and temperature conditions.
Importance of Tools and Techniques
Using the correct tools and techniques is crucial for a successful repotting procedure. A sharp knife or pruning shears are essential for carefully separating any tangled roots without damaging them. Using the correct potting mix, specific to begonias, ensures proper drainage and nutrient retention. Proper handling and placement of the plant in the new pot prevent any root disturbance or damage.
Watering Strategies During Overwintering
Keeping your begonias happy during their winter rest is crucial for their health and vibrant return in spring. Proper watering is a key component of this care, ensuring that the roots are not starved or drowned, both of which can be detrimental to the plant. Understanding the nuances of watering during overwintering is essential to successful begonias over the cold season.Watering begonias during the dormant period is less frequent than during their active growing phase.
The frequency and amount of water will depend on factors like the specific begonia variety, the size of the pot, the type of potting mix, and the surrounding environmental conditions. The goal is to maintain consistently moist soil, avoiding both dryness and excessive saturation.
Frequency and Amount of Water
Watering frequency should be adjusted to match the specific needs of the plant. A good rule of thumb is to water when the top inch of soil feels dry to the touch. This method, combined with monitoring soil moisture, helps avoid overwatering and underwatering. The amount of water required will vary depending on the size of the pot and the plant’s size.
A smaller pot will require less water than a larger one.
Recognizing Signs of Overwatering and Underwatering
It’s essential to recognize the signs of both overwatering and underwatering to adjust your watering regime accordingly. These tell-tale signs will help you maintain optimal soil moisture.
Overwatering vs. Underwatering Symptoms
| Symptom | Description | Cause | Solution |
|---|---|---|---|
| Wilting | Leaves droop and become limp. | Overwatering, leading to root rot. In some cases, underwatering in combination with high heat. | Reduce watering frequency and ensure proper drainage. If root rot is suspected, repot with fresh, well-draining mix. |
| Yellowing Leaves | Leaves turn yellow, often starting from the lower part of the plant. | Overwatering, which deprives roots of oxygen, and underwatering, causing nutrient deficiencies. | Adjust watering schedule. Ensure proper drainage. Repot if needed. Use a balanced fertilizer if the yellowing is related to nutrient deficiency. |
| Soggy Soil | The soil remains excessively wet for prolonged periods. | Overwatering. | Reduce watering frequency and ensure proper drainage. Consider a different potting mix. |
| Dry Soil | The soil feels dry and crumbly to the touch. | Underwatering. | Increase watering frequency to bring soil moisture back to the appropriate level. |
| Droopy Leaves (Severe) | Leaves are extremely limp and may have brown spots. | Overwatering or underwatering to a severe degree. | Repot with fresh, well-draining soil. Adjust watering accordingly. Consider the environmental conditions. |
Soil Moisture Monitoring
Monitoring soil moisture is an invaluable tool for maintaining the ideal watering regime. Using a moisture meter is a reliable way to ascertain the exact moisture content of the soil. These tools provide accurate readings, helping you avoid overwatering or underwatering your begonias. If you don’t have a moisture meter, practice your finger test for checking soil moisture.
Keeping your begonias happy through the winter requires a little extra TLC. Think about the potential return on your investment when you’re deciding on home renovations – some bathroom features, like elaborate jacuzzi tubs, might actually decrease your home’s value, according to this helpful guide on bathroom features decreasing home value. Fortunately, overwintering begonias isn’t nearly as complicated; just remember to find a cool, bright spot and reduce watering.
Easy peasy!
Insert your finger a few inches into the soil. If the top inch feels dry, it’s time to water.
Maintaining Healthy Begonias During Overwintering

Keeping your begonias thriving during the winter months requires a slightly different approach than their summer care. Proper ventilation, pest prevention, and consistent monitoring are crucial for maintaining their health and beauty throughout the colder season. Ignoring these aspects can lead to significant issues like fungal diseases and infestations, which can quickly decimate a beautiful collection.Overwintering begonias successfully hinges on replicating the ideal growing conditions, even in the face of lower temperatures and shorter daylight hours.
This involves careful attention to ventilation, pest control, and proper watering. These factors will ensure your begonias remain vibrant and healthy, ready to flourish again in the spring.
Importance of Proper Ventilation
Adequate ventilation is essential for preventing fungal diseases. During the overwintering period, begonias are often kept in a cooler, less humid environment. However, stagnant air can create a breeding ground for pathogens. Ensure your begonias have proper air circulation. Avoid placing them too close together, and consider using a fan to circulate air around the plants, especially in enclosed spaces.
This will help maintain optimal humidity levels and discourage the growth of fungi and bacteria.
Pest and Disease Prevention
Regular inspections are vital for early detection of potential issues. Begonias are susceptible to various pests and diseases, including aphids, spider mites, fungal leaf spots, and root rot. Proactive measures are far more effective than dealing with a full-blown infestation. Early intervention minimizes damage and prevents the spread of the problem to other plants.
Common Pests and Diseases
Aphids are small, sap-sucking insects that can quickly multiply. They leave behind sticky honeydew, which can attract ants and lead to sooty mold. Spider mites are another common pest, creating fine webbing on leaves. Fungal leaf spots appear as dark or yellow spots on the foliage. Root rot, often caused by overwatering, results in mushy roots and wilting.
Knowing the symptoms of each issue allows for swift action and appropriate treatment.
Preventative Measures
Regularly check your begonias for any signs of pests or diseases. Maintain good hygiene by wiping down leaves and removing any affected foliage. Proper watering techniques, as discussed earlier, are crucial in preventing root rot. Introducing beneficial insects like ladybugs or lacewings can help control aphid populations naturally. Providing adequate light and ventilation is key in preventing the spread of fungal issues.
Pest Control Methods
Maintaining healthy begonias involves proactive pest management. A variety of methods exist, each with its own set of advantages and disadvantages.
Overwintering begonias successfully is all about proper care. First, you need to find a cool, bright spot, like a basement or sunroom. Then, to ensure healthy plants, it’s essential to address any pests, such as clover mites, which can wreak havoc on your begonias. Fortunately, getting rid of clover mites is straightforward with a few simple steps.
Check out this helpful guide on get rid of clover mites for a comprehensive approach. Once the mites are gone, your begonias should thrive in their winter dormancy.
| Method | Effectiveness | Side Effects | Safety |
|---|---|---|---|
| Insecticidal Soap | Effective against many soft-bodied pests | Can harm beneficial insects if used indiscriminately | Generally safe for use around plants and pets, if used according to instructions |
| Neem Oil | Effective against various pests, including mites | May cause leaf burn if used improperly | Generally considered safe, but avoid prolonged direct sun exposure after application |
| Biological Control (e.g., ladybugs) | Environmentally friendly and effective in controlling some pests | May take longer to see results compared to chemical methods | Completely safe and eco-friendly |
| Systemic Insecticides | Highly effective, but can harm beneficial insects and other wildlife | Potential for phytotoxicity, if not used carefully | Generally not recommended for home use unless absolutely necessary, due to potential risks |
Proper identification of the pest or disease is crucial before employing any treatment. Consult reliable resources or a local garden center for guidance on the most suitable method for your specific situation.
Troubleshooting Overwintering Issues
Overwintering begonias successfully hinges on understanding and addressing potential problems. Consistent monitoring and proactive measures are crucial for maintaining healthy plants during this crucial period. Ignoring issues can lead to significant setbacks, impacting their health and overall appearance in the following growing season.Troubleshooting involves a careful diagnosis, identifying the root cause of any issues, and implementing the appropriate solutions.
By understanding the common problems and their associated symptoms, you can effectively address them and ensure your begonias thrive through the winter.
Identifying Common Problems
Diagnosing issues with begonias during overwintering requires close observation. Pay attention to changes in leaf color, texture, and overall plant health. Wilting, yellowing, or browning leaves, along with unusual growth patterns, can all signal underlying problems. Regular visual inspections and careful note-taking are vital for timely intervention.
Troubleshooting Guide
This table provides a comprehensive guide to common overwintering problems, their potential causes, observable symptoms, and effective solutions.
| Problem | Cause | Symptoms | Solution |
|---|---|---|---|
| Leaf Drop | Overwatering, underwatering, temperature fluctuations, or inadequate light | Leaves falling off prematurely, with or without yellowing | Adjust watering schedule to match the plant’s needs. Ensure adequate drainage. Maintain consistent temperature and light levels. Consider moving the plant to a location with more or less light, as needed. |
| Yellowing Leaves | Nutrient deficiency, overwatering, underwatering, or improper light | Leaves turning yellow, often starting from the lower leaves. Yellowing can be accompanied by browning or spotting. | Use a balanced liquid fertilizer diluted to half strength every few weeks. Ensure appropriate watering. Adjust light exposure as needed, moving the plant to a location with more or less light. |
| Brown Spots/Edges | Overwatering, underwatering, improper light, or pests | Brown spots or browning leaf edges. Leaves may also show signs of wilting. | Check for pests and address accordingly. Adjust watering schedule. Improve drainage. Ensure adequate light exposure. Consider a fungicide if fungal infection is suspected. |
| Slow Growth/No Growth | Insufficient light, improper temperature, or nutrient deficiency | Slow or stunted growth, lack of new leaves or blooms. | Move the plant to a location with more light, if possible. Maintain consistent temperatures. Provide balanced fertilizer as needed. |
| Root Rot | Overwatering, poor drainage, or improper potting mix | Waterlogged soil, mushy roots, and leaves that turn yellow and droop. | Reduce watering frequency. Ensure proper drainage in the pot. Repot the plant into a well-draining potting mix. |
Diagnosing Overwintering Problems
Regularly inspecting your begonias for signs of stress or disease is key to successful overwintering. Examine the leaves for any unusual discoloration, wilting, or damage. Assess the soil moisture level by gently probing the soil. Observe the plant’s overall vigor and growth pattern. By thoroughly examining your plants, you can identify potential problems early on and implement timely corrective measures.
Preparing Begonias for Spring Growth
Bringing your overwintered begonias back to vibrant life in spring requires careful attention. This involves gradually adjusting their environment to mimic the warmer, brighter days ahead, ensuring a smooth transition and promoting robust new growth. Proper preparation helps your begonias thrive and reward you with beautiful blooms.
Gradually Increasing Light Exposure
Begonias, especially those accustomed to cooler conditions, need a gradual increase in light to avoid shock. Sudden exposure to intense sunlight can cause leaf burn or stress. To avoid this, begin by moving your begonias to a location with bright, indirect light. Over several days or a week, slowly increase the amount of direct sunlight they receive.
This gradual adaptation will prevent leaf damage and encourage robust growth. Monitor your begonias closely for any signs of stress, such as yellowing leaves or wilting, and adjust the light exposure accordingly.
Adjusting Watering as Spring Approaches
As days lengthen and temperatures rise, your begonias’ watering needs will increase. The soil will warm up faster, leading to faster evaporation. Observe the soil moisture regularly. Water thoroughly when the top inch of soil feels dry to the touch. Reduce watering frequency if the weather becomes cooler and cloudier.
Maintaining consistent soil moisture is key to promoting healthy growth. Be mindful of not overwatering, which can lead to root rot. A good rule of thumb is to water less frequently but more deeply during this transition period.
Encouraging New Growth in Spring
Spring is a time of rejuvenation for your begonias. To encourage new growth, consider fertilizing your begonias with a balanced liquid fertilizer. Follow the manufacturer’s instructions for proper dilution and application. This provides essential nutrients to fuel the growth of new leaves and blossoms. Regular feeding during the growing season is important.
Moreover, pruning any dead or damaged foliage will promote a healthier and more vigorous appearance.
Recognizing Dormancy and Responding to It
Begonias may show signs of dormancy in the winter, characterized by reduced growth or a lack of new leaves. Signs can include leaves turning yellow, brown, or displaying spots. If you observe these signs, reduce watering to avoid overwatering during the dormant phase. A reduction in watering is essential to prevent root rot, a common issue when begonias are dormant.
Ensure the soil is well-draining, to prevent excess water from accumulating around the roots.
Conclusion
So there you have it—a complete guide to overwintering begonias like a pro! By following these steps, you’ll not only keep your begonias healthy and happy during the winter months but also prepare them for a spectacular spring bloom. Remember, consistency and attention to detail are key. By providing the ideal environment, you’ll be rewarded with beautiful begonias throughout the year.