


How to install kitchen cabinets sets the stage for a rewarding home improvement project. From meticulous planning to the final touches, this guide provides a detailed roadmap to transform your kitchen. This isn’t just about putting cabinets together; it’s about crafting a functional and beautiful space that reflects your style and needs. We’ll cover everything from accurate measurements to choosing the right materials and tools, making sure you have all the information needed for a smooth and successful installation.
This in-depth guide breaks down the entire process into manageable steps, ensuring you feel confident every step of the way. We’ll explore various cabinet types, installation methods, and troubleshooting common issues, so you’re prepared for anything. Get ready to transform your kitchen into a masterpiece!
Planning & Preparation
Transforming your kitchen into a dream space begins with meticulous planning. Accurate measurements, a detailed layout, and a solid understanding of cabinet types are crucial for a successful installation. This stage sets the foundation for a smooth and efficient project, ensuring everything fits perfectly and avoids costly mistakes.
Kitchen Dimension Measurements
Precise measurements are paramount to avoid costly fitting issues later. Start by carefully measuring the existing space, paying attention to wall angles, structural elements, and any existing obstructions. Use a measuring tape, preferably a retractable one, and ensure it’s in good condition. Record these dimensions accurately, noting any irregularities or variations in the wall. Take multiple measurements at different points to account for potential inconsistencies.
Document the measurements in a notebook or a digital format for easy reference during the design and installation phases. Use a level to ensure accurate vertical and horizontal measurements, especially when measuring for wall cabinets.
Cabinet Layout & Placement
A well-designed layout is key to maximizing space and functionality. Sketch a detailed plan of your kitchen, including the placement of all cabinets, appliances, and other fixtures. Consider the flow of traffic and the placement of countertops. Use graph paper or a digital design tool to create a scale drawing of your kitchen. This visual representation allows you to visualize the arrangement and make necessary adjustments before ordering or purchasing cabinets.
Label each cabinet’s intended location and its dimensions to avoid confusion during installation.
Installing kitchen cabinets can be a daunting task, but with the right approach, it’s totally manageable. One thing to remember is proper preparation—you’ll need to measure meticulously. And while you’re at it, did you know that sometimes you can find unexpected fungi growing in your houseplants? If you’re curious about that, check out this guide on mushroom growing in houseplant.
Once you’ve got your measurements right, you can confidently tackle the installation, making your kitchen look amazing. Remember to use sturdy brackets and screws for a durable installation.
Cabinet Types & Materials
Understanding different cabinet types is essential for optimal kitchen design. Base cabinets support countertops, wall cabinets provide storage above countertops, and island cabinets offer a central workspace and storage. Each type serves a specific function, and their arrangement should complement the overall design and workflow of the kitchen. Choosing the right type for each area is vital for functionality and aesthetics.
Installing kitchen cabinets can be a real project, but a well-organized approach makes it manageable. Think about the space you have and the layout you want before diving in. Knowing how to arrange your new kitchen cabinets will impact the look and functionality. For those looking to maximize space, exploring the best indoor garden systems, like best indoor garden systems , can inspire creative solutions for vertical growing.
Ultimately, the best way to install your kitchen cabinets depends on your specific needs and preferences.
| Material | Pros | Cons | Suitable for |
|---|---|---|---|
| Wood | Natural beauty, durability, customizability | Higher price, susceptible to moisture damage | Traditional, high-end kitchens |
| Laminate | Affordable, durable, resistant to scratches and moisture | Can appear less elegant, limited customization options | Modern, budget-friendly kitchens |
| MDF (Medium-Density Fiberboard) | Affordable, easy to work with, readily available | Can be susceptible to damage if not properly sealed, may not be as durable as solid wood | Budget-conscious kitchens, quick installations |
Essential Tools & Materials
The installation process requires specific tools and materials. A basic toolkit should include a measuring tape, level, pencil, screwdriver, drill, drill bits, safety glasses, work gloves, and a utility knife. For more complex installations, specialized tools like a miter saw and a drill press may be necessary. Materials like wood glue, screws, and hinges are also required.
Acquiring the right tools and materials in advance will minimize potential delays.
Safety Precautions
Safety should be a top priority throughout the installation process. Always wear safety glasses to protect your eyes from flying debris. Use work gloves to protect your hands from cuts and abrasions. Ensure the work area is well-lit and free of clutter to prevent accidents. If working with power tools, follow the manufacturer’s instructions carefully.
Keep children and pets away from the work area. Use caution when working with electrical outlets and water pipes. A safe work environment prevents potential injuries.
Cabinet Installation
Installing kitchen cabinets is a rewarding DIY project, but precision and proper techniques are crucial for a successful outcome. This stage builds upon the solid foundation laid in the planning and preparation phase. Following these steps will ensure your cabinets are securely fastened and aesthetically pleasing.Careful attention to detail and adherence to manufacturer instructions will contribute significantly to a professional-looking installation.
This involves accurately marking locations, using the right tools, and verifying measurements throughout the process. Each step, from attaching the frame to the wall to securing the hardware, plays a vital role in the overall stability and longevity of your cabinets.
Mounting Cabinet Frames to Wall Studs
Correctly mounting cabinet frames to wall studs is paramount for structural integrity. Improper attachment can lead to instability and potential damage over time. Locate the studs using a stud finder. Pre-drill pilot holes in the studs to prevent splitting. Use appropriate screws and anchors, ensuring they are long enough to penetrate the studs completely.
Confirm the screws are firmly embedded in the studs to prevent movement.
Installing Cabinet Doors and Drawers
Installing cabinet doors and drawers requires precision and patience. First, ensure the hinges are correctly positioned on the cabinet box and the doors. Use a level to ensure the doors are hung straight. Adjust the hinges for proper alignment and smooth operation. For drawers, ensure the drawer slides are correctly installed and aligned.
This ensures smooth and effortless opening and closing.
Attaching Cabinet Hardware
Attaching cabinet hardware like hinges, handles, and knobs is a crucial step for a finished look. Choose the right type of hardware to match your aesthetic preferences. Ensure hinges are securely attached to both the cabinet box and the doors. Install handles and knobs according to the manufacturer’s instructions. Pay close attention to alignment for a clean and professional finish.
Cabinet Hinge Types
| Hinge Type | Application | Description |
|---|---|---|
| Overlay Hinge | For cabinets where the door overlaps the cabinet face | Provides a flush look, good for aesthetics |
| Mortise Hinge | For cabinets with a recessed door | Provides a sleek, hidden look, commonly used in high-end cabinetry |
| Concealed Hinge | For a clean, modern look | Hinges are completely hidden from view, providing a smooth, uninterrupted surface |
| Full Overlay Hinge | For doors that extend fully over the cabinet face | Maximizes the visible door surface area |
Proper hinge selection is critical for smooth door operation and a unified cabinet appearance. Different hinge types are suited for specific cabinet designs and aesthetics.
Installing Cabinet Base and Wall Cabinets
Installing base and wall cabinets involves specific procedures. For base cabinets, ensure the cabinets are properly leveled and aligned. Secure them to the floor using appropriate fasteners. Wall cabinets require proper mounting to the wall studs, using appropriate anchors and screws. Consider using a level to ensure precise alignment and avoid issues with unevenness.
Securing Cabinets to Wall or Floor
Securely fastening cabinets to the wall or floor is essential for long-term stability. Use appropriate fasteners that are compatible with the wall material and cabinet construction. For wall cabinets, use wall anchors to ensure secure mounting. For base cabinets, use appropriate floor anchors or screws to fasten them to the subfloor or joists. Check for proper alignment and stability throughout the installation process.
Troubleshooting & Common Issues
Installing kitchen cabinets can be a rewarding experience, but unexpected problems can arise. This section details potential issues and provides solutions to ensure a smooth and successful installation. Knowing how to troubleshoot problems quickly can save you time, frustration, and money.
Potential Installation Problems
Common installation issues often stem from human error or unforeseen circumstances. These include misaligned cabinets, loose screws, and problems with door alignment. Careful planning and meticulous execution are crucial to avoiding these pitfalls.
Uneven Cabinets
Uneven cabinets are a frequent problem, often caused by variations in the subfloor or improper leveling of the cabinets during initial installation.
- Check the subfloor for irregularities. Use shims to level the cabinets. These shims can be small pieces of wood or specialized cabinet shims. Ensure they are appropriately placed and sized to provide support without affecting the overall stability of the cabinets.
- Ensure the cabinet supports are stable and correctly positioned.
Loose Screws
Loose screws can lead to instability and a wobbly cabinet structure.
- Tighten all screws using the appropriate screwdriver. If the screw is stripped, replace it with a new one.
- Check for proper screw length to ensure the screw extends deep enough to properly grip the wood.
Cabinet Doors Not Closing Properly, How to install kitchen cabinets
Problems with cabinet doors not closing properly often originate from misaligned hinges.
- Ensure the cabinet doors are level. Adjusting the hinges can resolve this issue. The hinges can be adjusted by loosening the screws on the hinge and adjusting the hinge position to align the door correctly.
- Check for obstructions. Remove any debris or obstructions that might be preventing the doors from closing completely.
- Inspect the door alignment. Uneven or misaligned doors can be a cause. Ensure the door’s edge aligns with the frame’s edge.
Adjusting Cabinet Hinges
Correcting hinge alignment is a critical step in achieving proper cabinet door operation.
- Locate the hinge screws. Carefully loosen these screws to allow for adjustment.
- Adjust the hinge position to align the door properly. Test the door frequently during the adjustment to ensure correct alignment.
- Tighten the hinge screws once the door is aligned.
Repairing Damaged Cabinet Components
Damage to cabinet components can occur during installation.
- Assess the damage to the cabinet component. Identify the parts requiring repair.
- Repair or replace damaged parts using appropriate tools and materials. Replacement parts can be ordered from the manufacturer or a local supplier.
- Match the replacement parts to the original cabinet components for proper fit and function.
Common Mistakes to Avoid
Common mistakes during cabinet installation can be costly and time-consuming to rectify.
- Failing to check the cabinet’s structural integrity before installation can lead to problems later on. Inspect the cabinets for any damage or defects before proceeding.
- Skipping the preliminary measurements and planning phase can result in costly errors. Accurate measurements are essential for a successful installation.
- Improperly securing cabinets to the wall or subfloor can compromise the structure’s stability. Use appropriate fasteners and follow manufacturer guidelines.
Specific Installation Methods
Kitchen cabinet installation transcends mere assembly; it’s a meticulous process demanding understanding of diverse cabinet types and installation techniques. Careful planning and execution are crucial for a seamless and aesthetically pleasing final product. Each cabinet type, from wall-mounted to island units, requires a unique approach, and considering these variations is key to achieving a robust and functional kitchen.Different installation methods cater to various cabinet designs and the specific requirements of each kitchen layout.
Installing kitchen cabinets can be a daunting task, but it’s totally doable! First, you’ve got to prep the space and measure everything carefully. Knowing what to declutter is just as important as knowing how to install them. For example, spring cleaning often involves getting rid of things minimalists throw out every spring, like old dishware or unused appliances.
This article is a great resource for ideas on what to purge. Then, follow a step-by-step guide for a successful installation, ensuring everything lines up correctly.
Understanding these approaches, from corner installations to those accommodating built-in appliances, ensures a well-integrated and efficient kitchen space.
Wall Cabinet Installation
Wall cabinets, often the most numerous in a kitchen, demand precision and stability. Proper attachment to the wall is paramount to prevent sagging or damage. Use appropriate wall anchors and mounting hardware, matching the cabinet’s weight and the wall’s material. Ensure the cabinets are level and plumb for a neat and visually appealing finish. Consider using adjustable brackets for cabinets that require different heights or varying wall conditions.
For example, wall cabinets above a range require extra support and specific mounting techniques to accommodate the heat and weight.
Base Cabinet Installation
Base cabinets form the foundation of the kitchen’s work area. Their installation needs to consider factors like floor level, plumbing, and electrical outlets. Carefully align the cabinets to ensure a level surface, ensuring that each cabinet sits securely on its supporting structure. Use shims and levelers to adjust for minor floor irregularities. Consider installing base cabinets before upper cabinets to avoid conflicts with plumbing and electrical runs.
Island Cabinet Installation
Island cabinets often feature more complex layouts, requiring careful planning and considerations for their unique needs. Ensure the island is supported by a stable base, whether concrete or a specially constructed platform. Plumbing and electrical considerations are crucial for island cabinets, especially if they include built-in appliances or sinks. The stability and weight-bearing capacity of the island should be carefully calculated and verified before installation.
Corner Cabinet Installation
Corner cabinets present a unique challenge due to the tight angles. Using corner-specific brackets and support systems is essential to ensure proper alignment and stability. Employing corner cabinet doors with adjustable hinges and mechanisms can optimize space utilization. Consider using corner cabinet organizers to maximize the use of the often-limited space within the corner. Ensure that the cabinets fit snugly and are properly supported to prevent future issues.
Cabinets with Built-in Appliances
Installing cabinets with built-in appliances requires careful planning and coordination. Measure and plan the appliance’s dimensions and placement carefully to ensure a seamless fit. Consider the appliance’s weight and power requirements when installing the cabinets. Follow the manufacturer’s instructions for appliance integration and installation. Pre-plan the electrical and plumbing connections to avoid potential problems during the installation.
Cabinets with Unusual Shapes or Sizes
Cabinets with unusual shapes or sizes, such as custom-designed pieces, demand specialized installation techniques. Accurately measure and plan the installation of these cabinets, ensuring they fit perfectly with the existing layout. Use specialized tools and techniques to secure unusual-shaped cabinets to the wall or base. Seek guidance from a professional installer or cabinet manufacturer for assistance in handling custom projects.
Visual Examples of Cabinet Installation Scenarios
| Cabinet Type | Installation Method | Visual Description |
|---|---|---|
| Wall Cabinet | Standard wall mount | A typical wall cabinet secured to the wall using brackets and anchors. The cabinet is level and plumb. |
| Base Cabinet | Floor mount | A base cabinet sitting on a level floor, with appropriate shims and levelers used to ensure even support. |
| Corner Cabinet | Corner bracket mount | A corner cabinet fitted with corner brackets and appropriate support mechanisms. |
| Island Cabinet | Custom base support | An island cabinet supported by a customized platform or concrete base, with considerations for plumbing and electrical runs. |
Tools & Materials: How To Install Kitchen Cabinets
Choosing the right tools and materials is crucial for a successful kitchen cabinet installation. Improper tools can lead to damage, while inadequate materials can compromise the longevity and structural integrity of your cabinets. This section will delve into the specifics, ensuring you have everything you need for a smooth and professional installation.
Essential Tools
A well-equipped toolkit is fundamental to a successful kitchen cabinet installation. Each tool plays a specific role, from precise measurements to secure fastening. A variety of tools, from simple to specialized, will contribute to the overall quality and efficiency of the project.
- Measuring Tools: Accurate measurements are paramount. A combination square, tape measure, level, and marking tools are indispensable for ensuring proper alignment and accurate placement of cabinets. Incorrect measurements can lead to significant issues later on, necessitating costly adjustments or replacements. A good example is ensuring a level countertop by checking multiple points for accuracy. The accuracy of measurements determines the overall quality of the project.
- Cutting Tools: Precise cuts are essential for ensuring cabinets fit snugly and seamlessly. A reciprocating saw, jigsaw, and a handsaw are critical for trimming materials to the exact specifications. These tools are crucial for making sure cabinets are installed properly, and they must be used with care to avoid damaging the cabinets or other parts of the kitchen.
- Fastening Tools: Driving screws and securing fasteners require specialized tools. A drill, screwdriver, and impact driver are crucial for efficiently installing cabinets and accessories. A cordless drill is convenient for various locations, while a screwdriver is necessary for precise screw tightening. The use of appropriate fastening tools is critical to the stability and durability of the cabinet installation.
- Other Necessary Tools: Additional tools like clamps, a utility knife, and a pencil are valuable aids in various aspects of the project. Clamps hold components securely while working, preventing misalignment. A utility knife is used for precise cuts on smaller components. A pencil is used for marking measurements.
Materials
Selecting the right materials ensures the longevity and aesthetics of your kitchen cabinets. Careful consideration of the type of wood, finish, and fasteners is essential.
- Cabinet Components: Cabinets are typically made from wood, plywood, or particleboard. Wood is preferred for its durability and aesthetic appeal. Plywood and particleboard are more affordable and are often used as backing for the cabinets.
- Fasteners: Appropriate screws, nails, and hinges are critical for securely fastening cabinets together. Choosing the right fasteners ensures stability and longevity of the cabinet installation. Examples include wood screws, drywall anchors, and hinges. Consider the type of wood when choosing fasteners.
- Adhesives: Appropriate adhesives are critical for securing various components. Construction adhesive is useful for attaching plywood or other materials. These adhesives should be selected based on the type of materials to be joined.
Measurements and Quantities
Accurate measurements and quantities are crucial for preventing waste and ensuring a successful installation.
- Detailed Measurements: Carefully measure the space where the cabinets will be installed to determine the exact dimensions of each cabinet. This includes checking for any obstacles in the space that might affect the dimensions of the cabinets. Ensure the measurements of each cabinet are recorded for reference during the installation process.
- Material Quantities: Calculate the necessary quantities of wood, plywood, or other materials needed for the project. Factor in waste, ensuring that you have enough material to complete the installation without running short.
Tools and Materials List
| Tool | Description | Quantity |
|---|---|---|
| Tape Measure | For precise measurements | 1 |
| Level | Ensures flat surfaces | 1 |
| Drill | For driving screws | 1 |
| Screwdriver | For tightening screws | 1 |
| Jigsaw | For precise cuts | 1 |
| Wood Screws | For fastening cabinets | (Variable, based on cabinet type) |
| Hinges | For attaching cabinet doors | (Variable, based on cabinet type) |
Fasteners
The correct fasteners are essential for a sturdy and long-lasting installation.
- Wood Screws: Wood screws are suitable for joining wood to wood. The type and length of wood screws depend on the thickness of the materials being joined.
- Drywall Anchors: Drywall anchors are suitable for fastening to drywall or other similar materials. These are used when installing cabinets in a wall cavity or similar.
- Hinges: Hinges are used to attach cabinet doors to the cabinet frames. The type of hinge depends on the cabinet design and the type of door.
Screw Length
Using the correct screw length is vital for structural integrity. Using screws that are too short may not adequately secure the cabinets, while using screws that are too long may damage the cabinets or penetrate through the material.
Choosing the correct screw length is crucial for stability and durability.
Visual Aids & Examples

Kitchen cabinet installation can seem daunting, but visualizing the process and understanding the steps involved can make it significantly easier. Clear visual aids, such as diagrams and images, are crucial for grasping the intricacies of cabinet installation and avoiding costly mistakes. This section provides detailed illustrations and examples to help you navigate each stage effectively.Visual aids are indispensable in the kitchen cabinet installation process.
They provide a clear and concise representation of each step, making it easier to understand the procedures and identify potential issues. By using diagrams, images, and examples, you can avoid common mistakes, improve accuracy, and ultimately ensure a successful installation.
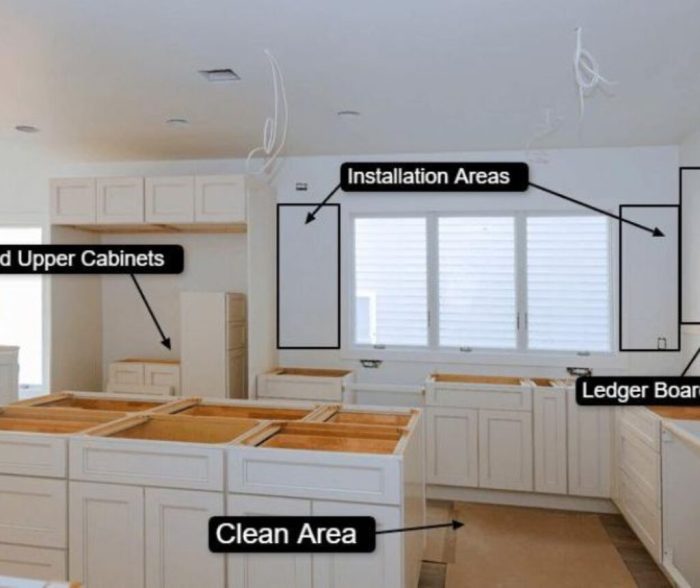
Cabinet Layout Diagram
Understanding the layout of your kitchen cabinets is fundamental to a smooth installation. A well-planned layout considers the functionality and aesthetics of the space. This diagram showcases different cabinet types and placements, illustrating how they work together to create an efficient and attractive kitchen.  The diagram depicts various cabinet types (base cabinets, wall cabinets, corner cabinets, and pantry cabinets) arranged to maximize space and functionality. Note the placement of drawers, shelves, and other components within each cabinet. Proper spacing is critical for easy access and movement.
Component Installation Illustrations
Visualizing the installation of individual cabinet components, such as hinges, drawer slides, and shelves, is crucial. The following illustrations provide detailed steps for correctly installing these components, ensuring a sturdy and functional cabinet. The illustration demonstrates how to attach hinges to the cabinet door. This step requires precise alignment to ensure proper functionality. Detailed instructions and measurements are provided to prevent common errors, such as improper hinge placement. Another illustration shows the correct way to install drawer slides, emphasizing the importance of following the manufacturer’s instructions for the specific type of drawer slide being used.
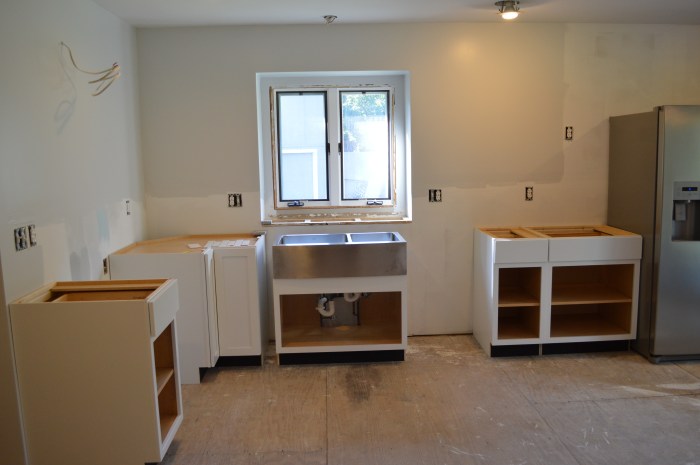
Step-by-Step Installation Images
Visual guides are essential to follow each step correctly. The following images demonstrate the various steps involved in installing cabinets, from preparation to final assembly. Accurate sequence is crucial for a professional installation. The images progressively show the steps involved in attaching the cabinet boxes to the wall, ensuring the correct level and spacing. They highlight the importance of using shims and leveling tools to achieve precise alignment. Another image demonstrates the installation of the cabinet doors and drawers. Each step is meticulously illustrated to ensure the installation aligns with the manufacturer’s specifications.
Troubleshooting & Repair Images
Recognizing and resolving issues promptly is vital. The following images illustrate common installation problems and their solutions, helping you diagnose and correct issues quickly. The images demonstrate how to identify and fix issues such as cabinet gaps, misaligned doors, and wobbly drawers. They highlight the use of appropriate tools and techniques for repair. This section shows the importance of accurate measurements and proper installation procedures to prevent these problems.
Safety Equipment Importance
Proper safety equipment is essential for preventing injuries during installation. The following points highlight the importance of using safety equipment.
- Safety Glasses: Protect your eyes from flying debris or harmful materials. Always wear safety glasses during drilling, sawing, or handling sharp objects. Examples of scenarios where safety glasses are crucial are when working with power tools, hammering, or using any tools that generate flying debris.
- Gloves: Protect your hands from cuts, scrapes, and abrasions. Using work gloves during installation is critical for handling wood, screws, and other materials. Examples include handling rough wood pieces or when working with nails and screws.
- Hearing Protection: Protect your hearing from loud noises. If the work involves power tools or other noisy equipment, use earplugs or earmuffs to prevent hearing damage. Examples include working with drills, saws, or other high-noise tools.
Proper safety equipment is crucial for maintaining a safe working environment and preventing accidents. By following safety guidelines and using appropriate gear, you can minimize the risk of injury during the installation process.
Conclusion
Congratulations! You’ve reached the end of our comprehensive guide on how to install kitchen cabinets. Hopefully, you’ve gained a wealth of knowledge and practical insights to tackle your project with confidence. Remember, meticulous planning and a methodical approach are key to success. This guide has provided a framework for your project, empowering you with the knowledge to make informed decisions and tackle any challenges that may arise.
Now go forth and create the kitchen of your dreams!