


How to grow and care for bigleaf hydrangeas sets the stage for this enthralling narrative, offering readers a glimpse into the beauty and complexity of these stunning flowers. We’ll explore everything from selecting the perfect cultivar to mastering the art of pruning and winter protection, ensuring you have the knowledge to cultivate vibrant, healthy bigleaf hydrangeas in your garden.
Get ready to embark on a journey to unlock the secrets of these captivating plants.
This comprehensive guide delves into the intricacies of bigleaf hydrangea cultivation, covering everything from their sunlight and soil requirements to optimal planting and watering techniques. Discover the secrets to thriving bigleaf hydrangeas, ensuring their beauty flourishes in your garden year after year.
Introduction to Bigleaf Hydrangeas

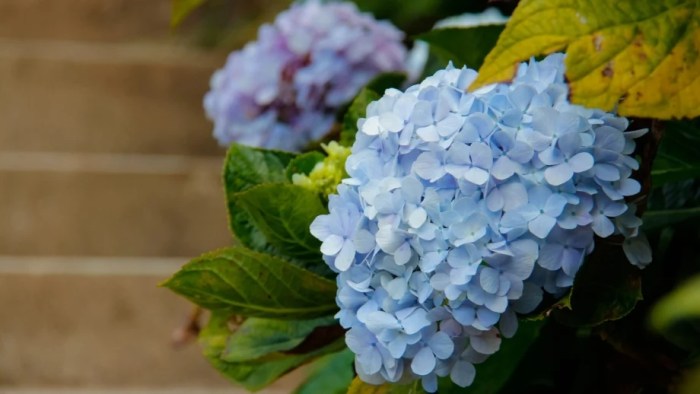
Bigleaf hydrangeas (Hydrangea macrophylla) are beloved for their stunning, showy flower clusters. These popular flowering shrubs are known for their vibrant colors, ranging from delicate pastels to bold jewel tones. They come in a wide variety of cultivars, each with unique characteristics, making them a versatile choice for gardens in various locations. These hydrangeas thrive in specific growing zones and require particular care for optimal growth.Bigleaf hydrangeas typically range in size from 3 to 8 feet tall and wide, depending on the cultivar.
Their growth habit can be either mounding or upright, adding to their aesthetic appeal. They are a popular choice for both home gardens and commercial landscaping due to their ease of maintenance and visual impact.
Cultivar Variations
Bigleaf hydrangeas boast a spectacular array of cultivars, each with its own distinct visual characteristics. Differences in flower color, size, and leaf shapes create a diverse palette for gardeners to choose from. Some cultivars feature clusters of large, dense blooms, while others display smaller, more delicate flower heads. Leaf shapes and sizes can also vary significantly, contributing to the overall aesthetic appeal.
Symbolism and Cultural Significance
Bigleaf hydrangeas, like many flowering plants, have associated cultural meanings. While not as prominent as some other flowers, their beauty and versatility are often associated with sentiments of grace, elegance, and appreciation for nature’s artistry. These blooms can add a touch of sophistication to any garden or floral arrangement.
Cultivar Comparison
| Cultivar | Flower Color | Mature Size (ft) | Sun/Shade Requirements |
|---|---|---|---|
| ‘Endless Summer’ | Pink, Blue, White | 4-6 | Part Shade |
| ‘Forever & Ever’ | Pink, Blue, White | 3-5 | Part Shade |
| ‘Nikko Blue’ | Blue | 4-6 | Part Shade |
| ‘PeeGee’ | Pink | 3-5 | Full Sun to Part Shade |
| ‘Grandiflora’ | Pink, White, Red | 4-8 | Part Shade |
This table provides a quick overview of different bigleaf hydrangea cultivars, highlighting their flower color, mature size, and light requirements. This information is crucial for selecting the right cultivar for your specific garden space and desired aesthetic. Choosing a suitable cultivar will ensure the plant thrives and adds beauty to your garden.
Sunlight and Soil Requirements
Bigleaf hydrangeas, with their stunning blooms, are relatively easy to care for once you understand their needs. Knowing their preferred sunlight and soil conditions is crucial for healthy growth and vibrant displays. This section dives into the specifics, from light preferences to soil pH adjustments, ensuring your hydrangeas thrive in your garden.Optimal sunlight conditions are vital for bigleaf hydrangeas to flourish.
These magnificent plants appreciate a balance of light and shade, influencing not only their growth but also their spectacular blooms.
Sunlight Preferences
Bigleaf hydrangeas generally thrive in partial shade. This means they benefit from a few hours of direct sunlight each day, typically morning sun, followed by dappled shade for the rest of the day. Full sun, while not impossible, can lead to scorched leaves and diminished bloom production. Conversely, full shade can result in weak growth and fewer flowers.
The ideal situation is a spot that receives filtered sunlight, avoiding the intense midday sun. Experimentation with different locations in your garden can help you determine the ideal spot for your hydrangeas.
Soil pH Requirements
The acidity or alkalinity of the soil, measured by pH, significantly impacts the color of bigleaf hydrangea blossoms. A lower pH (more acidic) soil favors the production of blue flowers, while a higher pH (more alkaline) soil often results in pink or purple blossoms. The ideal pH range for bigleaf hydrangeas is 6.0 to 6.5.
Soil pH Testing and Amendment
Determining your soil’s pH is essential for successful hydrangea cultivation. A simple soil test kit can be purchased at most garden centers or home improvement stores. These kits usually involve mixing a soil sample with a solution and comparing the resulting color to a chart to determine the pH level.Once you’ve determined your soil’s pH, you can amend it to achieve the optimal range for your hydrangeas.
If the pH is too high (alkaline), adding sulfur or aluminum sulfate can help lower it. Conversely, if the pH is too low (acidic), adding lime can help raise it. It’s crucial to follow the instructions on the amendment product carefully to avoid over-adjusting the soil pH.
Soil Type Suitability
Different soil types have varying suitability for bigleaf hydrangeas. The table below provides a guide, outlining common soil types, their suitability for hydrangeas, and suggested amendments. Remember that these are general guidelines; specific needs may vary based on your microclimate and soil conditions.
| Soil Type | Suitability for Bigleaf Hydrangeas | Soil Amendment Suggestions |
|---|---|---|
| Sandy Soil | Generally less suitable due to poor water retention. | Add compost, peat moss, or other organic matter to improve water retention and nutrient content. |
| Clay Soil | Can be challenging due to poor drainage. | Add organic matter like compost or peat moss to improve drainage and aeration. Consider incorporating perlite or vermiculite for added drainage. |
| Loamy Soil | Generally ideal for hydrangeas. | Amend with compost or other organic matter to enhance nutrient content and structure, if needed. |
Planting and Establishing Bigleaf Hydrangeas
Bigleaf hydrangeas, with their stunning blooms and vibrant foliage, are a popular choice for gardeners. Successful establishment depends heavily on the correct planting procedures, aligning with the plant’s needs and your local growing conditions. Proper planting techniques ensure healthy growth and abundant blooms in the years to come.Planting bigleaf hydrangeas at the right time and in the optimal conditions is crucial for their survival and development.
The following sections will provide detailed guidance on these essential aspects.
Ideal Planting Time
The best time to plant bigleaf hydrangeas is during the dormant season, typically in the fall, after the last frost of the year, or in the spring, before new growth begins. Fall planting allows the roots to establish before the hot summer months arrive, while spring planting gives the roots time to acclimate to their new environment before the growing season peaks.
In regions with extremely hot summers, fall planting is often the preferred choice. For example, in zones 7-9, the fall planting window offers the most favorable conditions, allowing the roots to develop and the plants to adapt before the summer heat. This strategy reduces the risk of transplant shock and promotes a strong start for the hydrangea.
Planting Depth and Spacing
Proper planting depth and spacing are essential for the healthy growth of bigleaf hydrangeas. The crown of the plant, the point where the stem meets the roots, should be at or slightly above the surrounding soil level. Planting too deep can lead to root rot or prevent the plant from thriving. Spacing guidelines depend on the size of the mature plant, with 3-5 feet recommended between plants, providing adequate room for the root systems to spread and for air circulation.
Overcrowding can lead to competition for resources, affecting the overall health and blooming potential of the hydrangeas.
Watering Techniques for New Plants
Consistent and appropriate watering is crucial for newly planted bigleaf hydrangeas to establish a strong root system. Newly planted hydrangeas require more frequent watering than established ones. Water deeply and thoroughly, ensuring the water reaches the root zone. Avoid shallow watering, as this can lead to a shallow root system, making the plant more susceptible to drought stress.
For the first few weeks, water deeply 2-3 times a week, adjusting based on rainfall and the specific soil conditions. As the plants grow and develop, the frequency of watering can be reduced.
Step-by-Step Planting Procedure
This section details the process for planting a bigleaf hydrangea, with illustrative details.
Bigleaf hydrangeas are stunning, but they need the right conditions to thrive. Plenty of sun, well-drained soil, and consistent watering are key. To really enhance your outdoor entertainment space, consider investing in some top-notch outdoor movie screens. Best outdoor movie screens can transform your backyard into a cinema, perfect for those warm summer evenings while you keep your hydrangeas happy and healthy.
Once you have the perfect viewing setup, you can fully appreciate the beauty of your blooming hydrangeas even more!
- Site Preparation: Choose a location that receives the appropriate amount of sunlight and has well-drained soil. Amend the soil with compost or other organic matter to improve drainage and nutrient content.
- Digging the Hole: Dig a hole that is twice as wide as the root ball and just as deep. This allows for the roots to spread easily and for the plant to settle properly.
- Placing the Plant: Carefully remove the plant from its container and gently loosen any circling roots. Position the plant in the hole, ensuring the crown is at or slightly above the surrounding soil level.
- Backfilling: Fill the hole with soil, gently firming it around the roots. Water thoroughly after backfilling to settle the soil and remove any air pockets.
- Mulching: Apply a layer of mulch around the base of the plant to retain moisture, suppress weeds, and regulate soil temperature. A 2-4 inch layer is typically sufficient.
- Watering: Water deeply and thoroughly after mulching to ensure proper hydration.
Watering and Fertilizing
Bigleaf hydrangeas, with their stunning blooms, require consistent care to thrive. Proper watering and fertilization are crucial elements in ensuring healthy growth and vibrant flowers. Ignoring these aspects can lead to stunted growth, poor flowering, and even disease susceptibility. This section delves into the specifics of these vital tasks, providing practical guidance for successful bigleaf hydrangea cultivation.
Consistent Watering
Proper watering is paramount for bigleaf hydrangeas, especially during dry spells. These plants prefer consistently moist soil, but not waterlogged. Overwatering can be just as detrimental as underwatering. The key is to maintain a balance, ensuring the soil remains damp but not saturated.
- Watering Methods: Various methods are available for watering bigleaf hydrangeas. A soaker hose is highly effective, as it delivers water directly to the roots, minimizing water loss through evaporation. Alternatively, a watering can with a gentle stream can be used to water the soil directly around the base of the plant. Avoid overhead watering, as it can lead to leaf diseases.
- Watering Frequency: The frequency of watering depends heavily on the weather conditions and the maturity of the plant. Young plants, especially those recently transplanted, need more frequent watering than established plants. During periods of intense heat and drought, watering may need to be increased to several times a week. Observe the soil moisture; if it feels dry a few inches below the surface, it’s time to water.
Bigleaf hydrangeas are stunning, but they need consistent care. Proper watering and sunlight are key. Plus, if you’re looking to protect your investment, choosing the right hot tub cover, like the ones featured on best hot tub covers , is crucial for maintaining its quality and extending its lifespan. Ultimately, beautiful hydrangeas require a little TLC and the right equipment for a beautiful garden.
Fertilizing Practices
Fertilizers provide essential nutrients to support healthy growth and abundant blooms. Choose a balanced fertilizer specifically formulated for flowering plants. Avoid using fertilizers high in nitrogen, as this can promote foliage growth at the expense of flowers.
- Choosing the Right Fertilizer: Look for a fertilizer with a balanced NPK ratio (Nitrogen, Phosphorus, Potassium). A ratio like 10-10-10 is suitable for most flowering plants. Organic fertilizers, such as compost tea or well-rotted manure, are also excellent choices for bigleaf hydrangeas, as they provide a slow-release of nutrients and enrich the soil. Liquid fertilizers are often convenient for application and can be watered directly into the soil.
- Application Techniques: Apply fertilizer to the soil around the base of the plant, avoiding contact with the stems or leaves. Follow the manufacturer’s instructions carefully for the appropriate application rate. For granular fertilizers, mix them thoroughly with the soil around the base. For liquid fertilizers, dilute them according to the instructions and water the solution directly into the soil.
Avoiding Over-Fertilization
Over-fertilization can harm bigleaf hydrangeas. Excess nutrients can lead to leaf burn, stunted growth, and even plant decline. A well-balanced and appropriate fertilization schedule is critical for preventing these issues. A slow-release fertilizer can reduce the risk of over-fertilization.
- Recognizing the Signs: Signs of over-fertilization include yellowing or browning of leaves, leaf drop, and stunted growth. If you notice these symptoms, stop fertilizing immediately and water the plant thoroughly to flush out the excess nutrients.
- Implementing a Schedule: Develop a consistent fertilization schedule. A light application every few weeks or months, depending on the fertilizer type and plant’s needs, is generally sufficient. Monitor your plant’s growth and adjust the schedule as needed. A soil test can help determine the specific nutrient needs of your soil and plant, providing personalized guidance for fertilization.
Watering Schedule
The following table provides a general guideline for watering bigleaf hydrangeas, but adjust as needed based on your specific climate and plant conditions.
| Weather Conditions | Plant Maturity (Young/Established) | Watering Frequency |
|---|---|---|
| Dry, hot weather | Young | 2-3 times per week |
| Dry, hot weather | Established | 1-2 times per week |
| Mild, humid weather | Young | 1-2 times per week |
| Mild, humid weather | Established | Every 7-10 days |
| Rainy weather | Young/Established | As needed, or avoid watering if rain is expected |
Pruning and Shaping
Bigleaf hydrangeas, with their stunning blooms, require regular pruning to maintain their shape, encourage healthy growth, and ensure abundant flowering year after year. Proper pruning techniques are essential for achieving the desired aesthetic and maximizing the plant’s potential. This process, when done correctly, can transform a somewhat unruly shrub into a well-formed, flowering masterpiece.Pruning is a vital part of hydrangea care.
It helps to remove dead or damaged wood, promote new growth, and encourage a balanced and attractive shape. By understanding the different pruning techniques and timing, you can guide your hydrangea’s development and maintain its beauty for years to come.
Best Time to Prune
Bigleaf hydrangeas are best pruned in late winter or early spring, before new growth begins. This allows the plant to focus its energy on developing healthy new stems and blooms rather than on healing from pruning cuts. Pruning during this period minimizes stress on the plant and maximizes the effectiveness of the pruning process. Avoid pruning during periods of extreme cold or frost, as this can further stress the plant.
Pruning Techniques
Different pruning techniques serve specific purposes, from removing deadwood to shaping the plant and promoting new blooms.
- Deadheading: This technique involves removing spent flower heads. This encourages the plant to produce more flowers and prevents the plant from expending energy on seed production. Removing spent blooms, by cutting them just above a node, promotes continuous flowering throughout the growing season.
- Shaping: Shaping involves adjusting the overall structure of the plant. This technique involves removing crossing or rubbing branches, to allow for better air circulation and light penetration. This promotes a more balanced and aesthetically pleasing shape for the plant. It can involve removing entire stems or shortening longer branches to maintain a desired form.
- Promoting New Growth: This technique focuses on stimulating the growth of new stems and blooms. It often involves pruning older stems back to the point where new growth is emerging. This allows for more vigorous new growth and ensures that the plant is well-balanced and not weighed down by older, less productive stems. By removing older stems, the hydrangea focuses its energy on new growth, leading to fuller and more vibrant blooms.
Pruning Tools
Using the right pruning tools is crucial for ensuring clean cuts and preventing the spread of diseases.
- Hand pruners: These are ideal for smaller cuts, such as deadheading and removing small branches. Sharp hand pruners prevent tearing and minimize the risk of damage to the plant.
- Loppers: Loppers are necessary for branches that are too thick for hand pruners. They allow you to cut through thicker branches and maintain clean cuts.
- Pruning shears: These are useful for larger cuts and shaping. They are also essential for removing stems that are interfering with the overall structure.
Pruning Procedure
This step-by-step procedure details the pruning process for bigleaf hydrangeas.
| Step | Action | Illustration Description |
|---|---|---|
| 1 | Assess the plant. Carefully examine the hydrangea, noting any dead, diseased, or damaged branches. Look for crossing or rubbing branches. Identify stems that need to be removed to maintain the plant’s shape. | Imagine a picture showing a hydrangea bush with a few branches that need to be removed. The focus should be on the overall shape of the plant and identifying branches that should be trimmed. |
| 2 | Gather your tools. Ensure your hand pruners, loppers, and pruning shears are sharp and ready for use. | Imagine a picture showcasing the various pruning tools, such as hand pruners, loppers, and pruning shears, arranged together, ready to be used. |
| 3 | Remove dead or diseased branches. Cut these branches back to the point where they emerge from healthy wood. | Imagine a picture depicting a dead branch being cut back to a healthy stem. |
| 4 | Prune crossing or rubbing branches. Cut back any branches that are rubbing or crossing each other to prevent damage and promote airflow. | Imagine a picture illustrating two branches rubbing against each other, and one being cut to eliminate the rubbing. |
| 5 | Shape the plant. Remove or shorten branches to maintain the desired shape. | Imagine a picture showing a hydrangea bush before and after pruning, highlighting the transformation in shape. |
| 6 | Clean up. Dispose of the pruned branches properly. | Imagine a picture of the pruned branches being gathered together and disposed of properly. |
Pest and Disease Management
Bigleaf hydrangeas, with their stunning blooms, are susceptible to various pests and diseases. Understanding these threats and implementing effective preventative and remedial measures is crucial for maintaining healthy, vibrant plants. This section details common problems, their symptoms, and practical solutions to ensure your hydrangeas thrive.
Identifying Common Pests, How to grow and care for bigleaf hydrangea
Bigleaf hydrangeas can be plagued by a range of insects. Recognizing the telltale signs of infestation is essential for timely intervention. Early detection often translates to easier and more effective treatment.
Bigleaf hydrangeas love well-drained soil and consistent moisture. To keep them happy, you’ll want to amend your soil with compost, and for tackling pesky weeds around the base, consider whether using vinegar as a weed killer is truly effective, as discussed in this helpful article on does vinegar actually kill weeds. Ultimately, regular watering and appropriate soil conditions are key to healthy hydrangea growth.
- Aphids: These tiny sap-sucking insects often appear in clusters on new growth and leaves. They cause distortion and yellowing of leaves. Infestations can also lead to honeydew, a sticky substance that attracts sooty mold.
- Spider mites: These tiny pests create a fine webbing on the undersides of leaves, particularly in dry conditions. Leaves affected by spider mites may turn yellow or bronze and eventually drop.
- Scale insects: These insects are typically small, hard-shelled pests that suck the sap from the plant. They can appear as small bumps or spots on the stems and leaves, leading to stunted growth and discoloration.
- Leafhoppers: These insects feed on the sap of leaves, leading to stippling and distortion of leaves. They also excrete honeydew.
Identifying Common Diseases
Bigleaf hydrangeas are also vulnerable to fungal and bacterial diseases. Proper identification is key to effective treatment.
- Powdery mildew: This fungal disease manifests as a white, powdery coating on leaves, stems, and buds. It often appears in humid conditions and can severely weaken the plant.
- Leaf spot diseases: These fungal diseases cause various patterns of spots on leaves, ranging from small, dark spots to larger, irregular lesions. Affected leaves may turn yellow, brown, or die.
- Bacterial leaf spot: Bacterial leaf spot is another disease affecting hydrangeas. It causes dark spots on the leaves, which often develop into lesions that enlarge and may lead to leaf drop.
- Root rot: Root rot, often caused by overwatering or poor drainage, affects the roots of the hydrangea. Affected plants may exhibit wilting, yellowing leaves, and eventually die.
Controlling Pests and Diseases
Effective pest and disease management involves a combination of preventative measures and targeted treatments.
- Cultural Control: Maintaining proper watering practices, adequate spacing, and good air circulation can significantly reduce the likelihood of pests and diseases. Ensure the soil drains well to prevent root rot.
- Organic Control: Several organic methods are available. Neem oil, insecticidal soap, and beneficial insects like ladybugs can help control pests. Baking soda solutions can be effective against powdery mildew.
- Chemical Control: If organic methods prove insufficient, targeted chemical treatments may be necessary. Always follow the instructions carefully and consider the potential impact on beneficial insects and the environment. Read the label thoroughly before using any chemical pesticide.
Prevention Through Proper Care
Proactive care is essential for preventing pest and disease issues.
- Regular Inspection: Regularly inspect your plants for signs of pests or diseases. Early detection allows for timely intervention.
- Sanitation: Remove and destroy any affected plant parts promptly to prevent the spread of diseases.
- Proper Watering: Avoid overwatering, which can lead to root rot. Water deeply but less frequently, allowing the soil to dry out between waterings.
- Good Soil Drainage: Ensure the soil drains well to prevent waterlogging and subsequent root rot. Amend heavy clay soil with organic matter to improve drainage.
Potential Pests and Diseases and Control Methods
| Pest/Disease | Symptoms | Control Methods (Organic/Chemical) |
|---|---|---|
| Aphids | Clusters on new growth, yellowing leaves, honeydew | Insecticidal soap (organic), neem oil (organic), horticultural oil, ladybugs (biological) |
| Spider mites | Fine webbing on undersides of leaves, yellowing/bronze leaves | Insecticidal soap (organic), horticultural oil (organic), miticides (chemical) |
| Powdery mildew | White powdery coating on leaves, stems, buds | Baking soda spray (organic), neem oil (organic), fungicides (chemical) |
| Leaf spot diseases | Spots on leaves, yellowing, browning | Fungicides (chemical), copper fungicides (organic), improve air circulation |
Propagation
Bigleaf hydrangeas, with their stunning blooms and vibrant foliage, are often sought-after additions to gardens. However, growing them from seed can be challenging and time-consuming. Fortunately, various propagation methods offer a quicker and more reliable way to increase your hydrangea collection. These methods allow you to create new plants from existing ones, ensuring you get the exact variety you desire.Propagation is the process of creating new plants from existing ones.
It’s a vital technique for gardeners who want to expand their collection of bigleaf hydrangeas. This process allows you to replicate desirable characteristics and avoid the unpredictable nature of seed propagation. Different methods offer varying levels of success and complexity.
Cuttings
This method involves taking a stem cutting from a healthy plant and encouraging it to root. It’s a relatively straightforward technique for experienced and novice gardeners alike.
- Selecting the Right Cutting: Choose a healthy, vigorous stem from the current year’s growth. Avoid stems that are too woody or overly soft. The ideal stem should be about 4-6 inches long and have several nodes (the points where leaves attach).
- Preparing the Cutting: Remove the lower leaves from the stem, leaving only a few leaves at the top. This reduces water loss and promotes rooting. Dip the cut end in rooting hormone to stimulate root development.
- Planting the Cutting: Plant the cutting in a well-draining rooting medium, such as a mixture of peat moss and perlite. Ensure the cutting is planted at a slight angle to maximize contact with the medium. Cover the pot with a plastic bag to maintain humidity.
- Maintaining the Cutting: Keep the rooting medium consistently moist, but not waterlogged. Provide indirect sunlight and a warm environment (ideally 70-75°F). Regularly check the cutting for signs of root development.
Layering
Layering is a propagation method that involves encouraging roots to form on a stem while it’s still attached to the parent plant. This method is gentler on the plant and often leads to successful propagation.
- Choosing the Right Branch: Select a healthy, flexible stem that’s not too thick or too thin.
- Making a Cut: Carefully make a shallow cut along the stem, exposing the cambium layer. This is the layer responsible for producing new cells and aiding in root formation.
- Covering the Cut: Cover the cut with moist rooting medium or sphagnum moss. Secure the medium around the stem with twine or clips.
- Maintaining the Moisture: Ensure the medium stays moist. Water it regularly, especially during dry periods.
- Root Development: Once roots develop (often after a few weeks to a few months), carefully separate the rooted stem from the parent plant and plant it in its own container.
Division
Division is a common method for propagating established bigleaf hydrangeas. It involves separating the plant into smaller sections, each containing roots and shoots. This method is particularly effective for hydrangeas that have become crowded or are no longer producing blooms to their potential.
- Preparing the Plant: Dig up the plant carefully, taking care not to damage the root system.
- Dividing the Roots: Gently separate the root ball into smaller sections, ensuring each division has a healthy root system and several shoots.
- Replanting: Replant each division in a prepared hole, ensuring the root ball is at the same level as it was before division. Water thoroughly and mulch around the base.
Comparison of Methods
| Method | Success Rate | Ease of Implementation | Time to Propagation |
|---|---|---|---|
| Cuttings | High, with proper technique | Moderate | 6-8 weeks |
| Layering | High, especially with flexible stems | Moderate | 6-12 weeks |
| Division | Very High | Easy | Immediate |
Generally, division is the most straightforward and reliable method. It often yields high success rates and is an excellent choice for propagating established plants. Cuttings and layering require a bit more attention and time but also provide a good return on investment.
Winter Protection

Bigleaf hydrangeas, with their stunning blooms, are a beautiful addition to any garden. However, these magnificent plants are susceptible to damage from freezing temperatures. Protecting them during the winter months is crucial for their health and longevity, especially in colder climates. Proper winter protection ensures that your hydrangeas emerge from winter in peak condition, ready to burst with spring blooms.Winter protection strategies are essential to ensure the survival and health of bigleaf hydrangeas in regions with harsh winters.
These methods shield the vulnerable parts of the plant from extreme cold, frost, and snow damage, which can lead to significant setbacks in growth and flowering the following season. Proper protection also helps maintain the overall structure of the plant, preventing damage that could compromise its ability to thrive.
Protecting Bigleaf Hydrangeas from Frost and Extreme Cold
Protecting bigleaf hydrangeas from frost and extreme cold involves several crucial steps. Early fall preparation plays a significant role in winter resilience. Healthy plants are better equipped to withstand the rigors of winter. This includes proper watering, fertilizing, and pruning to promote strong growth and root development.
Materials for Winter Protection
A variety of materials can be used to shield bigleaf hydrangeas from the elements. The selection of materials depends on the severity of the winter climate and the size of the plant.
- Mulch: A layer of mulch, such as shredded bark or straw, acts as an insulator, preventing the ground temperature from dropping too low around the roots. This helps protect the roots from frost heaving and damage. A 2-4 inch layer is generally sufficient.
- Burlap or Frost Cloth: These materials can be draped over the entire plant to provide a protective barrier against freezing temperatures. This is especially helpful for younger or more vulnerable plants.
- Wooden or Plastic Shelters: For larger plants, a simple wooden frame or plastic cover can provide comprehensive protection. This can be especially useful in areas with high winds or heavy snow.
- Tree Guards: Protecting the lower stems and trunk of the plant from direct contact with the ground helps prevent frost penetration. These guards can be made of cardboard, plastic, or other materials.
Comparing Winter Protection Methods
The effectiveness of different winter protection methods can vary depending on the specific conditions. The table below summarizes the pros and cons of various approaches.
| Method | Effectiveness | Pros | Cons |
|---|---|---|---|
| Mulching | Good | Affordable, readily available, helps retain moisture | Can be easily blown away in high winds, may not protect from extreme cold |
| Burlap/Frost Cloth | Excellent (for young plants) | Easy to apply, provides good insulation | Can be damaged by heavy snow or ice, may not fully protect large plants |
| Shelters | Excellent (for large plants) | Provides complete protection, especially from wind and snow | More expensive and labor-intensive to install |
| Tree Guards | Good (for trunk protection) | Protects the base of the plant | Doesn’t provide full coverage |
Closing Summary: How To Grow And Care For Bigleaf Hydrangea
In conclusion, nurturing bigleaf hydrangeas is a rewarding journey. By understanding their specific needs, from sunlight and soil to pruning and pest control, you can cultivate healthy and stunning specimens that will bring joy to your garden for years to come. This guide has equipped you with the essential knowledge and strategies to successfully grow and care for your bigleaf hydrangeas.
Enjoy the vibrant beauty they bring to your outdoor space!