


How to DIY permanent Christmas lights is your guide to transforming your outdoor space into a dazzling winter wonderland. This comprehensive guide delves into everything from planning your installation to choosing the perfect lights and materials, ensuring a safe and beautiful display that lasts for years to come. We’ll cover various lighting solutions, materials, and safety precautions to help you create your dream permanent Christmas light setup.
From assessing your property to selecting the right LED lights and wiring, this detailed guide provides practical advice and inspiration for crafting a spectacular and long-lasting holiday display. We’ll walk you through each step, providing valuable insights to ensure your project is a success. Learn about different types of lights, their pros and cons, and how to create a stunning visual effect that will amaze your neighbors and family.
Introduction to DIY Permanent Christmas Lights: How To Diy Permanent Christmas Lights
Transforming your outdoor space into a dazzling Christmas spectacle doesn’t require a hefty budget or professional installation. DIY permanent Christmas light installations offer a cost-effective and personalized way to create a magical ambiance, lasting far beyond the holiday season. This approach allows for creativity and customization, tailoring the look and feel of your decorations to match your unique style.Beyond the aesthetic appeal, permanent installations provide long-term enjoyment and a sense of pride in your handiwork.
Ever wanted those gorgeous, permanent Christmas lights, but not the tangled mess? Well, ditch the flimsy, temporary strands and embrace the DIY! It’s surprisingly simple to wire up some beautiful permanent lights. Speaking of simple, minimalists know that clutter, even on a kitchen counter, can lead to stress. For example, check out what items minimalists never keep on kitchen counter to get a good feel for what to avoid when you’re creating your DIY light display.
Once you’ve cleared your counters, you’ll be well on your way to a stunning, lasting Christmas light display!
By choosing the right materials and planning the installation carefully, you can create a beautiful and lasting display that will be admired for years to come.
Types of Permanent Lighting Solutions
Permanent outdoor lighting solutions encompass various options catering to different tastes and budgets. From simple string lights to elaborate, multi-faceted installations, the possibilities are extensive. Consider the size of your property, the desired aesthetic, and the level of effort you’re willing to invest when selecting a lighting system.
- String Lights: Simple and versatile, string lights are ideal for outlining trees, fences, or architectural features. They come in various colors and styles, allowing for easy customization.
- Landscape Lighting: This involves strategically placing lights to highlight specific areas of your landscape, such as trees, flowerbeds, or pathways. Professional-grade landscape lighting systems can add elegance and safety.
- Projector Lights: These offer an artistic touch by projecting festive images or patterns onto walls, houses, or trees. A popular option for unique displays.
- Integrated Lighting Systems: For a high-end solution, consider integrated systems where lights are embedded into structures or landscape elements, such as pathways or planters. This offers a sophisticated, clean look.
Materials for DIY Projects: Advantages and Disadvantages
Selecting the right materials is crucial for the longevity and effectiveness of your DIY permanent Christmas light installation. Consider the weather conditions in your area, the expected lifespan of the lights, and the overall aesthetic you’re aiming for.
- Copper Wire: Offers a classic, elegant look, but requires careful handling and is more susceptible to weather damage than other options. Copper wire is relatively expensive, but its aesthetic appeal is high.
- Aluminum Wire: Lightweight, durable, and resistant to rust, making it suitable for various weather conditions. Aluminum is less expensive than copper, but it may not offer the same aesthetic appeal.
- Plastic Coating: Provides insulation and protects the wires from damage, increasing the longevity of the lights. Different types of plastic offer varying degrees of durability and weather resistance.
- Waterproof Connectors: Crucial for preventing water damage and ensuring the lights function reliably. High-quality waterproof connectors are essential for long-term use.
Comparison of DIY Permanent Light Options
The table below provides a basic comparison of different DIY permanent Christmas light options, considering lifespan, cost, and installation difficulty. Note that these are estimations and actual results may vary depending on factors such as weather conditions and installation quality.
| DIY Option | Lifespan (Years) | Estimated Cost (USD) | Installation Difficulty |
|---|---|---|---|
| Copper Wire String Lights | 5-7 | $50-$150 | Medium |
| Aluminum Wire String Lights | 6-8 | $30-$100 | Medium |
| Integrated Landscape Lighting | 8-10 | $150-$500+ | High |
| Projector Lights | 5-7 | $75-$250 | Medium |
Planning Your Permanent Light Installation

Before you dive into the exciting task of installing permanent Christmas lights, meticulous planning is crucial. A well-considered approach ensures a flawless installation, minimizing potential problems and maximizing the enjoyment of your dazzling display. This phase focuses on the foundational steps for a successful and safe project.Careful site assessment and precise measurements are fundamental to a DIY permanent light installation.
Ignoring these aspects can lead to significant complications later on. Proper electrical safety and, if necessary, obtaining the required permits are equally vital. A well-planned layout ensures the lights are strategically placed for maximum impact and minimizes any future difficulties.
Site Assessment and Measurements
Accurate site assessment and precise measurements are essential for a successful DIY permanent light installation. Incorrect measurements can result in wasted materials, fitting issues, and even safety hazards. Measure twice, cut once, applies to this process as well. Thoroughly examine the area where the lights will be installed, noting any obstacles like trees, fences, or architectural features.
These considerations will influence the layout and the type of lights chosen. Ensure you have clear access to the location for installation and wiring.
Electrical Safety and Permits
Proper electrical safety is paramount when working with any electrical system. This is particularly important for permanent installations, where the lights will be connected to a power source. Consult with local electrical codes and regulations, and obtain any necessary permits if required. Determine the appropriate wattage and amperage for the lights, ensuring that the wiring and electrical outlets can handle the load.
Avoid overloading circuits, as this can lead to overheating, sparking, and fire hazards. Use appropriate safety gear like gloves and eye protection during the installation process.
Planning the Light Layout
A well-thought-out layout is key to a visually appealing and functional light display. Consider the aesthetic appeal and create a design that complements your home’s architecture and surroundings. Sketch out the intended path of the lights, noting the placement of the fixtures and the overall effect you wish to achieve. Consider using different types of lights, like icicle, string, or C9 bulbs, to add variety and dimension to the display.
Layout Ideas
| House Style | Layout Idea | Description |
|---|---|---|
| Traditional Colonial | Symmetrical, cascading patterns | Create symmetrical lines along the roofline or around windows and porches. Use a mix of string lights and icicle lights for a traditional feel. |
| Modern Contemporary | Geometric patterns, accent lighting | Employ geometric shapes and patterns to highlight architectural features like eaves or balconies. Use spotlights or accent lights to highlight specific areas. |
| Victorian | Ornate, intricate patterns | Utilize multiple layers of lights, including string lights, icicle lights, and other decorative options, to add visual complexity to the display. Focus on the details of the home’s architecture, mimicking its decorative patterns with the lights. |
| Cape Cod | Simple, linear patterns | Highlight the home’s natural lines with linear patterns of lights. Focus on strategically placing lights along the eaves and roofline, creating a warm and inviting ambiance. |
Choosing the Right Lights and Materials
Transforming your Christmas display from temporary to permanent requires careful consideration of the materials you choose. The longevity and effectiveness of your installation hinges on selecting the right lights, wires, and mounting solutions that can withstand the elements and your desired aesthetic. This crucial step ensures years of enjoyment from your DIY permanent display.
LED Light Types for Permanent Installations
LED lights have revolutionized holiday displays due to their energy efficiency and long lifespan. For permanent installations, choose LED lights designed for outdoor use. These lights often come with a higher IP rating, indicating their resistance to moisture and dust. Look for lights with a robust housing that can withstand potential impacts. Consider the light’s color temperature for the ambiance you desire.
Warm white lights create a cozy feel, while cool white lights offer a brighter, more modern look.
Wire Types and Outdoor Suitability
Selecting the right wire is vital for the long-term reliability of your permanent installation. Outdoor-rated wire is specifically designed to resist moisture, UV rays, and temperature fluctuations. Copper wire is a popular choice for its conductivity and durability. Aluminum wire is lighter and often more cost-effective, but its conductivity may be slightly lower. Ensure the wire gauge (thickness) is sufficient to handle the current draw of the lights.
Thinner wire can overheat and potentially cause a fire hazard. Consider the length of the run to avoid voltage drop, which can affect the brightness of the lights at the end of the line. Always use wire rated for outdoor use, as indoor wire is not equipped to handle the elements.
Weatherproofing for Outdoor Use
Protecting your lights from the elements is paramount for a long-lasting display. Employ weatherproof connectors to prevent moisture and debris from entering the electrical system. Look for connectors rated for outdoor use and designed to withstand harsh weather conditions. Consider using sealant to further protect connections from water ingress. This extra step can significantly extend the life of your lights.
For instance, silicone sealant is effective for filling gaps and crevices.
Mounting Options and Surface Suitability
Different surfaces require different mounting solutions. For attaching lights to trees, use specialized tree clips or straps. Ensure the mounting method won’t damage the tree. For house siding or fences, use adhesive-backed mounting strips or specialized clips. Always follow the manufacturer’s instructions for mounting.
Consider the weight of the lights and the type of surface to ensure secure attachment.
Connectors and Junction Boxes
Properly selecting connectors and junction boxes is essential for a safe and efficient installation. Choose weatherproof connectors that are compatible with your LED lights. This prevents water damage and ensures a secure connection. Employ junction boxes to manage wire runs and connections. This allows for easy access for troubleshooting and repairs, as well as prevents the wire from becoming tangled or damaged.
Locate junction boxes in accessible areas and ensure they are securely mounted.
Comparison of LED Light Types, How to diy permanent christmas lights
| Light Type | Color Temperature (K) | Brightness (Lumens) | Energy Efficiency (Watts/Lumens) |
|---|---|---|---|
| Warm White | 2700-3000K | 50-100 | 0.5-1.0 |
| Cool White | 5000-6500K | 70-150 | 0.4-0.7 |
| Neutral White | 3500-4000K | 60-120 | 0.5-0.8 |
This table provides a basic comparison of different LED light types. Remember to check the specifications of the specific lights you’re considering. This data can guide your selection process.
Wiring and Installation Procedures

Transforming your Christmas spirit into a permanent display requires meticulous attention to wiring and installation. Proper wiring techniques ensure the longevity and safety of your festive lights, while correct installation methods guarantee a visually appealing and secure display. This section delves into the crucial steps for achieving a flawless, safe, and aesthetically pleasing installation.Safe wiring practices for outdoor installations are paramount.
DIYing permanent Christmas lights is a rewarding project, but you need a solid plan! Before you string those lights up, consider how to overseed a lawn. Proper lawn care, like ensuring the soil is prepared correctly, will help your festive decorations stand the test of time, just like a well-maintained lawn. So, get those bulbs ready and prepare your yard for a holiday glow, by checking out how to overseed a lawn first.
Then, you’ll be ready to create the perfect, long-lasting Christmas light display!
Outdoor electrical work necessitates adhering to specific safety guidelines to prevent electrical hazards and ensure the well-being of yourself and others.
Safe Wiring Practices for Outdoor Installations
Outdoor installations demand extra caution due to the elements. Employing proper insulation and waterproof connectors is critical to prevent water damage, short circuits, and potential electrocution. Use appropriate gauge wire for the intended load. Overloading the circuit can lead to overheating and fire hazards. Ensure all connections are secure and insulated.
Correct Use of Electrical Connectors and Wire Strippers
Selecting the right electrical connectors is crucial for a secure and reliable connection. Ensure the connectors are rated for the voltage and amperage of your lights. Using wire strippers is vital for properly preparing the wire ends for connection. Incorrectly stripped wires can cause poor connections, leading to overheating and potential fire hazards. Always use wire strippers designed for the specific wire gauge.
Connecting Lights to a Power Source
Connecting the lights to a properly grounded power source is essential for safety and reliability. Verify that the power source can adequately handle the load of the lights. A surge protector is highly recommended to safeguard against power fluctuations. Ensure all connections are secure to prevent loose wires and sparks.
Installing Lights on Various Surfaces
Proper installation on different surfaces is crucial for a secure and visually appealing display.
- Eaves: Securely mount the lights along the eaves using appropriate clips or hooks, ensuring they are evenly spaced and not obstructing the flow of water. Use weatherproof clips to protect the lights from the elements.
- Fences: Use appropriate clips or mounting hardware designed for fences. Ensure the lights are not overly tight or loose to prevent damage to the fence or the lights themselves. Consider the height of the fence and the placement of the lights to ensure visibility and aesthetics.
- Roofs: Installing lights on roofs requires careful consideration of the roof’s structure and the weight of the lights. Use appropriate clips and hardware designed for roof mounting. Consult with a qualified electrician if you’re unsure about the proper installation techniques. Ensure that the lights are securely attached to prevent them from coming loose during strong winds.
Common Electrical Connections and Troubleshooting
This table provides a quick reference for common electrical connections and troubleshooting steps for your DIY permanent Christmas light installation.
Ever wanted to DIY some super-stylish, permanent Christmas lights? It’s easier than you think! Once you’ve mastered the wiring and placement, you can enjoy festive illumination all year round. Speaking of seasonal blooms, what to do with those hyacinth bulbs after they’ve finished flowering? Proper care for these bulbs will ensure they’ll be ready to burst into bloom next year.
Now, back to those fabulous, DIY Christmas lights! The trick is to choose the right materials and plan the design carefully.
| Connection Type | Description | Troubleshooting Steps |
|---|---|---|
| Series Connection | Lights are connected end-to-end. | If one light is out, the entire string might not work. Check the connections of the affected light. |
| Parallel Connection | Lights are connected to a common wire. | If one light is out, the others will still work. Check the connections of the affected light. |
| Grounded Connection | The electrical system is grounded for safety. | Check the ground connection for proper bonding to prevent shock hazards. |
| Overheating | Excessive heat from the lights. | Reduce the number of lights on the circuit or check for loose connections. |
| No Power | No power reaching the lights. | Check the power source, circuit breaker, and fuse box. Ensure the connections are secure. |
Troubleshooting and Maintenance
Bringing your DIY permanent Christmas lights to life requires more than just installation. A crucial aspect of owning these dazzling displays is knowing how to address potential issues and maintain them for years to come. This section delves into troubleshooting common problems, essential maintenance, and component replacement strategies.Proper maintenance is vital for the longevity and brilliance of your permanent light displays.
Regular checks and timely repairs prevent costly replacements and ensure your lights continue to illuminate your home or business for years to come.
Potential Installation Problems and Troubleshooting
Identifying problems early in the installation process can save you time and frustration. Incorrect wiring connections, damaged components, or insufficient power supply are all potential issues. Carefully inspect connections and ensure proper insulation. If a section of lights isn’t working, isolate the faulty area by checking connections and components. A multimeter can be invaluable for verifying voltage and continuity.
Consult wiring diagrams for guidance if needed.
Maintenance for Longevity
Regular maintenance is key to preventing costly repairs and ensuring the longevity of your permanent Christmas light displays. This involves routine checks, cleaning, and addressing any potential issues promptly. Dust accumulation, for example, can impede light output and even lead to overheating. Consistent cleaning can help extend the lifespan of the light bulbs.
Replacing Faulty Components
Replacing faulty components is a crucial part of maintaining your permanent light display. The process involves identifying the defective component, obtaining a replacement, and carefully replacing it while adhering to safety precautions. Always turn off the power before starting any repair work. Refer to the manufacturer’s instructions for specific replacement procedures. Consider keeping a spare set of bulbs or components on hand.
Common DIY Permanent Light Problems and Solutions
- Dim or flickering lights: This can be caused by loose connections, a faulty transformer, or a damaged wire. Check all connections, replace the transformer if necessary, and inspect wires for any breaks or damage. Using a multimeter to verify the correct voltage at the light strings is crucial.
- Lights not turning on: First, check the circuit breaker and ensure the power supply is functioning. If the issue persists, inspect the wiring connections for any breaks or loose connections. Confirm the correct polarity of the wires, and ensure the correct gauge of wire is being used.
- Lights burn out: Replacement bulbs are usually readily available. Identify the burned-out bulb and replace it with a compatible bulb. Be mindful of the bulb’s wattage and type.
- Water damage: If exposed to water, immediately turn off the power supply and carefully dry the affected components. If the damage is severe, consider replacing the damaged section of the lights.
Importance of Off-Season Storage
Proper storage is essential for preserving the longevity of your permanent Christmas light displays. This protects the lights from damage, dust, and moisture, ensuring they’re ready to shine the next holiday season. Storing lights in a cool, dry place will extend their life. Keep them away from extreme temperatures and direct sunlight. Store them in their original packaging or use protective containers to avoid damage.
Maintenance Procedures Guide
| Type of Installation | Routine Cleaning | Component Replacement | Wiring Inspection |
|---|---|---|---|
| Exterior (e.g., house facade) | Regular wiping down with a soft cloth, paying attention to dust accumulation. | Replace bulbs as needed. Inspect connections for corrosion. | Check for loose connections, ensure wires are insulated. Pay close attention to connections in areas exposed to moisture. |
| Interior (e.g., window displays) | Dusting with a soft brush. Avoid using harsh chemicals. | Replace bulbs as needed, ensuring compatibility with existing wiring. | Check for damage to wiring from bending or stretching. |
| Rooftop installations | Use a soft-bristled brush to remove debris. | Replace bulbs as needed, keeping track of bulb wattage. | Check for any damage from wind, rain, or ice. |
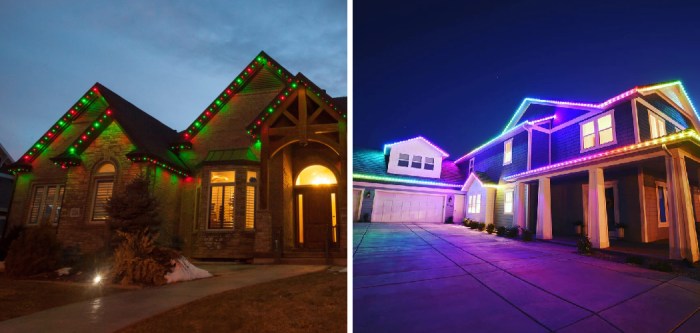
Creative Design Ideas and Inspiration
Transforming your outdoor space into a dazzling Christmas spectacle doesn’t have to be daunting. With a little creativity and planning, your permanent light display can become a unique statement piece, reflecting your personal style and adding a touch of magic to your surroundings. From subtle elegance to bold statements, the possibilities are endless.Permanent outdoor Christmas lights offer a canvas for artistic expression, allowing you to create personalized displays that truly stand out.
This section dives into imaginative design concepts, providing inspiration for unique light patterns, color combinations, and seasonal transitions. Understanding how to balance light intensity with visual appeal is crucial to creating a captivating and memorable display.
Exploring Different Outdoor Spaces
Permanent lighting installations can be adapted to various outdoor settings, from a simple walkway to a sprawling garden or a dramatic entryway. Consider the existing architecture and landscape features. Trees, shrubs, and fences can all be incorporated into the design, creating a cohesive and visually appealing narrative.
Unique Light Patterns and Configurations
Beyond simple string lights, explore a variety of light patterns. A cascading waterfall of lights down a wall or fence, for example, adds a dynamic touch. Clusters of lights, arranged in intricate patterns, can highlight specific architectural features. Consider using different light intensities for depth and dimension. A combination of warm and cool-toned lights can add visual interest and create a cozy, welcoming atmosphere.
A geometric pattern on a wall can be another interesting design element.
Creative DIY Designs with Color and Style
Experiment with different color palettes. A warm, inviting display might feature a range of warm white and amber hues, while a more modern look might use cool white and blue tones. Combine different light styles, such as string lights, spotlights, and accent lights, to create layered effects. Consider the impact of color temperature on the overall ambiance.
The light color should complement your home’s architecture and landscape design. For instance, warm white lights create a cozy and inviting feel, while cool white lights provide a modern and sleek aesthetic.
Seasonal Changes in Display
Maintaining a dynamic display doesn’t require a complete overhaul each season. Consider incorporating seasonal elements, like colored accents or seasonal decorations, to adapt the display. Adding a few strategically placed seasonal decorations, such as snowflakes, or miniature figurines, can enhance the display’s appeal during the holidays. A change in color schemes or light patterns can give the display a fresh look without replacing the entire installation.
Balancing Light Intensity and Visual Appeal
The intensity of the lights should be carefully considered to avoid overwhelming the surrounding landscape or architectural elements. Too much light can wash out details, while too little light can make the display look unnoticeable. Experiment with different light settings and distances to achieve the optimal balance. The light should illuminate the area in a way that highlights its beauty without being overly harsh or distracting.
Design Themes for Outdoor Displays
| Design Theme | Description | Examples |
|---|---|---|
| Warm Glow | Utilizes warm white and amber lights to create a cozy and inviting ambiance. | String lights along walkways, spotlights on trees, clusters of amber lights on a pergola. |
| Modern Elegance | Emphasizes clean lines and cool white lights with subtle accent lighting. | Linear patterns of lights along a fence, spotlights on architectural details, clusters of cool white lights on a modern patio. |
| Nature’s Embrace | Integrates lights with natural elements, highlighting trees, shrubs, and pathways. | String lights draped through trees, spotlights on flowering plants, accent lights highlighting architectural details. |
Safety Precautions for DIY Installations
Transforming your home with permanent Christmas lights can be a rewarding project, but electrical safety is paramount. Improper handling of electrical components can lead to serious hazards, from minor shocks to potentially fatal accidents. Thorough understanding and adherence to safety precautions are crucial throughout the entire process, from planning to maintenance.Electrical safety is not just a suggestion; it’s a necessity.
Every stage of the DIY permanent light installation should prioritize safety. Grounding, insulation, and proper wiring techniques are essential to prevent electrical shocks and fires. Following these precautions will ensure a safe and enjoyable holiday season.
Importance of Electrical Safety
Electrical systems, even seemingly simple ones, carry inherent risks. Improperly installed wiring can lead to short circuits, overheating, and potentially dangerous electrical shocks. Using substandard materials or skipping crucial safety steps can compromise the integrity of the system, increasing the risk of fire hazards. A thorough understanding of electrical safety principles is vital for preventing accidents.
Proper Grounding and Insulation
Proper grounding is essential to safely redirect any stray electrical current away from the installation and into the earth. This prevents dangerous voltage buildup that could lead to shock. Insulation, such as appropriate wire coverings and casings, is equally crucial. It acts as a barrier, preventing electrical contact with other materials, reducing the risk of short circuits and shocks.
Always use high-quality, UL-listed materials to ensure both grounding and insulation meet safety standards.
Safety Guidelines for Outdoor Electrical Work
Working with electricity outdoors presents unique challenges. Outdoor elements like moisture, temperature fluctuations, and potential exposure to the elements can negatively impact the integrity of electrical components. Using waterproof or weatherproof materials is crucial to protect the installation from damage. Check weather conditions before starting the project and be mindful of the possibility of rain or snow.
Always ensure that all electrical connections are completely dry and secure before proceeding. Avoid working in wet conditions.
Safety Reminders for Handling Electrical Components
- Never work alone when handling electrical components. Always have a second person present for assistance and support.
- Ensure all power sources are turned off before any wiring or installation work is performed.
- Use insulated tools and gloves when handling electrical wires to prevent accidental shocks.
- Inspect all electrical components for damage or defects before use. Damaged components should be immediately replaced to prevent potential hazards.
- Never overload circuits. Overloading can lead to overheating and potential fire hazards.
- Follow the manufacturer’s instructions carefully for all components. This is essential for ensuring the proper and safe use of the products.
- Maintain a safe distance from electrical wires and connections during the installation process.
- Keep flammable materials away from the work area to reduce the risk of fire.
- Use the correct size wire for the amperage required by the light strings. Using insufficient wire can lead to overheating and potential fire hazards.
Avoiding Potential Hazards During Installation
Thorough planning and meticulous execution are crucial to prevent potential hazards during installation. This includes checking the circuit breaker capacity and ensuring it can handle the load of the light string. A properly sized circuit breaker will protect against overloading and prevent potential fire hazards. Properly securing all wires and connections is essential. Loose connections are a primary cause of electrical hazards.
Necessity of Obtaining Permits When Applicable
Local building codes may require permits for electrical installations, particularly for permanent outdoor installations. Obtaining the necessary permits ensures compliance with safety regulations and protects you from potential legal issues. Check with your local authorities to determine the specific requirements for your area. This will help you ensure the installation is up to code and that you are in full compliance with local regulations.
Wrap-Up
Creating your own permanent Christmas light display is a rewarding project that can bring joy and festive cheer to your home for years to come. By carefully planning your installation, selecting appropriate materials, and prioritizing safety, you can create a stunning display that will be the envy of your neighborhood. Remember, this comprehensive guide equips you with the knowledge and resources to create a dazzling, safe, and long-lasting holiday light show.