


How to change an outlet is a crucial skill for any homeowner. Knowing how to safely and effectively replace an old or faulty outlet can save you time and money. This guide provides a comprehensive walkthrough, covering everything from identifying the right tools to safely disconnecting power and correctly installing the new outlet. We’ll also explore common troubleshooting steps, focusing on safety throughout the process.
Understanding different outlet types, like single, double, and GFCI, is key. We’ll detail the purposes and typical applications of each. This knowledge will help you make informed decisions when choosing the right replacement outlet for your needs. Proper safety precautions are paramount, and we’ll emphasize these throughout the guide. Learn to identify potential risks and how to mitigate them.
Introduction to Outlet Changes
Knowing how to change an electrical outlet is a crucial skill for any homeowner. It allows you to address issues like faulty outlets, upgrade your wiring for newer appliances, or simply replace a worn-out outlet. This knowledge empowers you to maintain a safe and efficient electrical system in your home. Ignoring these tasks can lead to significant risks, both to your personal safety and potential property damage.Understanding the intricacies of electrical work is essential for safe and successful outlet changes.
Improperly performed outlet changes can result in electric shocks, fires, or damage to your home’s wiring. This isn’t just a matter of inconvenience; it could lead to serious harm.Before starting any electrical work, rigorous safety precautions are paramount. Always turn off the power to the circuit breaker associated with the outlet you’re working on. Use insulated tools and gloves to prevent electric shock.
Never work on electrical systems while standing on a wet surface. Always ensure you have a well-lit workspace and proper ventilation.Different types of electrical outlets serve various purposes and are used in specific applications. Understanding these differences is crucial for correct installation and utilization.
Outlet Types and Applications
| Outlet Type | Purpose | Typical Applications | Image Description |
|---|---|---|---|
| Single | Provides a single power source. | General use in homes, such as a lamp or a small appliance needing only one connection. | A simple, single-prong outlet with a light grey background. Imagine a standard wall outlet, where the prongs are arranged in a straight line. |
| Double | Provides two power sources. | Lamps, small appliances, or devices requiring two independent power connections. | Two outlets side-by-side, with a dark background. The two outlets have their own prongs, each spaced apart for two separate connections. |
| GFCI (Ground Fault Circuit Interrupter) | Provides added safety by interrupting power flow if a ground fault occurs. | Areas with a high risk of water exposure, such as bathrooms, kitchens, and outdoor locations. They’re also often found in garages or basements. | A double outlet with an additional set of buttons or a different shape, potentially with a “test” and “reset” button. The background is light blue, indicating a safety feature. |
A GFCI outlet, a crucial safety feature, is designed to protect against electric shock by quickly interrupting the flow of electricity if a ground fault is detected. This is particularly important in areas where water and electricity are likely to be present.
Tools and Materials Needed

Getting ready to tackle an outlet change requires a careful selection of tools and materials. Proper preparation minimizes potential hazards and ensures a successful and safe installation. A comprehensive list and understanding of each tool’s function are crucial for a smooth and efficient process. This section details the necessary tools and materials, emphasizing safety precautions and specific requirements for different outlet types.
Essential Tools, How to change an outlet
A well-stocked toolbox is essential for a successful outlet change. The following tools are typically needed for most standard installations. Proper handling and usage are paramount to avoid accidents and ensure a high-quality installation.
- Screwdriver: A Phillips head screwdriver is commonly used to remove and install screws holding the outlet box and the outlet itself. Ensure the screwdriver’s size matches the screws to prevent stripping. Use caution when working with screws to avoid damaging the outlet box or wires.
- Wire Strippers: Wire strippers are crucial for carefully removing the insulation from the ends of the wires to expose the bare copper for connection. Using wire strippers correctly is vital to ensure proper electrical contact and prevent shorts. Different types of wire strippers cater to various wire sizes; choose the appropriate size for the wires involved.
- Voltage Tester: A voltage tester is essential for verifying that the power to the outlet is off before starting any work. This crucial safety measure prevents electric shocks. Always use a voltage tester to ensure the circuit is de-energized. Touch the probes to the wires to detect voltage.
- Needle Nose Pliers: Needle-nose pliers are helpful for gripping and manipulating small parts, such as wires, screws, and terminals. These tools allow for precise handling of delicate components.
- Voltage Tester: A voltage tester is crucial for confirming the power to the outlet is off before starting any work. This essential safety precaution prevents electric shocks. Always use a voltage tester to confirm the circuit is de-energized.
- Utility Knife: A utility knife is used for cutting wires, plastic, or other materials needed for the project. Properly handle the knife to prevent cuts and injuries. Use caution when cutting wires, ensuring a clean cut to avoid damaging the wire’s structure.
Materials Needed
The correct materials are equally important for a successful outlet change. A careful selection of the correct screws, wires, and outlet covers is essential for compatibility and safety.
- New Outlet: Select an outlet that is compatible with the existing wiring and electrical code requirements. The outlet should be appropriate for the electrical load expected in the area.
- New Outlet Box (If Necessary): An outlet box may need replacing depending on the condition of the old one. Ensure the new box is compatible with the electrical code and the wall structure.
- Screws: Match the screws to the outlet and outlet box for a secure installation. Choose appropriate screws for the material of the outlet box. Ensure the screws are in good condition and the correct size.
- Wires: Select wires that match the existing wiring in terms of gauge and type. Ensure the wires are compatible with the electrical code. Proper wire gauge ensures safe and reliable electrical connection.
- Outlet Cover: The outlet cover should match the new outlet for a finished and secure installation. Ensure the cover is correctly installed to prevent damage or short circuits.
Specific Screw Types and Outlet Covers
Different outlet types might require specific screw types. The outlet cover needs to be compatible with the outlet. This section Artikels common requirements.
| Outlet Type | Screw Type | Outlet Cover Type |
|---|---|---|
| Standard Duplex Outlet | Phillips head screws | Standard duplex cover |
| GFCI Outlet | Phillips head screws | GFCI cover |
| 3-Way Outlet | Phillips head screws | 3-way cover |
Step-by-Step Procedure
Changing an electrical outlet safely and correctly requires careful attention to detail and adherence to safety protocols. Improperly performed electrical work can lead to serious hazards, including fire or electric shock. This section will guide you through the process, from initial disconnection to final testing. Following these steps precisely will significantly reduce risks and ensure a successful outcome.Electrical work should always be performed by a qualified electrician if you are not comfortable with the process.
If you lack the necessary experience or tools, it’s best to seek professional assistance.
Disconnecting the Power Supply
Before starting any electrical work, it’s crucial to disconnect the power supply to the circuit. This prevents accidental shocks and ensures a safe working environment. Locate the circuit breaker for the specific outlet you’re working on in your home’s electrical panel. Turn the breaker to the “off” position. Verify that the power is completely off by using a non-contact voltage tester to check for any residual voltage.
This is a vital safety step, and skipping it can lead to dangerous situations.
Removing the Old Outlet
Carefully remove the old outlet. First, use a screwdriver to remove any screws securing the outlet cover plate. This plate protects the electrical components and should be removed before proceeding. Next, disconnect the wires connected to the old outlet. Identify each wire color (black, white, and ground) and carefully remove the wire connections from the outlet terminals.
Ever tackled changing an outlet? It’s surprisingly straightforward, but knowing how to hang garland on mantel can help you prep for the holidays. You’ll want to make sure the area is clear and you’ve got the right tools before you start. Once you’ve got your new outlet in place, you can confidently tackle the next DIY project, like installing new light fixtures, or even a simple task like fixing a loose doorknob.
how to hang garland on mantel This is a great project for getting the holiday spirit going. After all, a well-placed outlet is just as crucial as a perfectly hung garland, both for your safety and for a well-decorated home.
The wires should be marked and kept separate to ensure correct reconnection.
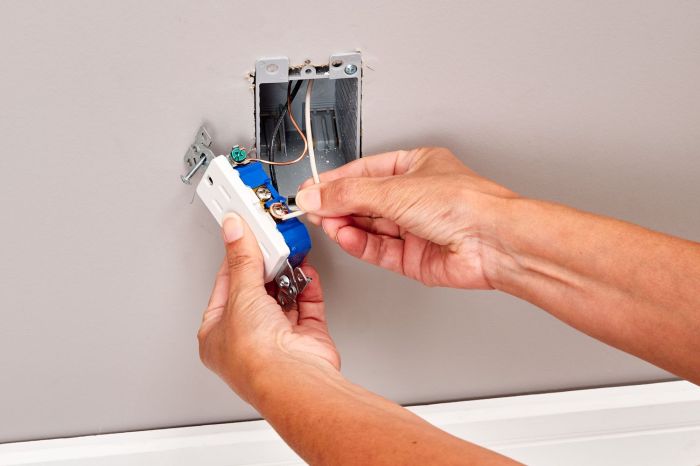
Connecting New Wires and Installing the New Outlet
Connect the new wires to the corresponding terminals on the new outlet. Ensure the black wire connects to the brass-colored terminal, the white wire to the silver-colored terminal, and the ground wire (usually bare copper) to the green or copper-colored terminal. Use wire connectors to secure the connections if necessary. Crimping the wire connectors ensures a strong and secure connection, preventing loose connections and potential hazards.
Carefully check each connection to ensure a tight and secure fit. Refer to the new outlet’s instructions for specific wire connection details.
Installing the New Outlet
Align the new outlet with the mounting holes in the wall. Carefully insert the outlet into the wall and secure it using the appropriate screws. Replace the outlet cover plate. Tighten the screws to ensure a secure fit.
Securing the New Outlet
After installing the outlet, double-check the connections and ensure everything is secure. Look for any loose wires or connections. This step is critical to preventing future problems.
Testing the New Outlet
Finally, turn the circuit breaker back on. Use a lamp or other electrical device to test the new outlet to verify it’s working correctly. If the device powers on, the outlet is functioning properly. If there’s a problem, turn the circuit breaker off immediately and check the connections again. This final step ensures the safety and proper functioning of the new outlet installation.
Troubleshooting and Common Mistakes

Changing an electrical outlet can seem straightforward, but potential problems can arise. Understanding these potential pitfalls and how to troubleshoot them is crucial for a safe and successful installation. Knowing how to identify and resolve issues quickly can save time and frustration. Avoiding common mistakes is key to completing the job correctly the first time.
Potential Problems During Outlet Changes
Common issues during outlet replacements stem from improper wire connections, loose connections, or faulty electrical components. These problems can range from a simple loose wire to a tripped circuit breaker. A thorough understanding of these issues will help prevent further problems and ensure a safe installation.
Troubleshooting Loose Connections
Loose connections are a frequent cause of problems. Visual inspection is crucial. Make sure all wires are securely fastened to the terminals. A loose connection can lead to overheating, sparks, and even fire hazards. Tighten all connections until they are firm and secure.
Troubleshooting Tripped Breakers
A tripped circuit breaker is another common issue. If the breaker has tripped, it indicates an overload or short circuit in the circuit. The first step is to locate the tripped breaker and reset it. If the breaker trips again immediately, there might be a more significant issue that requires further investigation. Consult a qualified electrician if the problem persists.
Troubleshooting Faulty Outlets
A faulty outlet itself can also cause problems. Inspect the outlet carefully for any damage or signs of overheating. If the outlet is damaged, it should be replaced. Faulty outlets can lead to short circuits or shocks. Ensure you are working with a suitable replacement outlet.
Ever tackled changing an outlet? It’s surprisingly straightforward, but if you’re looking for a quick DIY project, it’s always a good idea to check your local building codes before you start. While you’re researching how to change an outlet, you might also wonder if a spicy deterrent like cayenne pepper can keep those pesky squirrels away from your garden.
A recent article explored whether cayenne pepper actually deters squirrels. For a detailed analysis, check out this interesting piece on does cayenne pepper deter squirrels. Regardless, if you’re up for the task, changing an outlet is a pretty rewarding experience. Just be sure to turn off the power first!
Troubleshooting Wire Issues
Incorrect wire connections can be problematic. Mismatched wires or improper wire stripping can result in poor electrical contact, leading to a variety of issues. Ensure all wires are the correct type and properly stripped before connecting them. Always verify that the wires are connected to the correct terminals on the outlet.
Troubleshooting Wiring Diagram Discrepancies
Understanding and following the wiring diagram is critical. Incorrect wiring can lead to dangerous situations. Ensure the wires are connected according to the diagram and that all connections are secure. If you are unsure about the wiring, consult a qualified electrician for assistance.
Learning how to change an outlet can be a handy skill, especially if you’re looking to upgrade your home’s electrical system. Sometimes, though, dealing with a muddy lawn in winter is a bigger priority. Fortunately, there are effective ways to get your lawn back in shape, like using landscape fabric and gravel to prevent further damage, as detailed in this helpful guide: ways to fix a muddy lawn in winter.
Once you’ve tackled the winter mud, you can confidently tackle that outlet change project!
Table of Potential Problems and Solutions
| Problem | Possible Cause | Solution |
|---|---|---|
| Outlet won’t turn on | Loose connection, tripped breaker, faulty outlet. | Check connections, reset breaker, replace outlet if necessary. |
| Sparks or heat from outlet | Loose connection, overloaded circuit, faulty wiring. | Tighten connections, check circuit breaker, inspect wiring, and consider contacting an electrician. |
| Flickering lights near the outlet | Loose connection, overloaded circuit, or an intermittent short circuit. | Check connections, check circuit breaker, and check for any loose wires in the surrounding area. |
| Outlet feels hot to the touch | Overloaded circuit, loose connections, or a short circuit. | Turn off the power, check connections, and reset the breaker. If the problem persists, contact a qualified electrician. |
Safety Considerations: How To Change An Outlet
Electrical work, even seemingly simple tasks like changing an outlet, carries inherent risks. Ignoring safety precautions can lead to serious injuries, including electric shock, burns, and even death. This section emphasizes the crucial importance of safety measures, providing detailed instructions for preventing accidents.Proper safety procedures are paramount when working with electricity. Treating electrical systems with respect and understanding the potential hazards is essential.
Always prioritize your safety and the safety of those around you.
Importance of Power Shut-Off
Correctly turning off the power supply is the single most critical safety step in any electrical work. Incorrect or incomplete power shut-off can result in serious accidents. Failure to isolate the circuit can expose workers to electric shock. Always ensure the circuit breaker or fuse associated with the outlet is turned off before beginning any work.
- Locate the circuit breaker or fuse box for the specific circuit that powers the outlet. Identify the corresponding breaker or fuse responsible for the outlet.
- Turn the breaker to the “off” position. This will disconnect the power from the circuit, preventing any flow of electricity.
- Verify the power is off. Use a non-contact voltage tester to double-check the circuit. This device detects the presence of voltage without direct contact, ensuring the circuit is indeed de-energized.
Proper Use of Protective Gear
Using appropriate personal protective equipment (PPE) significantly reduces the risk of injury during electrical work.
- Wear insulated gloves to prevent electrical shock if accidental contact occurs. Ensure the gloves are rated for the voltage levels you are working with.
- Use insulated tools. Ensure all tools, such as screwdrivers, pliers, and wire strippers, are made of or have insulated handles to prevent accidental contact with energized wires.
- Always wear safety glasses or goggles to protect your eyes from flying debris or sparks that may occur during the work process.
Working with a Qualified Professional
While changing a standard outlet is relatively straightforward, some situations require the expertise of a qualified electrician.
- Complex wiring or unusual issues should be handled by a professional. If you encounter difficulties, unusual wiring configurations, or are uncertain about any aspect of the work, contact a licensed electrician.
- For electrical work in older homes, or if the outlet is part of a larger electrical system, seek professional help. Electrical systems in older homes might have outdated wiring, and modifications can lead to unintended consequences if not performed by a qualified professional.
Emergency Procedures for Electrical Shock
Knowing how to respond to an electrical shock emergency can be critical.
- If someone experiences an electrical shock, immediately disconnect the power source. This is the first and foremost step.
- Call for emergency medical assistance immediately. Timely medical intervention is crucial in electrical shock cases.
- Do not touch the victim until the power is completely shut off. Touching a victim who is still in contact with energized wires can result in additional shock.
Final Review
Replacing an electrical outlet, while potentially daunting, becomes manageable with careful preparation and a step-by-step approach. This guide has provided a detailed roadmap to help you confidently navigate the process. Remember safety is paramount, and if you feel unsure at any point, consult a qualified electrician. With this knowledge, you can tackle electrical work around your home with confidence and avoid potential hazards.