


How to mulch hostas sets the stage for this enthralling narrative, offering readers a comprehensive guide to enhancing their hosta gardens. We’ll explore the benefits of mulching, from retaining moisture to suppressing weeds, and provide detailed steps for preparing your hostas, choosing the right mulch, and applying it effectively. Discover the secrets to a healthy and beautiful hosta garden, transforming it into a captivating display.
This guide will cover everything from selecting the ideal mulch type for your climate and soil conditions to maintaining the mulch layer throughout the growing season. We’ll also delve into common mistakes to avoid and provide solutions for troubleshooting any mulching issues you might encounter.
Introduction to Hosta Mulching
Hostas, with their stunning foliage and relatively low maintenance needs, are a popular choice for gardeners. Mulching plays a crucial role in maintaining healthy hosta plants and enhancing their overall appearance in a garden bed.Mulching hostas is the practice of applying a layer of organic material around the base of the plants. This covering serves multiple purposes, benefiting the plants in various ways.
Proper mulching techniques can lead to thriving hosta plants, minimizing issues, and making garden maintenance simpler.
Purpose of Hosta Mulching
Mulching hostas in a garden bed is a beneficial practice that serves a variety of important purposes. It improves the soil’s condition, protects the hostas from harsh weather, and minimizes the need for frequent weeding.
Benefits of Hosta Mulching
Mulching offers several key advantages for hosta plants. By creating a protective layer around the plant roots, the benefits include improved moisture retention, reduced weed growth, and better temperature regulation.
- Moisture Retention: Mulch helps retain soil moisture, reducing the frequency of watering needed. This is especially important during dry periods, preventing the soil from drying out and the hostas from becoming stressed. Consistent moisture levels support healthy root growth and prevent the plants from wilting. Hostas, in particular, prefer consistent moisture levels. By preventing moisture loss, mulch helps maintain a healthy and vibrant environment for the hosta.
- Weed Suppression: A layer of mulch effectively smothers emerging weeds, minimizing the need for constant weeding. This saves time and effort, allowing you to focus on other gardening tasks. Weed suppression is vital in maintaining a clean and aesthetically pleasing garden bed. Without the need to manually remove weeds, the garden environment can thrive.
- Temperature Regulation: Mulch helps regulate soil temperature, preventing drastic fluctuations between day and night. This is particularly beneficial during cold winters and hot summers, protecting the hosta roots from extreme temperatures. In winter, mulch helps insulate the roots from freezing temperatures, while in summer, it helps keep the roots cool. This temperature regulation is essential for the overall health of the hosta.
Types of Mulch Suitable for Hostas
Various organic materials can be used as mulch for hostas. The choice depends on factors like availability, cost, and aesthetic preferences.
- Wood Chips: A common choice, wood chips provide good weed suppression and moisture retention. Their dark color can also help warm the soil in colder climates.
- Straw: A readily available and inexpensive option, straw effectively suppresses weeds and helps maintain soil moisture. Its light color might not be suitable for all garden aesthetics, however.
- Shredded Bark: Shredded bark offers excellent weed suppression and a visually appealing aesthetic. It also provides good moisture retention. Its varied textures can enhance the overall garden design.
Ideal Mulch Thickness for Hostas
A consistent mulch layer around hosta plants is crucial for optimum growth and health. A recommended depth of 2-4 inches is usually sufficient. Thicker layers can potentially smother the hostas.
Preparing the Hosta Plants for Mulching
Giving your hostas the best possible start for winter involves more than just adding mulch. Proper preparation ensures the mulch works to protect your plants and doesn’t harm them. A healthy hosta, ready for the winter, is a hosta that’s well-positioned to thrive in the spring.Healthy hostas are key to a successful mulching process. This involves evaluating the plants’ overall health before adding any mulch.
Look for signs of disease, pests, or damage. If you spot any issues, address them before applying mulch, which could potentially worsen the problem.
Identifying Healthy Hostas
Healthy hostas exhibit vibrant foliage, free from signs of disease or pests. Check for browning, yellowing, or wilting leaves. Look for holes, blemishes, or unusual discoloration. Infected plants should be treated before mulching to avoid spreading the problem. Healthy hostas have a firm, unyielding texture.
Removing Existing Mulch (If Applicable)
If there’s existing mulch around your hostas, carefully remove it. Use your hands or a small rake to loosen and remove the old mulch, being cautious not to damage the hosta crowns or roots. Clearing the area allows for better assessment of the hosta’s base and ensures the new mulch layer makes proper contact. Thorough removal prevents issues with pest buildup or disease that may have been hidden under the previous layer.
Even Mulch Application
Apply the mulch evenly around the hosta plants, ensuring the layer isn’t too thick or too thin. A consistent layer provides uniform protection and prevents issues like moisture buildup or poor drainage. A general guideline is 2-4 inches of mulch. Avoid piling the mulch directly on the hosta crown, as this can lead to rot or fungal issues.
Instead, distribute it around the base of the plant, leaving a small space between the mulch and the crown.
Protecting Hosta Crowns
Protecting the crown is crucial. The crown is the most vulnerable part of the hosta. Avoid placing mulch directly on the crown. Instead, apply the mulch around the base of the plant. This will allow air circulation and prevent moisture from accumulating, reducing the risk of rot.
Proper protection ensures the plant’s health and resilience during the winter months.
Step-by-Step Mulching Procedure
- Inspect your hostas for any signs of disease or pests.
- Carefully remove any existing mulch from around the hosta plants.
- Gather your chosen mulch material (e.g., wood chips, shredded bark).
- Spread the mulch evenly around the base of each hosta, keeping it a few inches away from the crown.
- Ensure the mulch layer is consistent in depth (2-4 inches).
- Observe the hostas for any signs of moisture buildup or rot.
Choosing the Right Mulch
Choosing the right mulch for your hostas is crucial for their health and beauty. It helps regulate soil moisture, suppress weeds, and maintain a suitable temperature around the roots. The best mulch type will depend on your specific climate, soil conditions, and the aesthetic you’re aiming for in your garden. Consider these factors when making your selection.The ideal mulch will create a nurturing environment for hosta roots.
This involves not just covering the soil, but also selecting a material that will contribute to the overall well-being of your hostas. This selection process involves understanding the different types of mulch, their characteristics, and their suitability for various conditions.
Mulch Types and Their Properties
Different mulches offer various benefits and drawbacks. Understanding these properties is essential for choosing the best option for your hostas.Various materials can be used as mulch, each with its own unique set of characteristics. The decomposition rate, water retention, and overall impact on the soil are key considerations. Different mulches will affect the moisture level around the hosta roots, and this must be taken into account when making a choice.
Decomposition Rate
The rate at which a mulch decomposes affects its longevity and its contribution to the soil. Fast-decomposing mulches like shredded leaves or grass clippings break down quickly, enriching the soil with nutrients but requiring more frequent replenishment. Slower-decomposing mulches, such as bark chips or wood chips, last longer but may not contribute as much readily available nutrition in the short term.
The choice depends on the desired level of soil enrichment and the frequency of mulch application you are prepared for.
Water Retention
Mulch’s ability to retain water is crucial, especially in dry climates. Materials like straw and pine needles have lower water retention compared to shredded bark or wood chips. Understanding how much water your mulch will hold is vital for maintaining adequate moisture levels around the hostas’ roots, preventing them from drying out. Choosing the right mulch will help avoid the need for excessive watering, which is important for the long-term health of your plants.
Advantages and Disadvantages of Different Mulches for Hostas
- Shredded Leaves: An excellent choice for enriching the soil with organic matter. It decomposes quickly, adding nutrients. However, it may need more frequent replenishment and can harbor pests if not managed properly.
- Grass Clippings: A readily available option. However, it can harbor diseases and attract pests if not properly composted before use. The nitrogen content can also burn hosta roots if used in excessive quantities.
- Bark Chips: A popular choice for its aesthetic appeal and long-lasting properties. It retains moisture well and suppresses weeds. However, it can be expensive and may not break down quickly, depending on the type of bark.
- Wood Chips: Another durable option, excellent for moisture retention and weed suppression. It provides good insulation for the soil. However, it can be more expensive than other options and may take longer to decompose, potentially affecting the nutrient content.
- Pine Needles: Known for its acidic nature, this mulch is beneficial for acid-loving plants. It decomposes slowly, and is less effective at suppressing weeds. It is also important to consider that pine needles can become quite compacted, reducing aeration and potentially hindering water drainage.
- Straw: A cost-effective option that suppresses weeds well. However, it has low water retention and may require more frequent watering. This can be a significant disadvantage in drier climates, and the material does not decompose rapidly.
Best Mulch Types for Different Climates and Soil Conditions
The best mulch type depends heavily on the climate and soil conditions. In dry climates, mulches with high water retention are preferable. In consistently wet climates, mulches that promote good drainage are more suitable. The type of soil, whether it is sandy, clay-based, or loamy, also plays a significant role. Consider the specific needs of your hostas when choosing mulch.
Color Considerations
The color of the mulch can affect the overall appearance of your hosta garden. Darker mulches can absorb more heat, which may be beneficial in cooler climates. Lighter mulches can reflect more light, which can be advantageous in hotter climates. The color of the mulch should also complement the foliage of your hostas.
Mulch Comparison Table
| Mulch Type | Decomposition Rate | Water Retention | Weed Suppression | Cost | Availability | Maintenance |
|---|---|---|---|---|---|---|
| Shredded Leaves | Fast | Moderate | Good | Low | High | High (frequent replenishment) |
| Grass Clippings | Moderate | Low | Fair | Low | High | Moderate (potential pest issues) |
| Bark Chips | Slow | High | Excellent | Medium | High | Low (long-lasting) |
| Wood Chips | Slow | High | Excellent | Medium | High | Low (long-lasting) |
| Pine Needles | Slow | Low | Fair | Low | Moderate | Moderate (needs regular replenishment) |
| Straw | Slow | Low | Good | Low | High | Moderate (needs frequent watering) |
Applying the Mulch
Proper mulch application is crucial for healthy hosta plants. It conserves moisture, suppresses weeds, regulates soil temperature, and enhances the overall aesthetic appeal of your garden. This step, while seemingly straightforward, requires careful consideration to ensure optimal results.Applying mulch effectively involves several key techniques that contribute to a thriving hosta environment. From achieving a uniform layer to preventing issues like stem rot, the following guidelines will ensure your hostas receive the best possible support.
Creating a Uniform Layer
Achieving a uniform mulch layer ensures even moisture distribution and prevents weed growth. Start by evenly spreading a layer of mulch across the planting area, working from the outside edges inwards. Use a rake or your hands to gently press the mulch into the soil, ensuring close contact without smothering the hosta crowns. Avoid creating clumps or pockets of air, as these can trap moisture and lead to fungal issues.
Maintaining Proper Mulch Depth
The depth of the mulch layer significantly impacts hosta health. A consistent layer of 2-4 inches is ideal for most hosta varieties. A shallower layer may not provide adequate weed suppression or moisture retention, while a deeper layer can potentially smother the crown of the plant. Regular checks and adjustments are necessary to maintain the correct depth as the mulch decomposes.
For example, a new layer of mulch may be needed after a period of heavy rainfall.
Preventing Mulch Displacement
Preventing mulch from washing away or accumulating around stems is essential for optimal hosta care. Mulch should be placed away from the base of the hosta plants, avoiding direct contact. This practice helps prevent excess moisture from accumulating around the stems, which can lead to fungal diseases like stem rot. You can also use landscape fabric or edging to help contain the mulch and maintain its position.
Additionally, consider the slope of your garden; on inclines, a slightly thicker layer of mulch may be needed to prevent erosion.
Adjusting Application Based on Hosta Size and Shape
The size and shape of the hosta plant will influence the mulch application strategy. Larger hostas with broad leaves may require a slightly thicker layer of mulch than smaller varieties. Consider the specific shape of the hosta’s spread; if the plant has a dense, rounded shape, you may want to adjust the mulch application to accommodate this. For example, you might use a thinner layer around the edges of a spreading hosta to prevent excess moisture buildup while maintaining the desired depth in the center.
Consider also the type of hosta. Some hostas grow to be more expansive than others.
Maintaining the Mulch Layer
Maintaining a healthy mulch layer around your hostas is crucial for their long-term health and vigor. A well-maintained mulch layer helps regulate soil temperature and moisture, suppressing weeds, and protecting the crowns of your plants. This section will detail the ongoing care required to keep your mulch layer functioning optimally.Proper mulch maintenance ensures the longevity of its benefits. Consistent upkeep prevents mulch from becoming compacted, uneven, or harboring pests and diseases.
It also allows for adjustments throughout the growing season to accommodate changing environmental conditions.
Mulch Buildup and Thinning
Mulch buildup can occur over time, especially if not regularly maintained. This can lead to poor air circulation around the roots and potentially impede water drainage. Thinning the mulch layer to a depth of approximately 2-3 inches (5-7.5 cm) is crucial for optimal conditions. Removing excess mulch and replacing it with fresh material is important to maintain the effectiveness of the mulch.
Pest and Disease Management
Mulch can sometimes attract or harbor pests and diseases. Regular inspections and prompt removal of affected plants or mulch can prevent the spread of problems. For instance, if you notice fungal diseases or signs of insect infestation, remove the affected plant material and surrounding mulch, ensuring the affected area is disinfected.
Seasonal Adjustments
Mulch application needs to be adjusted based on the weather conditions and the plant’s needs. During periods of heavy rainfall, you may need to add more mulch to maintain adequate moisture retention. Conversely, in very dry conditions, you may need to top up the mulch to prevent excessive moisture loss. Observe the hostas and adjust your mulch application strategy accordingly.
For example, if the summer is exceptionally dry, you might increase the mulch depth to help retain moisture around the roots. Conversely, if there’s excessive rainfall, reducing the mulch depth might be necessary to prevent waterlogging.
Mulch Removal and Replacement
Removing and replacing mulch is essential for maintaining its effectiveness. This allows you to assess the overall health of the hosta and the condition of the mulch. To remove the mulch, use a garden rake or hand trowel to gently remove the old mulch, being careful not to damage the roots of the hostas. Once the old mulch is removed, replenish the area with fresh mulch.
Consider adding a new layer of compost to the top of the removed soil to enhance soil health. This is important for maintaining good soil structure, drainage, and aeration around the hostas. It also ensures that your plants receive the necessary nutrients for healthy growth.
Mulching in Different Scenarios: How To Mulch Hostas

Hosta mulching isn’t a one-size-fits-all approach. The best technique depends on your garden’s unique characteristics, including the type of hostas you’re growing, the surrounding plants, your climate, and the soil composition. Understanding these factors will help you create the ideal environment for your hosta’s thriving.Mulching strategies need to be adapted to various garden settings, from small containers to expansive borders, and even sloping terrains.
Different hosta varieties also respond differently to various mulching techniques. This section will delve into the nuances of mulching hostas in diverse situations, considering crucial factors for optimal growth and health.
Mulching hostas is a cinch! Just remember to avoid putting anything on top of them that could cause problems, like, say, a stack of papers or a pile of old receipts, like you might on your nightstand. Consider checking out some tips on items to not put on the nightstand for some great ideas to keep your nightstand organized and your hostas happy.
A good layer of mulch will keep your hostas looking their best all season long!
Mulching in Containers
Container-grown hostas benefit from mulching, though the amount is generally less than for in-ground hostas. A thin layer of mulch, approximately 1-2 inches deep, is sufficient to retain moisture and suppress weeds. Using a well-draining potting mix and a lightweight mulch like shredded bark or pine needles is crucial for containers to prevent waterlogging. Consider the container’s size when determining the appropriate mulch amount.
Mulching hostas is super easy! Just spread a layer of organic mulch around the base of the plants, keeping it a few inches away from the crown. This helps retain moisture and suppress weeds. Knowing which women interior designers to know here can also be inspiring when you’re trying to create the perfect garden ambiance.
And remember, proper mulching also protects the roots, ensuring your hostas thrive!
Mulching in Borders
Hostas in borders can be mulched with a slightly thicker layer (2-4 inches) than in containers. This deeper layer aids in maintaining consistent soil moisture and suppressing weeds effectively. The choice of mulch type should complement the overall aesthetic of the border and consider the surrounding plants. Consider the mature size of the hostas when determining the mulch depth and the surrounding plants that could potentially be affected by the mulch.
Mulching on Slopes
Mulching hostas on slopes requires careful consideration of erosion control. A thicker layer of mulch, potentially 3-4 inches, is often necessary to hold the soil in place, preventing water runoff and soil erosion. Using a mulch that’s denser and heavier, like wood chips or shredded bark, is a good choice for slopes. Choose a mulch that effectively retains moisture and prevents soil erosion.
Consider the slope’s angle and the hosta’s mature size to determine the optimal mulch depth and type.
Mulching hostas is a simple way to keep them happy and healthy. A thick layer of organic mulch, like shredded leaves or wood chips, helps retain moisture, suppresses weeds, and regulates soil temperature. Knowing when to plant tomatoes is also crucial for a successful harvest. Ideally, you’ll want to plant them outdoors after the last frost, as outlined in this handy guide when to plant tomatoes , and this will ensure that your hostas get the best conditions for healthy growth and vibrant foliage.
Mulching with Other Plants
When mulching hostas alongside other plants, consider the specific needs of each species. For example, some plants might prefer a different moisture level than hostas. Ensure the mulch layer doesn’t smother or deprive other plants of essential nutrients. A balanced mulch application that considers the needs of all plants involved is crucial for harmonious growth. Consider the root systems and water requirements of the surrounding plants to avoid competition or damage.
Mulching in Different Climates and Soil Types
Different climates and soil types influence hosta mulching strategies. In arid climates, a thicker layer of mulch is needed to retain moisture. In humid climates, ensure the mulch doesn’t retain too much water, potentially leading to root rot. For heavy clay soils, a well-draining mulch is essential. Light, sandy soils might benefit from a slightly thicker layer to retain moisture.
Mulching Techniques for Different Hosta Varieties
| Hosta Variety | Mulch Type | Mulch Depth (inches) | Additional Considerations |
|---|---|---|---|
| ‘Francee’ | Shredded bark | 2-3 | Avoid dense mulches that may impede air circulation. |
| ‘Patriot’ | Pine needles | 3-4 | Monitor moisture levels in humid climates. |
| ‘Sum and Substance’ | Wood chips | 2-4 | Consider the hosta’s mature size and surrounding plants. |
| ‘Undulata’ | Compost | 2-3 | Ensure the compost is well-aged to avoid any burning issues. |
This table offers a general guideline; always adjust mulching based on specific conditions.
Common Mistakes and Solutions
Mulching hostas is a straightforward way to enhance their health and appearance, but even seasoned gardeners can make mistakes. Understanding common pitfalls and their solutions will help you achieve optimal results. Proper mulching techniques ensure healthy root systems, controlled weeds, and a vibrant, thriving hosta garden.
Common Mulching Mistakes
Improper mulching techniques can lead to a variety of issues, from diminished hosta health to unwanted weed growth. A crucial aspect of successful hosta mulching is avoiding common pitfalls.
- Applying too much mulch:
- Applying mulch directly against the crowns of the hosta plants can create a moist environment, leading to root rot and fungal diseases.
- Applying too much mulch can also impede air circulation, potentially harming the hosta’s overall health.
- Applying mulch too tightly around the crown can suffocate the hosta roots, hindering their ability to absorb water and nutrients.
- Using the wrong type of mulch:
- Certain mulches, like those high in nitrogen, can potentially harm hostas.
- Some mulches, such as certain wood chips, can alter the soil pH, which might affect the hosta’s well-being.
- Mulches that decompose quickly might require more frequent applications, increasing your workload.
- Incorrect application depth:
- A thin layer of mulch may not effectively suppress weeds and maintain moisture balance.
- An excessively deep layer of mulch can hinder the hosta’s growth and potentially lead to issues with air circulation and water drainage.
- The ideal mulch depth for hostas typically ranges from 2-4 inches.
Fixing Mulching Issues
Addressing mulching mistakes promptly can prevent long-term damage to your hosta plants. Corrective actions should be tailored to the specific error.
- Too much mulch:
- Remove the excess mulch from around the hosta crowns and base.
- Ensure a proper air circulation space is maintained.
- Replenish with a suitable amount of mulch, adhering to the recommended depth.
- Wrong mulch type:
- Replace the unsuitable mulch with a recommended mulch type, like shredded bark or wood chips.
- Consider the soil pH and the potential effects on hosta growth when choosing a mulch.
- Check the nitrogen content of the mulch if concerned about potential damage.
- Incorrect depth:
- Remove the existing mulch to the appropriate depth.
- Replace with the correct mulch layer, typically 2-4 inches deep.
- Assess the need for adjustments based on your specific garden conditions.
Frequently Asked Questions (FAQs)
- How often should I reapply mulch?
- Mulch needs replenishment as it decomposes, typically every 1-2 years, or more frequently depending on the type of mulch used and the weather conditions.
- What are the signs of mulch-related issues?
- Signs of problems include yellowing leaves, stunted growth, fungal diseases, and excessive weed growth.
- Can I use different mulches in different areas of my hosta garden?
- Yes, you can use different mulches in different areas based on specific needs, but maintain consistency within a section.
Troubleshooting Tips
Addressing mulching problems proactively can prevent severe damage to your hosta plants.
- Observing hosta health: Regularly inspect your hostas for signs of stress or disease, paying close attention to leaf color, growth patterns, and overall vigor.
- Maintaining proper drainage: Ensure adequate drainage around hosta plants to prevent waterlogging, a common cause of root rot.
- Monitoring weed growth: Regularly remove weeds to prevent competition for nutrients and water, which can weaken hosta plants.
Illustrative Examples

Transforming your hosta garden from ordinary to extraordinary often hinges on the thoughtful application of mulch. This isn’t just about covering the soil; it’s about creating a visual symphony that enhances the beauty of your hosta plants. The right mulch can highlight the foliage’s unique patterns and textures, making your garden a true spectacle.
Before and After Mulching
Visualizing the impact of mulch is crucial. A striking example involves a hosta garden with bare, exposed soil between the plants. The lack of a mulch layer leaves the soil looking dry and unkempt, drawing attention away from the vibrant hosta foliage. In contrast, the same garden with a well-maintained mulch layer presents a completely different aesthetic.
The mulch creates a cohesive, inviting landscape, allowing the hosta’s colors and forms to shine. The contrast between the two scenarios highlights the dramatic visual improvement achieved through mulching. The before-and-after comparison underscores the practical benefits of this simple gardening technique.
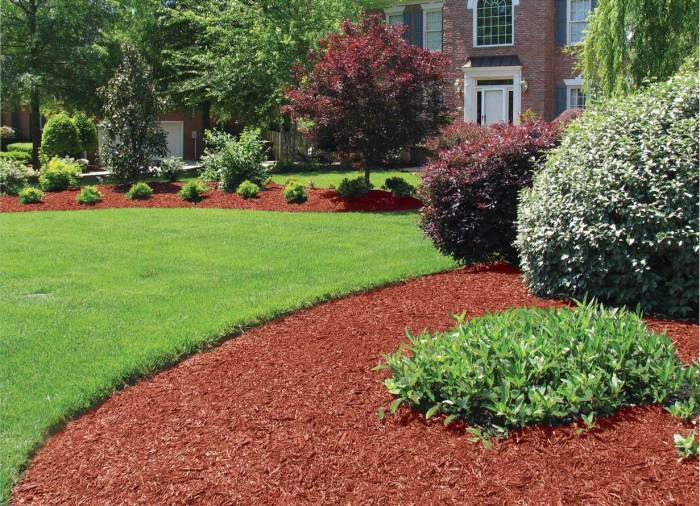
Different Mulch Types
Mulch comes in a wide array of materials, each offering unique visual characteristics. For instance, shredded hardwood mulch, with its rich brown color and fine texture, can create a warm, inviting atmosphere, complementing the deep green hues of many hosta varieties. Similarly, pine bark mulch, with its light brown or reddish tones, offers a more neutral backdrop that allows hosta foliage to stand out.
These different colors and textures have a significant impact on the garden’s overall visual appeal.
Mulch Color and Texture
The color of the mulch can significantly impact the visual harmony of the hosta garden. A dark brown mulch, for example, can create a dramatic contrast with the lighter shades of some hosta varieties. On the other hand, a light beige mulch can offer a more subtle, neutral backdrop, highlighting the unique patterns and textures of hosta leaves.
Mulch texture also plays a critical role. A coarse, chunky mulch can create a rustic, natural look, while a finer, more uniform mulch provides a smoother, more polished aesthetic. These variations in color and texture provide gardeners with a wide range of options to customize the visual appeal of their hosta gardens.
Complementing and Contrasting Hosta Foliage, How to mulch hostas
Choosing the right mulch color and texture involves understanding how these elements can complement or contrast with hosta foliage. A dark mulch, for instance, can create a striking contrast against the lighter green hues of certain hosta varieties, making them stand out more vividly. Conversely, a light-colored mulch can offer a more subdued backdrop, allowing the hosta’s delicate patterns and textures to be more prominent.
The key is to choose a mulch that enhances, rather than detracts from, the visual appeal of the hosta plants.
Visual Appeal of Mulched Hosta Gardens
A well-mulched hosta garden boasts a sophisticated and inviting aesthetic. The mulch’s role extends beyond simply covering the soil; it contributes to the garden’s overall visual harmony. By carefully considering the color, texture, and application of mulch, gardeners can create a garden that is not only functional but also a source of visual delight. The visual appeal of such a garden is undeniable, attracting admiration and inspiring others to adopt similar practices.
The overall effect is one of well-maintained beauty, highlighting the hosta plants as the focal point of the landscape.
Ending Remarks
In conclusion, proper hosta mulching is a key element in achieving a thriving and visually appealing garden. By understanding the process, selecting the right mulch, and maintaining the layer effectively, you can create a beautiful environment for your hostas to flourish. This comprehensive guide has equipped you with the knowledge to transform your hosta garden into a captivating masterpiece.