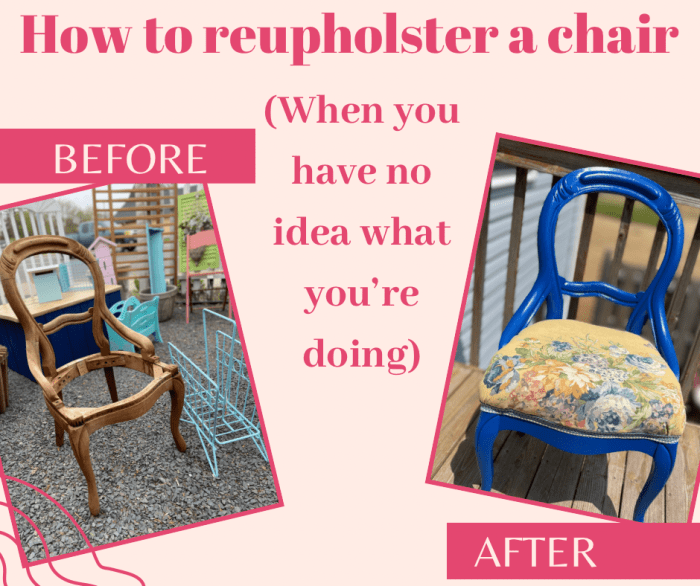
How to reupholster a chair seat sets the stage for a rewarding DIY project. Transforming an old, worn-out chair into a stylish and comfortable piece of furniture is achievable with the right knowledge and tools. This guide breaks down the entire process, from preparing the chair to selecting the perfect fabrics, and finally, completing the reupholstery with finesse.
This comprehensive guide covers every step of the reupholstery process, from initial assessment and dismantling to selecting materials, creating the new upholstery, and finishing touches. We’ll explore various chair seat types, tools, materials, and different techniques, ensuring a thorough understanding of each stage.
Introduction to Chair Seat Reupholstery
Transforming a tired, worn-out chair seat into a stylish and comfortable one is a rewarding DIY project. Reupholstery breathes new life into old furniture, saving you money while expressing your personal style. This guide walks you through the process, from initial assessment to the final, finished product.This guide provides a comprehensive overview of reupholstering chair seats, covering essential steps, necessary tools and materials, and considerations for different chair types.
Understanding these factors will help you tackle the project with confidence and achieve a professional-looking result.
Chair Seat Types and Reupholstery Needs
Different chair seat types require specific considerations during the reupholstery process. Wooden chairs, for example, often benefit from careful preparation to ensure a sturdy and durable finish. Metal chairs, while potentially more straightforward in some cases, may require unique considerations regarding the attachment of the new upholstery. Fabric chairs may need specialized treatments to maintain the integrity of the original frame.
Tools and Materials Required
A successful reupholstery project hinges on having the right tools and materials. Essential tools include a staple gun, a variety of upholstery needles and thread, a measuring tape, a utility knife, scissors, and a staple remover. Materials typically include new upholstery fabric, padding, and possibly specialized adhesive or fasteners depending on the chair type.
Preparing a Chair Seat for Reupholstery
Preparing the chair seat for reupholstery is crucial for a successful outcome. This step ensures a proper fit and a durable finish. The preparation process involves removing the old upholstery, inspecting the frame for damage or wear, and reinforcing any weak areas. This meticulous preparation often saves time and effort in the long run.
- Disassembly: Carefully remove all existing upholstery, including padding and any fasteners. Be cautious not to damage the frame in the process.
- Inspection: Thoroughly inspect the chair frame for any damage, cracks, or loose screws. Repair any damaged areas or replace any loose hardware before proceeding.
- Reinforcement (if needed): For wooden chairs, reinforce any weak spots with wood glue, screws, or other appropriate materials.
- Cleaning: Clean the chair frame thoroughly to remove dust, debris, or old adhesive residue. This ensures a clean surface for the new upholstery.
- Measurements: Accurately measure the seat’s dimensions to ensure the new fabric is appropriately sized.
Materials for Different Chair Seat Types
| Chair Seat Type | Typical Upholstery Materials |
|---|---|
| Wooden | Fabric, leather, vinyl, or other suitable upholstery materials. Wood glue, screws, staples, or other fasteners may be required depending on the chair. |
| Metal | Fabric, leather, or vinyl. Metal staples, rivets, or other suitable fasteners are often used. |
| Fabric (e.g., wicker, rattan) | Fabric, synthetic materials, or other materials suitable for the chair’s frame. Careful handling of the original fabric is important to preserve its integrity. |
Preparing the Chair Seat

Getting your chair ready for reupholstery is crucial for a successful project. A meticulous approach to disassembly, fabric removal, and frame preparation ensures a precise fit and a lasting result. Proper measurements are vital for selecting the right fabric and achieving a perfect match. This section will guide you through each step, from carefully disassembling the chair to preparing the frame for new upholstery.
Disassembling the Chair Seat
Careful disassembly is the first step to a smooth reupholstery project. Incorrect disassembly can damage the chair’s structure or lead to lost parts. Safety should be paramount. Always wear appropriate safety gear, such as gloves and eye protection. Use tools cautiously and assess the chair’s construction method before beginning.
This often involves removing screws, bolts, and staples, taking careful notes of the assembly sequence. Take photos if necessary to ensure you can reconstruct the chair correctly. Work methodically, noting any special features or unique design elements.
Removing Old Fabric and Padding, How to reupholster a chair seat
Removing old fabric and padding is a critical stage. Various methods exist, each with its own set of advantages and disadvantages. The best approach depends on the chair’s construction and the materials used. This process is often time-consuming and requires patience. Be mindful of potential damage to the frame during the removal process.
Reupholstering a chair seat can be a surprisingly satisfying DIY project. First, you’ll need to carefully remove the old fabric. Thinking outside the box, you could consider using scraps of old fabric or even repurposed tissue paper for a unique touch. For some creative ideas on how to reuse tissue paper, check out this helpful guide: ways to reuse tissue paper.
Once you’ve got your new material, carefully attach it to the chair frame and you’re done! It’s a rewarding way to give a piece of furniture a new lease on life.
Careful consideration and the right tools can significantly reduce the risk of accidental damage.
Measuring the Chair Seat Accurately
Precise measurements are fundamental for selecting the right fabric and ensuring a perfect fit. Inaccurate measurements can lead to fabric waste, an uneven finish, or a poorly fitting seat. Thoroughly measure the seat’s dimensions, including length, width, and depth. Measure the seat’s curves and any unique contours. Document these measurements meticulously, including any angles or irregular shapes.
Using a measuring tape, ensure you accurately capture all dimensions. Take multiple measurements to ensure accuracy and verify the consistency of the measurements. Detailed records of all measurements, angles, and contours will prove invaluable.
Cleaning and Preparing the Frame
A clean frame is essential for a smooth and successful reupholstery project. This involves removing all traces of old fabric, glue, and padding remnants. Using appropriate cleaning solutions and tools, thoroughly clean the frame. This will ensure a clean surface for the new upholstery. Addressing any imperfections, such as cracks or splinters, is also crucial.
Repairing any damage to the frame before applying new upholstery will ensure a long-lasting and durable finish. Thorough cleaning prevents issues with the adhesive and ensures the new upholstery adheres correctly.
Methods for Removing Old Padding and Fabric
| Method | Pros | Cons |
|---|---|---|
| Using a Utility Knife | Quick and relatively easy for simple designs. | Can damage the frame if not used carefully. May not be effective on tightly bonded materials. |
| Using a Staple Remover | Effective for removing staples and tacks. | Requires experience and care to avoid damaging the frame. |
| Using a Screwdriver | Effective for removing screws and fasteners. | May not be appropriate for all chair designs. |
| Using a Fabric Detachment Tool | Designed for upholstery, minimizing frame damage. | Can be expensive and not readily available. |
Careful consideration of the chair’s construction and materials is key to choosing the most appropriate method.
Measuring and Documenting Chair Seat Dimensions
Accurate measurements are crucial for fabric selection and proper fitting. Use a measuring tape to accurately measure the length, width, and depth of the chair seat. Document any curves or contours with sketches or photographs. Note any unique features of the chair seat. Record all measurements meticulously in a notebook or digital document.
This documentation is critical for ordering the right amount of fabric and ensuring a perfect fit. This ensures a smooth process, minimizing errors and waste.
Selecting Materials and Fabrics
Choosing the right materials is crucial for a successful chair reupholstery project. The fabrics and padding you select will determine the chair’s longevity, comfort, and aesthetic appeal. Careful consideration of factors like durability, water resistance, and the chair’s intended use will ensure your reupholstered seat stands the test of time.Understanding the properties of different upholstery fabrics, padding materials, and threads will allow you to make informed decisions.
This section will guide you through the process of selecting the perfect materials for your reupholstery project, from choosing a durable fabric to selecting padding that provides optimal comfort.
Upholstery Fabrics
Fabric selection is paramount in reupholstery. Different fabrics offer varying degrees of durability, water resistance, and aesthetic appeal. Consider the chair’s intended use when making your choice. A high-traffic family room chair will need a more durable fabric than a living room accent chair.
- Durability: Look for fabrics that resist tearing, fading, and staining. Cotton, linen, and velvet can be beautiful, but may not be the most durable choices for heavy use. Leather, microfiber, and high-quality synthetic fabrics are often more resilient.
- Water Resistance: For chairs exposed to spills or moisture, select water-resistant fabrics like leather, vinyl, or certain treated fabrics. Natural fabrics like cotton and linen are not typically water-resistant.
- Style: Consider the existing style of your chair and your personal preference. A classic wingback chair might look best with a textured velvet, while a modern armchair could benefit from a smooth, contemporary fabric.
Padding Materials
Padding determines the comfort and support of the chair seat. Different padding materials offer varying levels of firmness and resilience.
- Comfort Level: For maximum comfort, consider using a combination of foam layers with varying densities. A dense foam core can provide support, while a softer layer atop adds cushioning. Down or feather padding is another option for a plush, soft feel, but it might not be as durable as foam.
- Support: High-density foam offers superior support and durability, which is excellent for high-traffic areas. For chairs that need more cushioning, consider adding a layer of memory foam or a similar material.
- Cost: Foam padding is typically more affordable than natural fiber fillings like down. Consider the cost of the padding in relation to the overall budget of the project.
Threads
Choosing the right thread is essential for a professional-looking finish. Thread type and color directly impact the aesthetic and durability of the finished product.
- Matching the Fabric: Select a thread color that closely matches the fabric’s color. Using a contrasting thread can add visual interest but may not be suitable for all styles.
- Thread Strength: Use a thread that’s strong enough to hold the fabric securely. Look for upholstery thread designed for the type of fabric you’re working with. This will prevent premature wear and tear.
- Thread Type: Polyester and nylon are popular choices for their durability and strength. Cotton thread might be more suitable for natural fabrics like linen, but it may not be as resilient.
Fabric Selection Guidelines
Selecting the right fabric hinges on the chair’s intended use and the desired aesthetic.
Reupholstering a chair seat can be a surprisingly satisfying DIY project. You’ll need the right tools and a bit of patience, but the results are worth it. While you’re sourcing your fabrics, it’s worth considering whether or not strawberry pots are truly necessary for your garden; are strawberry pots necessary for optimal strawberry growth? Ultimately, though, the focus should be back on securing the new fabric to the chair frame for a professional-looking result.
- High-Traffic Areas: Choose durable fabrics like leather, microfiber, or heavy-duty synthetics for chairs in high-traffic areas. Avoid delicate or easily stained fabrics.
- Formal Settings: A formal dining chair might look best with a rich velvet or a classic linen, depending on the overall aesthetic.
- Modern Design: For a modern chair, consider smooth microfiber, leather, or a contemporary woven fabric.
Fabric Comparison Table
| Fabric | Pros | Cons |
|---|---|---|
| Leather | Durable, water-resistant, luxurious | Expensive, can be heavy, may not be as comfortable |
| Microfiber | Durable, easy to clean, various colors/styles | Can feel less luxurious than leather, may not be as breathable |
| Velvet | Elegant, soft texture | Less durable, more prone to staining |
| Cotton | Natural, breathable, affordable | Less durable, more prone to stains and wrinkles |
Padding Selection Guidelines
The right padding ensures comfort and support. The desired comfort level will influence the padding choice.
- Firmness: For firm support, opt for high-density foam. For a softer, more yielding feel, choose lower-density foam or add a layer of cushioning.
- Thickness: The thickness of the padding will affect the overall comfort and support. Consider the desired level of cushioning when making your choice.
- Budget: Different padding materials have different price points. Consider the cost of the padding in relation to the overall project budget.
Creating the New Upholstery: How To Reupholster A Chair Seat

Transforming a tired chair seat into a comfortable and stylish piece requires meticulous attention to detail. This stage involves carefully preparing the fabric, attaching it to the frame, installing the padding, and ensuring a flawless, even finish. Each step, from precise cutting to secure attachment, contributes to the overall quality and longevity of the reupholstered seat.The success of this project hinges on the proper execution of each step.
Carefully measuring and cutting the fabric prevents waste and ensures a perfect fit. Appropriate attachment methods secure the upholstery, while the padding adds comfort and support. Achieving a tight and even fit guarantees a durable and aesthetically pleasing result.
Fabric Cutting and Preparation
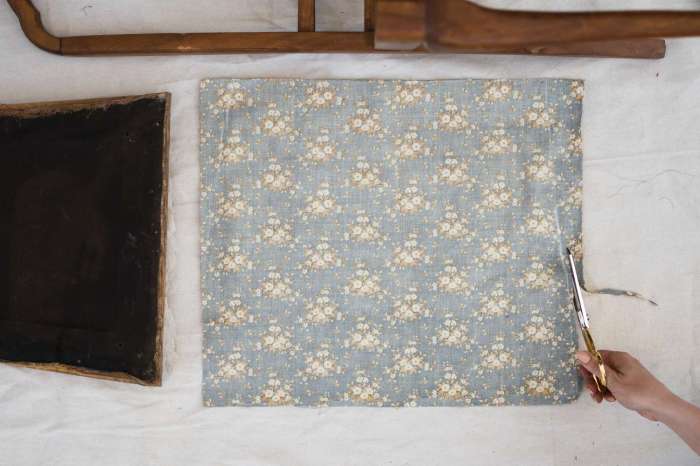
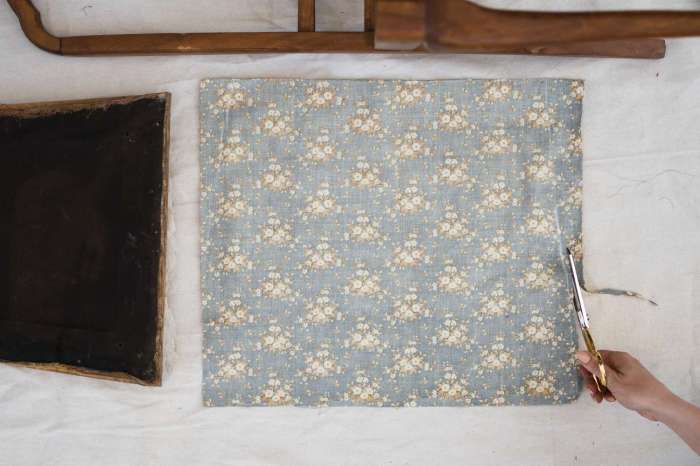
Careful fabric cutting is crucial to ensure a good fit and avoid waste. Incorrect measurements or uneven cuts can result in a poorly fitted seat. First, carefully measure the seat area, including any curves or contours. Use these measurements to create a pattern on the fabric, allowing for seam allowances. Use sharp scissors or a rotary cutter for clean cuts.
For complex shapes, consider using templates or tracing paper to maintain accuracy. Pre-wash and pre-treat the fabric to prevent shrinkage or color bleeding during or after installation.
Attaching the Fabric to the Frame
Securely attaching the fabric to the chair frame is paramount for longevity and a professional finish. Several methods exist, each with its advantages and disadvantages. Stapling is a common and relatively quick method. Staple guns and appropriate staples are crucial for this technique. Use a staple gun with a low-to-medium setting to avoid damaging the fabric or the frame.
Reupholstering a chair seat can be surprisingly rewarding, especially if you’re aiming for a unique look. You’ll need some basic tools and materials, and, of course, a bit of patience. But, you might also want to consider the overall design trend you’re working with, like, say, Nate Berkus, who famously hates design trends, nate berkus hates design trends.
Ultimately, though, a well-done reupholstering job is all about the comfort and durability of your final product.
For a more refined look, consider using tacks or upholstery tacks. These create a less noticeable seam and can be easily removed if needed.
Installing the Padding
Proper padding enhances comfort and support. The type and thickness of padding should align with the desired level of comfort and support. For instance, foam padding offers good resilience, while fiberfill padding provides a softer touch. Lay the padding on the chair seat frame, ensuring it fills the entire area and is uniformly distributed. Use clips or pins to temporarily secure the padding in place.
Ensuring a Tight and Even Fit
A tight and even fit is essential for a durable and aesthetically pleasing result. This is achieved through careful stretching and securing of the fabric, ensuring it conforms to the contours of the seat frame without wrinkles or excess fabric. Use the correct tools and techniques to ensure a tight and even fit. Overlapping fabric should be stitched or stapled to prevent slippage.
Consider using fabric glue to reinforce seams.
Installing Fabric and Padding – Step-by-Step
- Measure the seat carefully and mark the fabric accordingly, adding seam allowances.
- Cut the fabric following the marked lines, ensuring clean edges.
- Lay the padding on the seat frame, ensuring even distribution.
- Carefully position the fabric over the padding, ensuring a snug fit.
- Secure the fabric using appropriate methods (staples, tacks, or upholstery tacks), working from the center outward to avoid stretching.
- Check for wrinkles or gaps in the fabric and padding. Adjust as needed.
- Finally, trim excess fabric and secure the edges.
Securing the Fabric – Different Methods
- Stapling: A fast and readily available method. Pros: quick and efficient. Cons: can create noticeable staples if not done carefully, potentially damaging the fabric or frame.
- Tacks: Provides a more refined finish. Pros: more aesthetically pleasing. Cons: takes longer than stapling, requires careful handling.
- Upholstery tacks: Versatile and adaptable to various fabrics. Pros: Offers a durable, seamless look, suitable for different upholstery materials. Cons: Requires specialized tools.
- Fabric Glue: Reinforces seams and prevents fabric slippage. Pros: Strong adhesive, minimizes visible stitching. Cons: May not be suitable for all fabrics, requires precise application and clean-up.
Finishing Touches and Reassembly
Bringing your reupholstered chair seat to completion involves meticulous attention to detail in the finishing touches. These final steps are crucial for achieving a professional and polished look, ensuring the longevity and beauty of your project. A carefully executed reassembly process is equally important, guaranteeing the structural integrity and functionality of the finished chair seat.
Finishing the Fabric Edges
Properly finishing the edges of the fabric is paramount for a professional look and prevents fraying. This step protects the fabric, creating a clean and neat appearance. Different fabric types require specific techniques. For example, woven fabrics may benefit from serging or zig-zag stitching to prevent unraveling. A well-finished edge is not only aesthetically pleasing but also contributes to the chair seat’s durability.
Attaching Decorative Elements
Adding decorative elements like buttons, tufting, or piping can elevate the chair seat’s design. Carefully plan the placement and spacing of these elements before attaching them. Ensure the adhesive or stitching is strong enough to secure the elements while maintaining the integrity of the upholstery. Properly securing decorative elements adds a distinctive touch and contributes to the overall aesthetic appeal.
Reassembling the Chair Seat Components
The reassembly process requires precision and attention to detail to ensure the seat components are securely fastened. Check the original chair’s instructions if possible, or carefully examine the existing structure. Using the appropriate screws, nails, or other fasteners will prevent future issues. Pay attention to the alignment of the seat components. This step ensures the structural integrity of the seat and prevents future problems.
Inspecting for Imperfections and Loose Areas
A thorough inspection is critical to identify any imperfections or loose areas before the chair seat is fully assembled. Look for loose threads, misaligned stitching, or any other issues. Addressing these imperfections immediately ensures a flawless final product. Checking for these issues ensures a high standard of work and avoids potential problems down the road.
Finishing Touch Application Methods
| Finishing Touch | Application Method |
|---|---|
| Serging | A specialized sewing technique that prevents fabric unraveling, particularly on woven fabrics. |
| Zig-zag stitching | A sewing technique that sews along the edge of fabric, creating a strong and neat finish. |
| Tufting | Creating decorative stitches that gather fabric into a dense, elevated area. |
| Piping | Inserting a decorative fabric strip around an edge, often used for a tailored look. |
| Buttons | Attaching buttons using appropriate tools, like button holes or sewing, in a decorative arrangement. |
Quality Control in Reupholstery
Quality control is essential in reupholstery projects. Carefully review the entire process, from preparing the seat to assembling the finished product. Each step must be executed with precision to achieve a high-quality result. By meticulously checking for imperfections, maintaining consistent standards, and adhering to a detailed plan, you can ensure a professional and reliable outcome. A strong quality control process minimizes errors and ensures the chair seat meets the highest standards.
Outcome Summary
Reupholstering a chair seat is a rewarding project that allows you to breathe new life into an old piece of furniture. By following the detailed steps and tips Artikeld in this guide, you can confidently tackle this task and create a beautiful and comfortable chair. Remember to carefully measure, choose the right materials, and pay attention to detail throughout the process for optimal results.
The satisfaction of a newly reupholstered chair is well worth the effort!


