


How to transplant trees and shrubs is a crucial skill for any gardener. This guide will walk you through the entire process, from selecting the right plant and preparing the site to post-planting care. Learn the essentials of choosing the perfect location, gathering the necessary tools and materials, performing the transplant, and ensuring the new plant thrives.
We’ll cover crucial steps like choosing the ideal tree or shrub for your space, considering factors like sunlight, soil, and mature size. Then, we’ll delve into preparing the planting hole, transplanting the plant with care, and finally, maintaining it after the move. We’ll even give you some helpful tips for watering, mulching, and supporting young trees to ensure successful transplantation.
Planning and Preparation
Choosing the right tree or shrub for your garden is a crucial step in ensuring its long-term health and beauty. Careful planning and preparation are vital to a successful planting, minimizing stress on the new plant and maximizing its chances of thriving. This involves understanding the plant’s needs and matching them to the specific conditions of your garden.A successful planting begins with thoughtful consideration.
This involves researching the plant’s mature size, growth rate, and specific needs, as well as carefully selecting a suitable planting site based on sunlight, soil, and drainage. This thorough preparation ensures a happy and healthy new addition to your garden.
Choosing the Right Plant
Understanding the specific needs of the plant is essential for its survival and overall health. This involves considering the plant’s mature size, growth habits, and potential impact on the surrounding landscape. Researching the plant’s requirements, including sunlight exposure and soil type, is vital for long-term success.
Transplanting trees and shrubs can be tricky, but with the right approach, you can ensure a successful move. Proper preparation is key, and choosing the right time of year is crucial. You also need to consider the size and health of the plant and the new location’s conditions. It’s a rewarding process, and I’ve recently been researching the latest techniques, which can help with avoiding transplant shock.
Plus, if you’re looking for a similar aesthetic for your garden, you might want to check out if farmhouse design is still trendy these days is farmhouse design still trendy. Hopefully, these tips will help you in your next transplanting project.
- Thorough research is essential to identify plants that are suitable for your specific location and environmental conditions. Consider the mature size of the plant and whether it will be compatible with the existing landscape.
- Consult local nurseries and gardening experts for recommendations tailored to your region and climate. They can offer valuable insights into the best plant choices for your area.
- Evaluate the plant’s growth habits and mature size to ensure it will fit within the allocated space without overcrowding existing vegetation or structures.
Selecting the Planting Site
Careful site selection is paramount to the plant’s long-term health. Sunlight exposure, soil type, and drainage significantly impact the plant’s growth and overall well-being. A suitable site will ensure optimal conditions for the plant to thrive.
- Assess the sunlight exposure at the potential planting site. Determine if the location receives full sun (at least 6-8 hours of direct sunlight daily), partial shade, or full shade. Different plants have varying sunlight requirements.
- Evaluate the soil type. Consider the soil’s drainage capabilities, texture, and pH level. A well-drained soil is crucial for preventing root rot and ensuring proper nutrient absorption.
- Examine the drainage characteristics of the site. Ensure that water drains properly away from the planting area to prevent waterlogging, which can harm the plant’s roots. Poor drainage can lead to root rot and other issues.
Determining Planting Depth
Correct planting depth is crucial for the tree or shrub to establish a healthy root system. Proper planting depth ensures optimal growth and minimizes the risk of issues such as root girdling.
- The planting depth should be the same as the depth of the root ball. Ensure the top of the root ball is level with the surrounding soil surface.
- Avoid planting too deep, which can inhibit growth. A planting depth that is too shallow may also lead to problems with the plant’s stability.
Ideal Planting Conditions for Different Plants
The following table summarizes ideal planting conditions for various tree and shrub types. Matching the plant’s needs with the site conditions is crucial for a healthy and successful planting.
| Plant Type | Sunlight | Soil | Mature Size |
|---|---|---|---|
| Oak | Full Sun | Well-drained | Large |
| Rose | Full Sun/Partial Shade | Moist | Small |
| Maple | Full Sun/Partial Shade | Well-drained, moist | Medium |
| Juniper | Full Sun/Partial Shade | Well-drained, dry | Small |
Gathering Materials and Tools

Successfully transplanting trees and shrubs hinges on careful preparation. A well-stocked toolbox and appropriate materials are crucial for a successful outcome. This section Artikels the essential tools and materials required for this process, from digging the hole to final planting.
Essential Tools
A variety of tools are needed to effectively transplant trees and shrubs. Different tools cater to various tasks, from digging and leveling the soil to precisely working around the root ball.
| Tool | Function |
|---|---|
| Shovel | Ideal for digging trenches and loosening soil, particularly effective for larger planting holes. |
| Spade | Excellent for digging and leveling the soil, facilitating the creation of a smooth and even planting bed. |
| Hand Trowel | Perfect for fine digging, careful soil preparation around the roots, and placing the planting mix. |
| Pruning Shears/Loppers | Used for trimming roots and branches that may be damaged or excessively long, ensuring proper root ball handling. |
| Measuring Tape | Critical for ensuring the planting hole is the correct size for the tree’s root ball. |
Materials Needed
Besides the tools, specific materials are necessary for successful transplanting. These materials aid in providing the tree with the best possible environment for growth.
- Planting Mix: A high-quality planting mix provides essential nutrients and moisture retention, supporting the tree’s growth after transplanting.
- Mulch: Mulch helps retain moisture, suppress weeds, and regulate soil temperature, which is essential for the transplanted tree’s health and growth.
- Protective Gloves: Gloves safeguard your hands from dirt, thorns, and potential injuries during the transplanting process.
- Watering Can/Hose: Essential for hydrating the tree immediately after transplanting, ensuring its survival and acclimation to the new environment.
Preparing the Planting Hole
The process of preparing the planting hole directly impacts the tree’s survival and subsequent growth. Precision is key to ensuring the root ball is planted at the correct depth and in suitable soil conditions.
- Determine Hole Size: The planting hole should be significantly wider than the root ball to allow the roots to spread naturally. The hole’s depth should match the depth of the root ball in the original location. Measure the diameter and depth of the root ball for accurate preparation.
- Dig the Hole: Use a shovel or spade to dig a hole slightly larger than the root ball, ensuring that the sides of the hole are not too steep. This facilitates the proper placement of the tree.
- Amend the Soil: Mix the existing soil with the planting mix to improve drainage, aeration, and nutrient content. This step ensures the tree receives adequate nourishment and support after transplanting.
- Ensure Proper Depth: The top of the root ball should be level with the surrounding soil. This is critical for proper water drainage and prevents the tree from becoming waterlogged or drying out.
Digging the Hole
Carefully digging the hole ensures the root ball fits snugly without damaging the roots. The process must be precise to prevent root damage and promote healthy growth after transplantation.
- Assess the Root Ball: Carefully examine the root ball to understand its size and shape. This crucial step ensures the hole is appropriately sized to accommodate the roots without undue stress.
- Digging Technique: Use a shovel or spade to dig a hole significantly wider than the root ball’s diameter. The hole’s depth should be identical to the depth of the root ball in the original location. This step prevents root damage and ensures the tree is planted at the appropriate level.
- Proper Soil Handling: Avoid compacting the soil while digging, as this can hinder root development. Maintain loose soil to allow for proper aeration and nutrient uptake.
Transplanting Procedures: How To Transplant Trees And Shrubs
Successfully transplanting a tree or shrub depends heavily on the careful execution of each step, especially when it comes to handling the root ball. This section dives deep into the procedures, from careful excavation to proper watering techniques, ensuring a smooth transition for your new plant.
Excavating the Plant
The goal during excavation is to minimize root damage. For container-grown plants, gently loosen the soil around the container’s edges to prevent damage to the root ball. If the plant is in the ground, use a shovel or spade to carefully dig around the plant’s base, working your way outward in a circle. Avoid digging too deep or too wide to prevent severing roots.
Transplanting trees and shrubs can be tricky, but proper preparation is key. Think about the root ball size and how it affects the overall process. Sometimes, water stains on ceilings can be a frustrating problem, often stemming from leaky pipes or even improper drainage. Understanding the potential causes of water stains on ceilings, as detailed in this article, causes of water stains on ceilings , can help you troubleshoot similar issues in your landscaping.
Ultimately, the success of a transplant depends on careful planning and execution, just like avoiding those pesky water stains.
Work slowly and steadily, ensuring the soil around the roots remains intact as much as possible. Be mindful of the plant’s root system, especially in the case of established shrubs. Try to preserve as much of the soil and root structure as possible during this process.
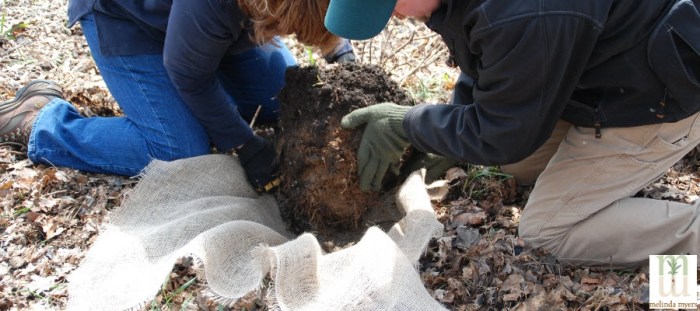
Handling the Root Ball
The root ball is a crucial component in the success of the transplant. Handle it with care to avoid breaking or damaging the roots. Avoid pulling or jerking the plant from the ground. Use a burlap or other protective material, if necessary, to support the root ball during removal and transport. Support the plant from below, and wrap the root ball with burlap or a similar material to provide protection against damage and drying out during transport.
If the root ball is particularly large, consider using a professional tree spade or digging tools that can help in maintaining the integrity of the root ball.
Placing the Plant in the Hole
Carefully place the plant into the prepared hole, ensuring the root ball is positioned at the correct depth. The top of the root ball should be level with the surrounding soil’s surface. A crucial aspect of this procedure is the preservation of the plant’s natural position. The crown (the point where the trunk meets the branches) should not be buried; this can lead to issues with waterlogging and disease.
Backfilling the Hole
Fill the hole with the same soil you removed, gently pressing down on the soil to eliminate air pockets around the roots. This process ensures good contact between the soil and the roots, which is crucial for water and nutrient absorption. Ensure the soil is consistently packed around the roots to support the plant and to prevent shifting.
Watering the Transplanted Plant
Thorough watering is essential after transplanting. Water the plant deeply and consistently to help settle the soil around the roots and encourage root growth. The goal is to keep the soil consistently moist but not waterlogged. Continue watering regularly for the first few weeks after transplanting, especially during dry periods.
Transplanting trees and shrubs requires careful planning and execution. Proper digging, handling, and replanting are key. Similar to the meticulous care needed for these larger plants, consider the hardiness of houseplants, like those listed in this article on hard to kill houseplants experts recommend , which can offer a valuable insight into successful plant care. Ultimately, whether you’re working with a majestic oak or a delicate fern, understanding the specific needs of each plant will help ensure a healthy and thriving transplant.
Positioning the Root Ball
- The root ball should be positioned at the same level as it was in its original location. This is critical to avoid crown rot or other issues.
- Avoid burying the crown, the part of the plant where the trunk meets the branches. Burying the crown can lead to problems with moisture and disease.
The root ball should be positioned at the same level as it was in its original location. Avoid burying the crown (the part of the plant where the trunk meets the branches).
Proper positioning of the root ball is vital for a successful transplant. This ensures that the plant’s natural growth patterns are maintained.
Post-Planting Care

Bringing a new tree or shrub home is exciting, but the journey doesn’t end with the planting. Post-planting care is crucial for establishing a healthy and thriving plant. Proper watering, mulching, and support are essential for successful transplanting. These steps will ensure your new addition quickly integrates into its new environment and flourishes for years to come.
Watering
Establishing a consistent watering schedule is vital for the newly transplanted plant. Newly planted trees and shrubs require more frequent watering than established ones, especially during the first few weeks after transplanting. Water deeply and thoroughly, ensuring the water penetrates the root ball and surrounding soil. This deep watering encourages root growth into the surrounding soil. Avoid shallow watering, which can lead to shallow root systems and increased susceptibility to drought stress.
The frequency of watering will depend on factors like soil type, weather conditions, and the size of the plant. Monitor the soil moisture regularly. If the soil feels dry a few inches below the surface, it’s time to water. A good rule of thumb is to water deeply when the top inch of soil feels dry.
Adjust the watering schedule as your plant establishes itself.
Mulching, How to transplant trees and shrubs
Mulch plays a critical role in the long-term health and success of your transplanted tree or shrub. Applying a layer of mulch around the base of the plant helps retain moisture, suppressing weed growth, and regulating soil temperature. Mulch also prevents soil erosion, protecting the delicate root systems from the elements. Apply a layer of mulch, typically 2-4 inches deep, around the base of the plant, leaving a small space between the mulch and the trunk to prevent moisture buildup and potential rot.
Different types of mulch offer varying benefits, including moisture retention and aesthetic appeal.
Support
Young trees and shrubs may need support to prevent damage from wind, heavy rain, or their own weight. Proper support is crucial for maintaining the structural integrity of the plant, particularly during the first few years after transplanting. Use stakes, cages, or other appropriate support systems to guide the plant’s growth and protect it from damage. The type of support needed will depend on the size and species of the plant.
Choose a support system that is sturdy and will not damage the plant’s bark. Remove the support once the plant has become well-established and can support itself.
Fertilizing
Fertilizing a newly transplanted plant can give it a boost in establishing itself. However, be mindful of not over-fertilizing. A balanced fertilizer can provide essential nutrients to promote healthy growth. Follow the instructions on the fertilizer packaging for the appropriate application rate. Avoid using fertilizers high in nitrogen, as this can lead to excessive leaf growth and can potentially harm the root system.
Instead, use a balanced fertilizer to provide the necessary nutrients for healthy root development and overall plant health. Avoid applying fertilizer directly to the stem or leaves, and ensure that the fertilizer is distributed evenly around the root zone.
Mulch Types and Benefits
| Mulch Type | Benefits |
|---|---|
| Wood Chips | Excellent moisture retention and effective weed suppression. |
| Shredded Bark | Provides good moisture retention, adds aesthetic appeal to the garden. |
| Pine Straw | Excellent weed suppression and moisture retention, can contribute to soil acidity. |
| Grass Clippings | Effective weed suppression, but can attract pests and needs regular application. |
Epilogue
Transplanting trees and shrubs can be a rewarding experience, bringing new life to your garden. By following the steps Artikeld in this guide, you’ll increase your chances of a successful transplant and enjoy a thriving new addition to your landscape. Remember the importance of careful planning, proper technique, and ongoing care for a happy and healthy new plant.